
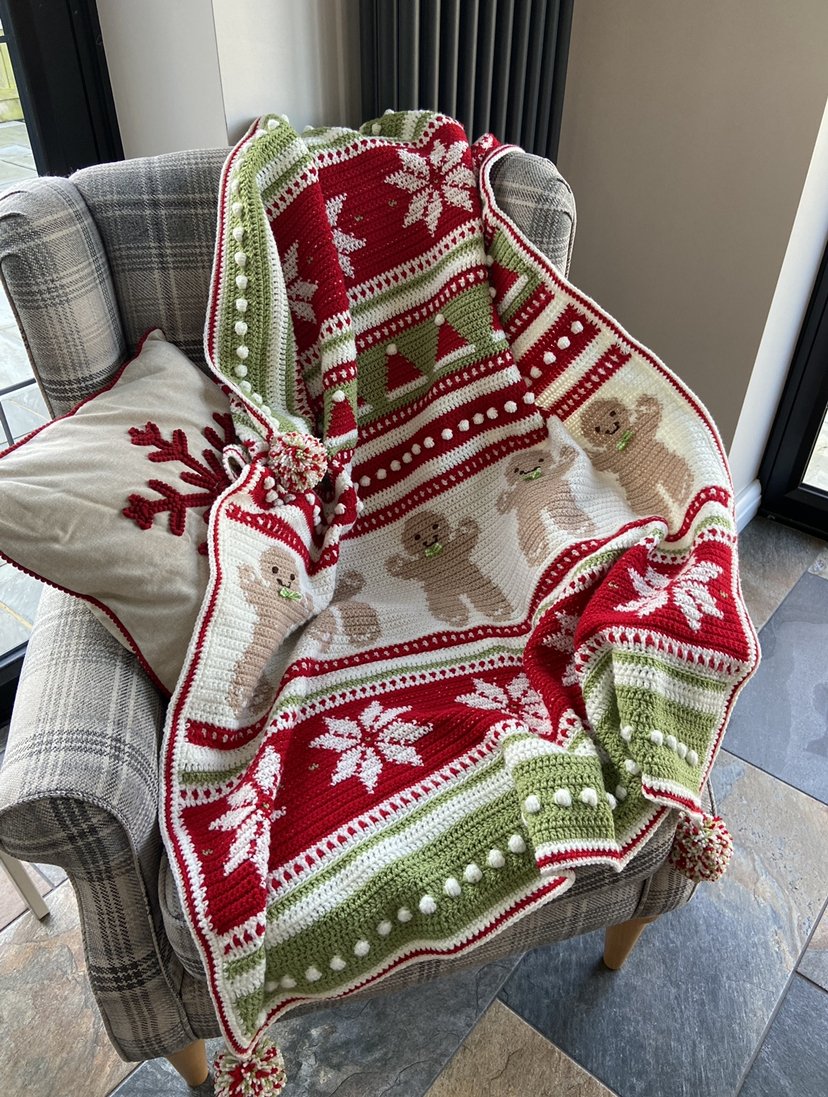
Christmas Eve Wishes
UPDATE: This pattern is now available to buy as an advert free pdf download. The pattern includes all six parts of the original CAL in one document. It is available in UK and US terms. You can find it in my shop here.
This free version of the pattern has now been replaced with a revised version. Please click here for all the links you need for the updated version.
It’s finally time for Christmas Eve Wishes!
We are starting early, by popular demand, for anyone who wants to get a head start or make multiple blankets before Christmas. I have broken the pattern down into six sections and, if you’re not quite ready to get into the Christmas spirit just yet, I will be running this as a CAL (Crochet - a - long) for 6 weeks from mid October. The CAL will have accompanying videos if you feel need a bit more help and I will be on hand to help with any questions you have.
I hope the tutorials I have included here will ease you past any tricky parts in the meantime but if you need help you can drop me an email at hello@madebyanita.co.uk and I will be happy to help in any way I can.
Ok, let’s dive in!
You will need:
Finished Size: 100cm x 125cm (39.5” x 47.5”)
Your Choice of dk yarn

280g Cream
180g Red
150g Green
50g Beige
I used Hayfield Bonus dk in Cream, Ladybird, Moss Green and Oatmeal.
Hayfield Bonus yarn packs available from: Snufflebeanyarn.co.uk
A few metres of dark brown to embroider the faces on the gingerbread people
1 metre of ribbon for the bows on the gingerbread people. I used 1cm wide gingham ribbon, but you can crochet these if you prefer.
4mm hook
4.5mm hook. Rows with colour changes tend to be a little tighter than single colour rows. Changing to a larger hook will keep your tension even and edges completely straight.
Yarn needle
Scissors
A pompom maker or cardboard to make the optional pompoms.
You can use any type or weight of yarn you like for this blanket, just change to the recommended hook size for that yarn.
Gauge: Gauge is not too important for this blanket as long as your tension is consistent throughout. Changing hook size when indicated will really help with that.
Stitch Terms:
These are the stitches/ terms you will need to be familiar with before you begin.
ch/s - chain/s
tr - treble crochet (US double crochet)
htr - half treble crochet (US half double crochet)
dc - double crochet (US single crochet)
sk - skip
ss - slip stitch
st/s - stitch/es
Helpful Tips and Information
If you would like to make the blanket wider, increase your starting chain in multiples of 30. Each pattern repeat measures approximately 20cm in width. You can repeat stripes or charts to increase the length as much as you like.
Don’t panic if you haven’t read a pattern before. I will write the stitch terms in full to start, with the abbreviations in brackets to help you get used to them.
It’s a good idea to read through the whole pattern before you begin.
Turn your work at the end of each row unless otherwise stated.
This stitch count for EVERY row is always 150 stitches. The pattern gives instructions for positioning the first and last stitches in rows to ensure your stitch count stays at 150.
A chain 2 at the start of a row DOES count as a stitch.
A chain 1 at the start of a row DOES NOT count as a stitch.
You can click on the pictures to make them bigger if you need to.
Section 1 - Stripes and Bobbles

This is what we will be working on in this section. I’ve given detailed instructions for all of these rows and they will all be repeated at various points in the blanket.


Foundation Chain: Using green and a 4mm hook, chain (ch) 152 stitches (sts).
1 . Row 1: 1 treble (tr) in 4th chain (ch) from hook.
The needle shows where to put your first treble.
2. This shows the first treble completed and the 3 skipped chains. This counts as 2 trebles.
3. Now 1 treble (tr) in each chain (ch).
You will have 150 treble(tr) stitches (sts), including the skipped 3 chains at the beginning of the row. .


4. Row 2: 2 chain (ch), skip (sk) the first stitch and 1 tr in each st across.
The needle is pointing to where you put your first treble.
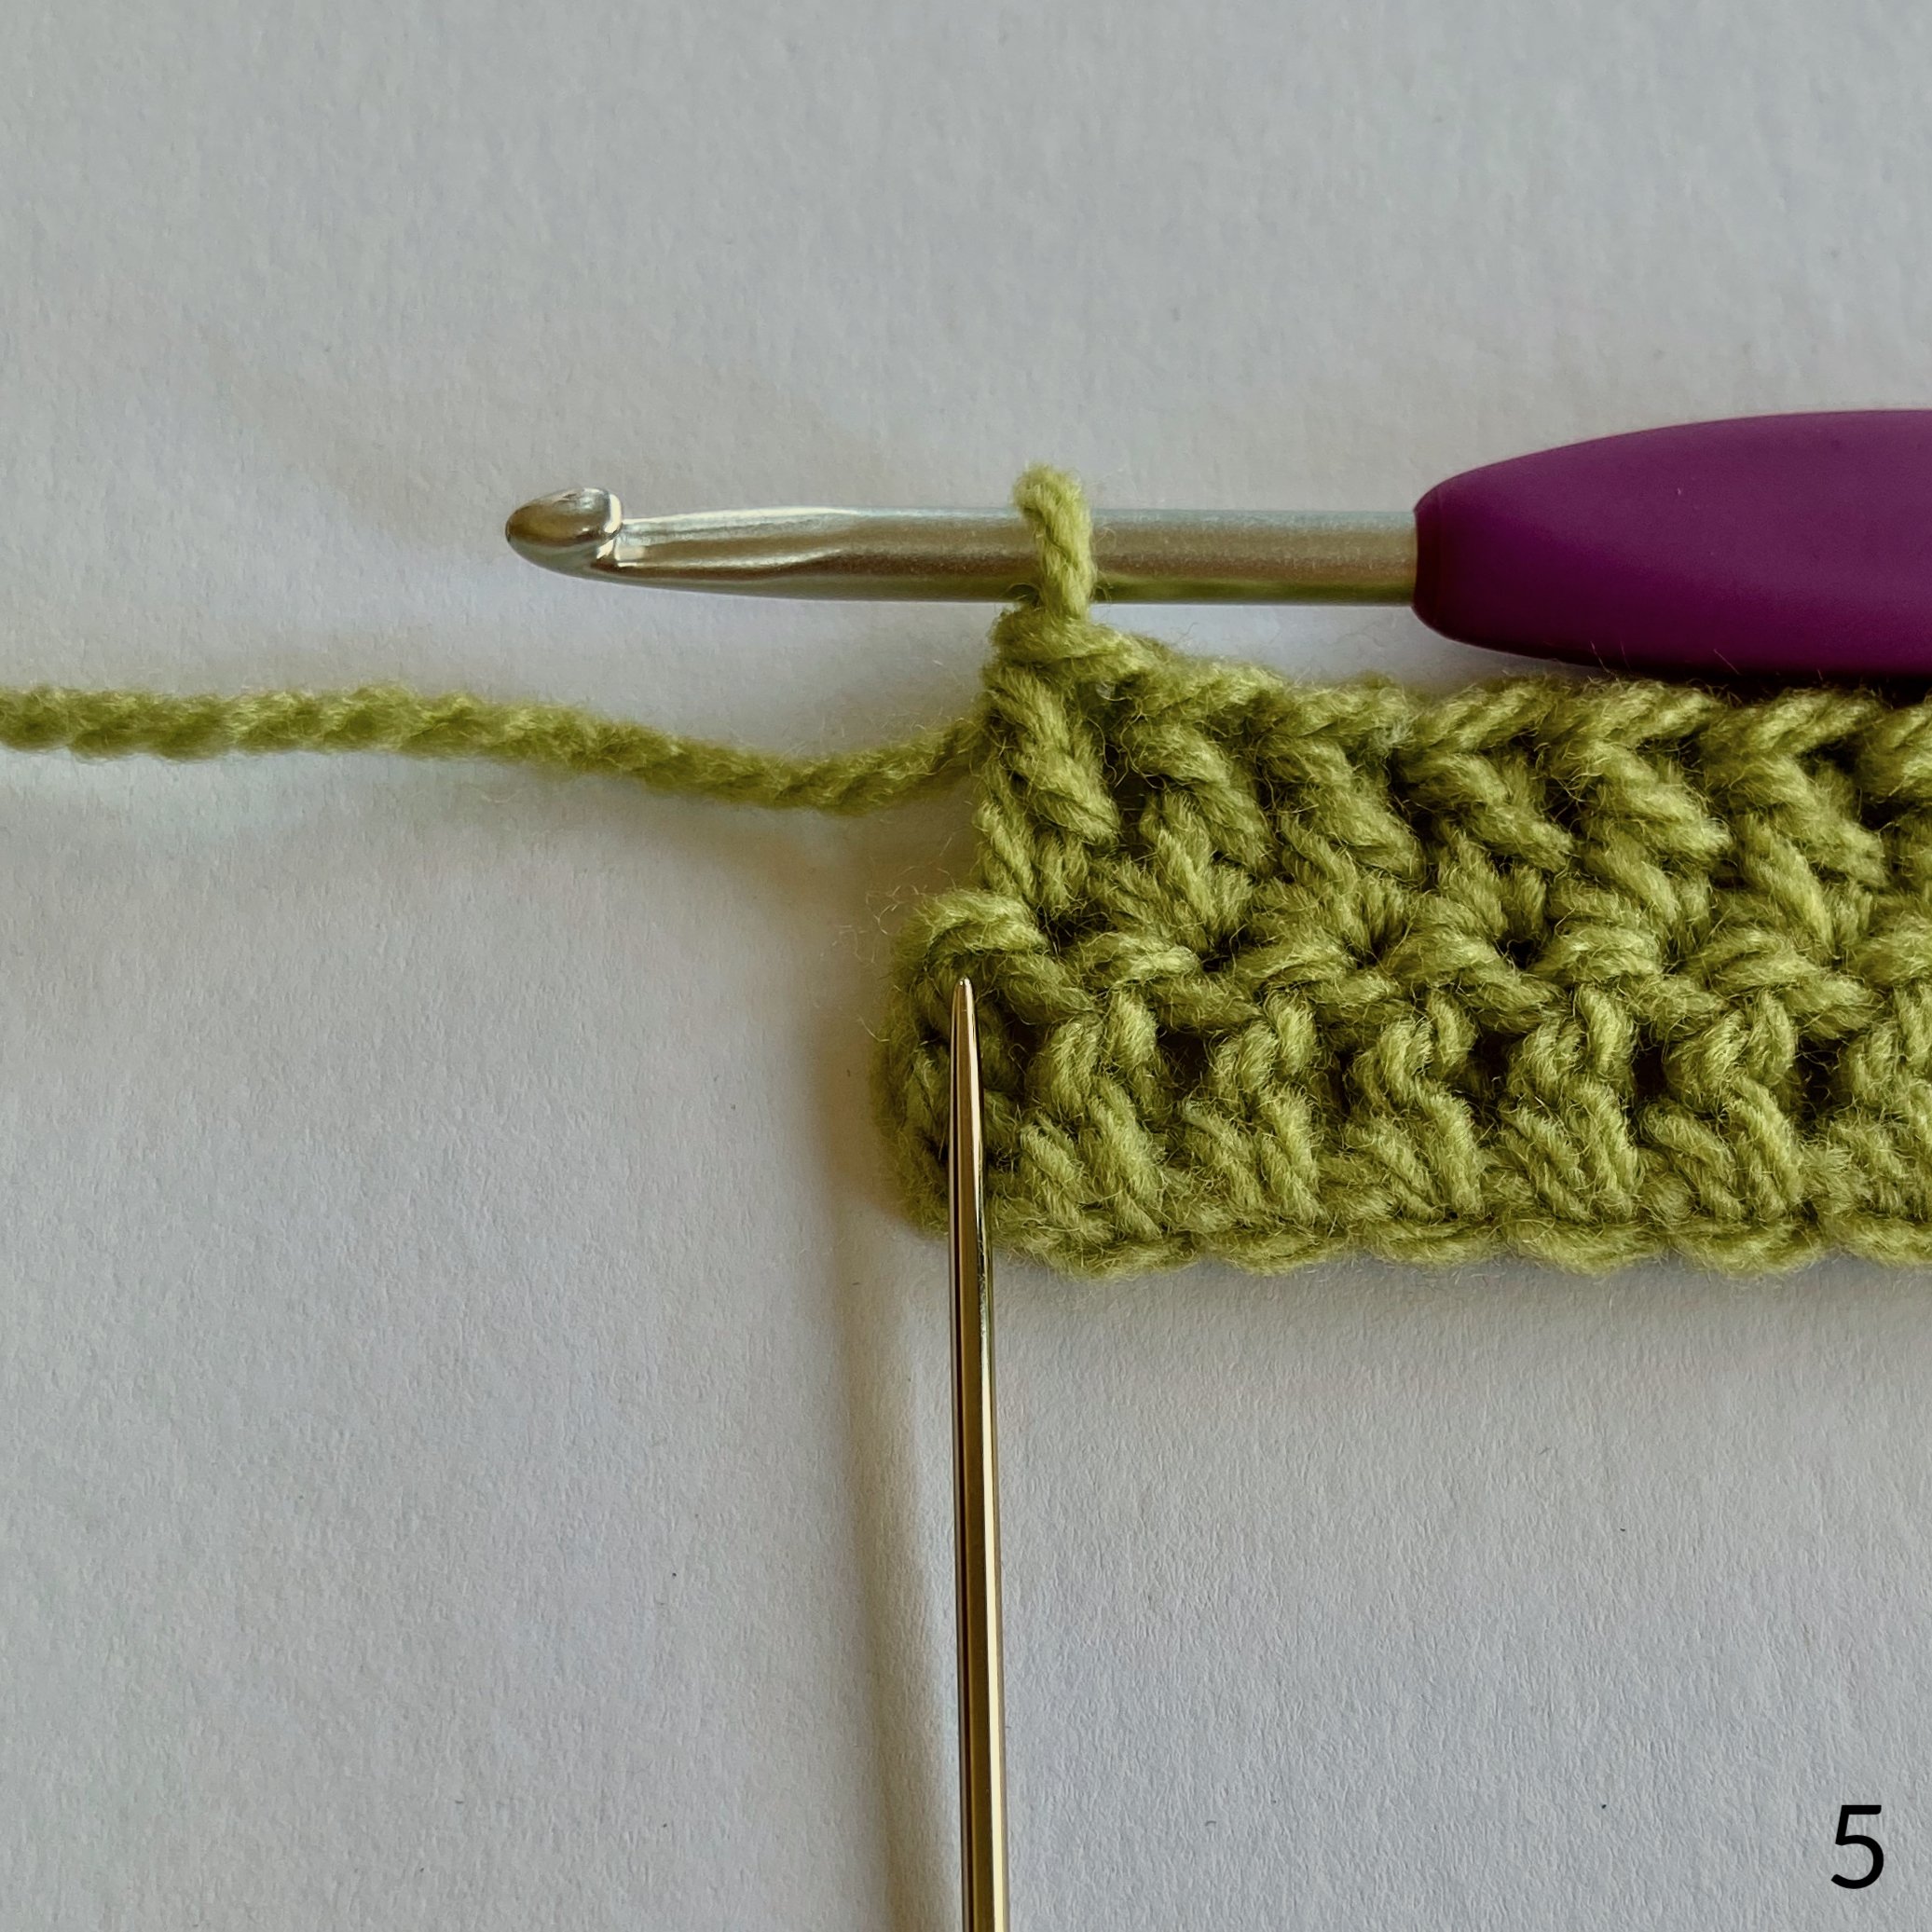
5. The last stitch in the row is a little tricky to see. The needle is pointing to where it goes. You may want to count your stitches in this first row to make sure you still have 150.
6. Rows 3 & 4: Repeat row 2, two more times.

7. Row 5: Bobble Row. 1 ch, 1 double crochet (dc) in each of the first 3 sts. The 1 ch does not count as a stitch, so place your first stitch where the needle is pointing.
8. When working the 3rd dc, stop while you still have 2 loops on the hook.
9. Complete the stitch by pulling through a loop of cream. This is how you will make all your colour changes throughout the blanket.
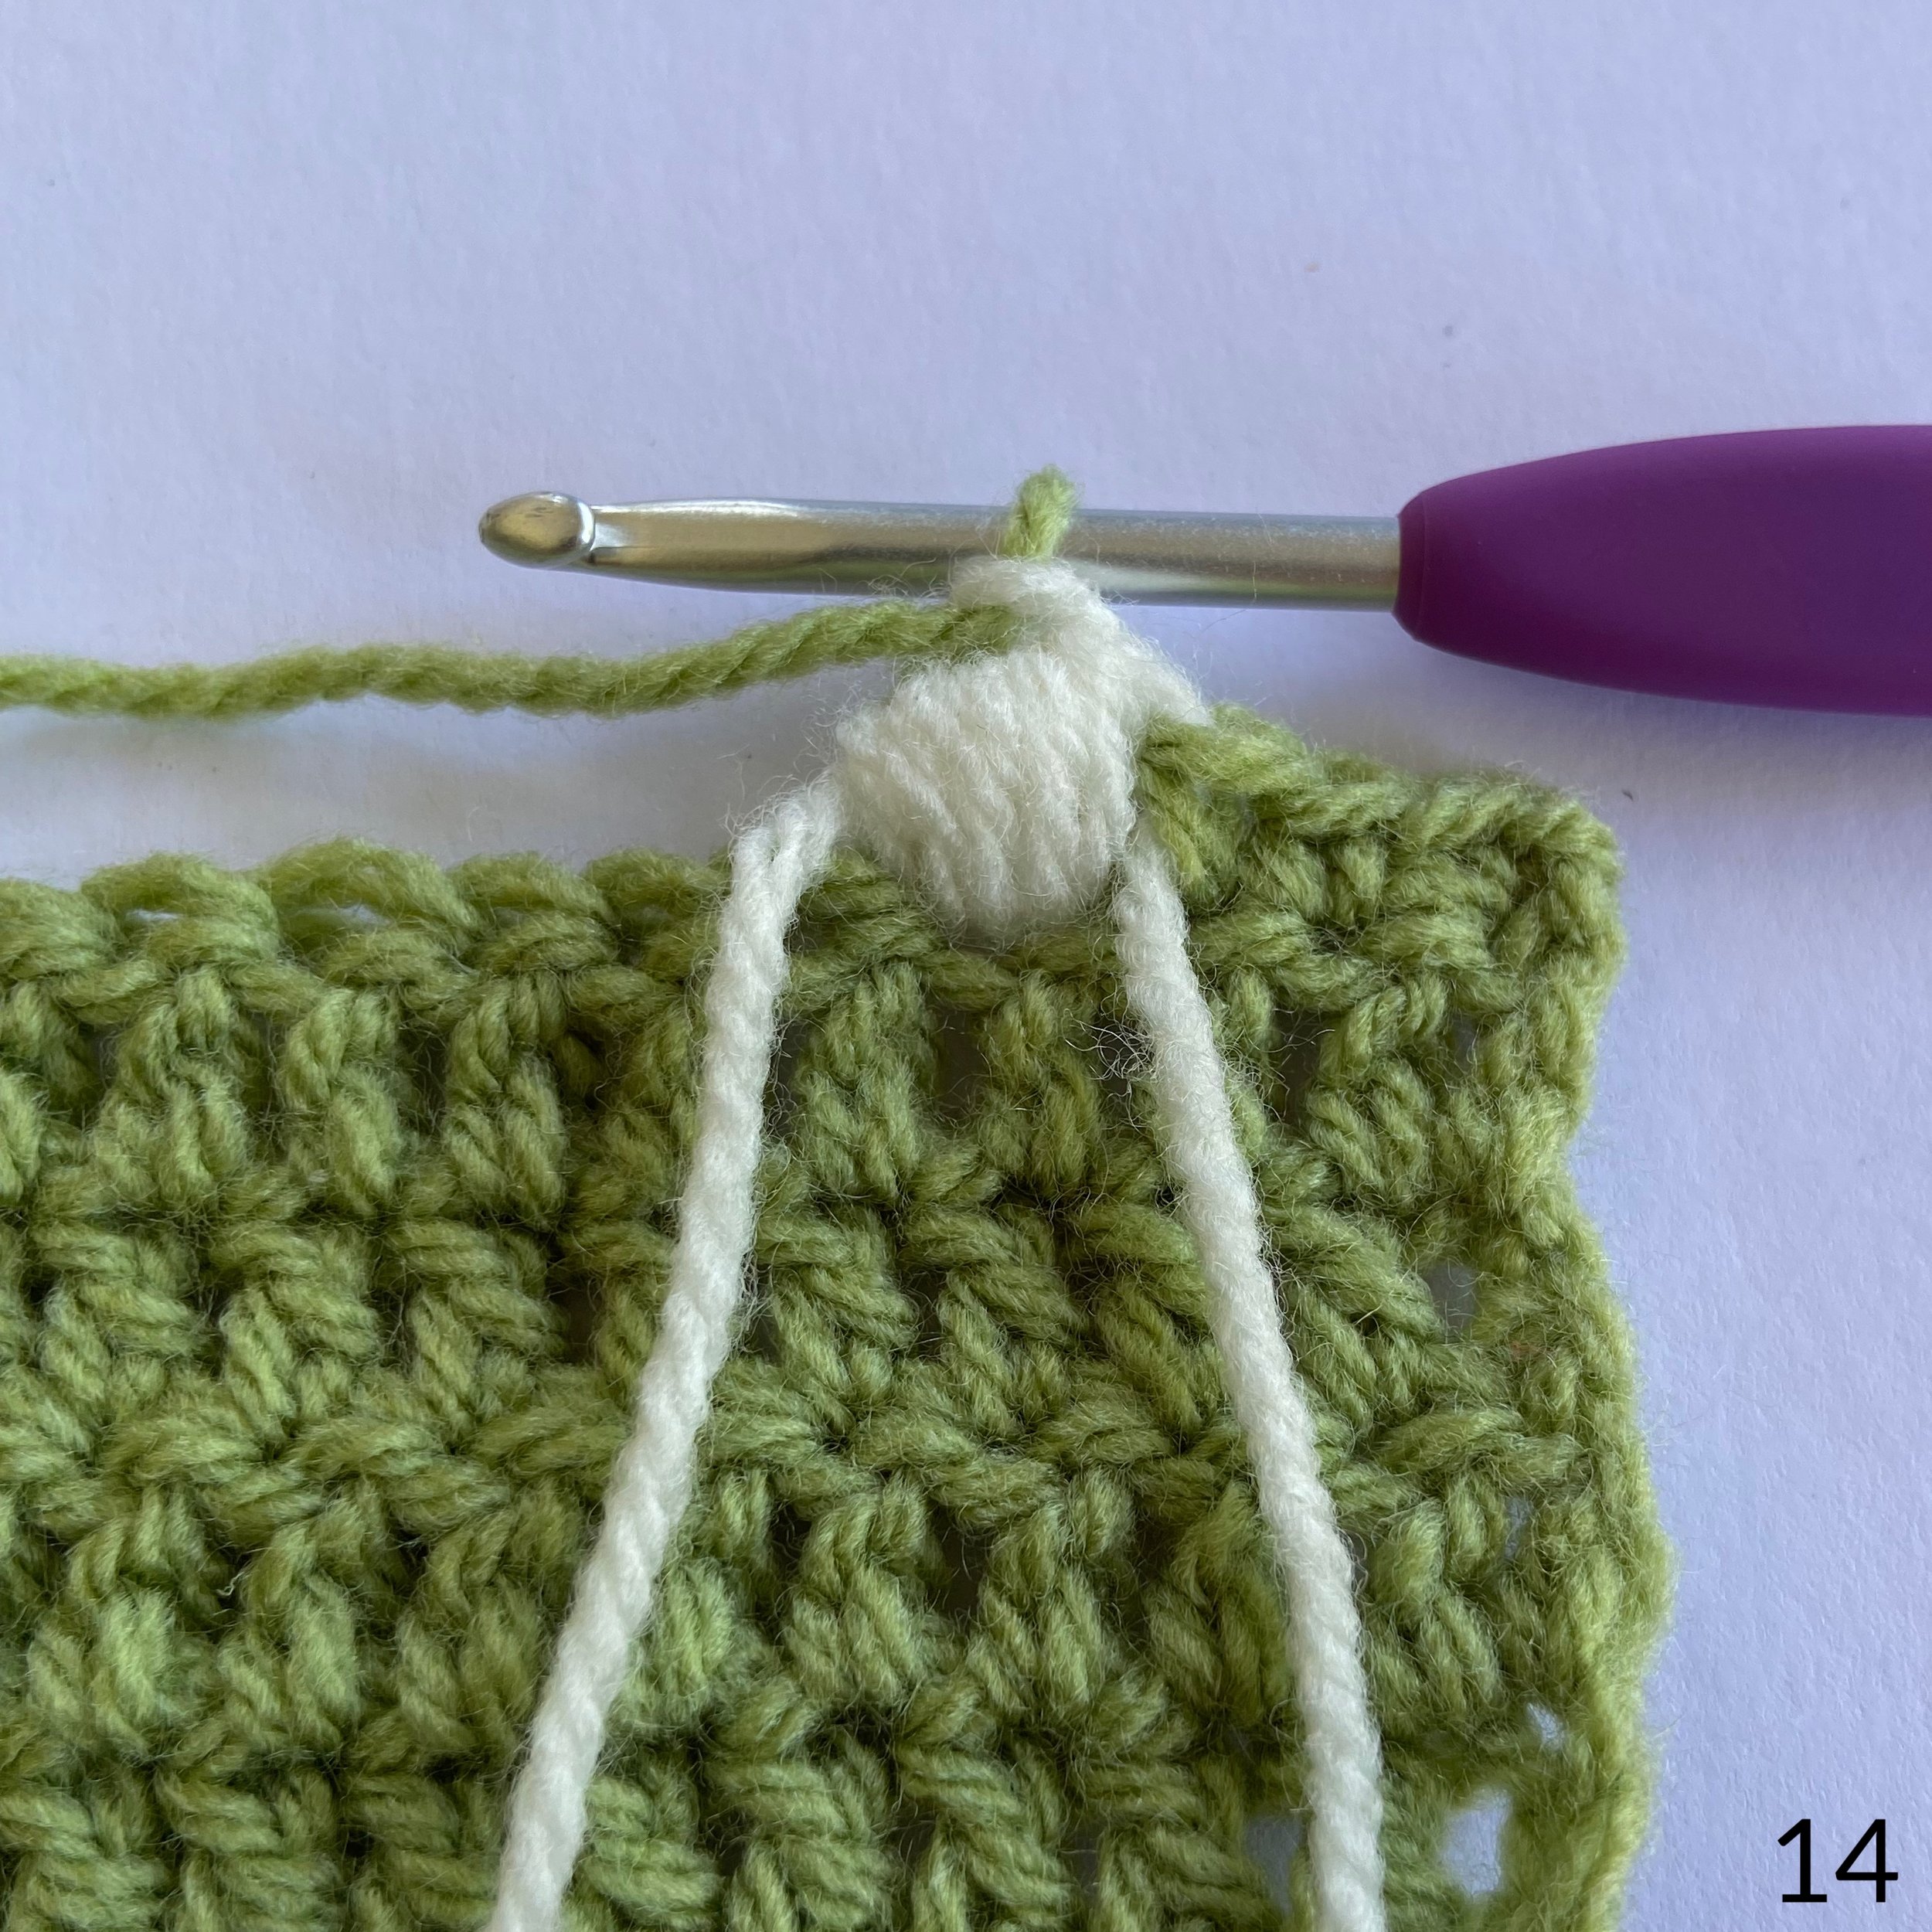
To make the bobble
10. Yarn over and insert your hook into the next stitch. You can see that the cream is on top of the green yarn and you will pull the loop under the green yarn. This traps the green yarn inside the stitch so you can’t see it.
11. Pull up a loop of cream.
12. Yarn over and pull up a loop 3 more times. You should have 9 loops on your hook.
13. Yarn over and pull through all loops on your hook.
14. Now place the cream yarn towards you, pick up the green yarn and pull it through the cream loop on the hook to complete the bobble.
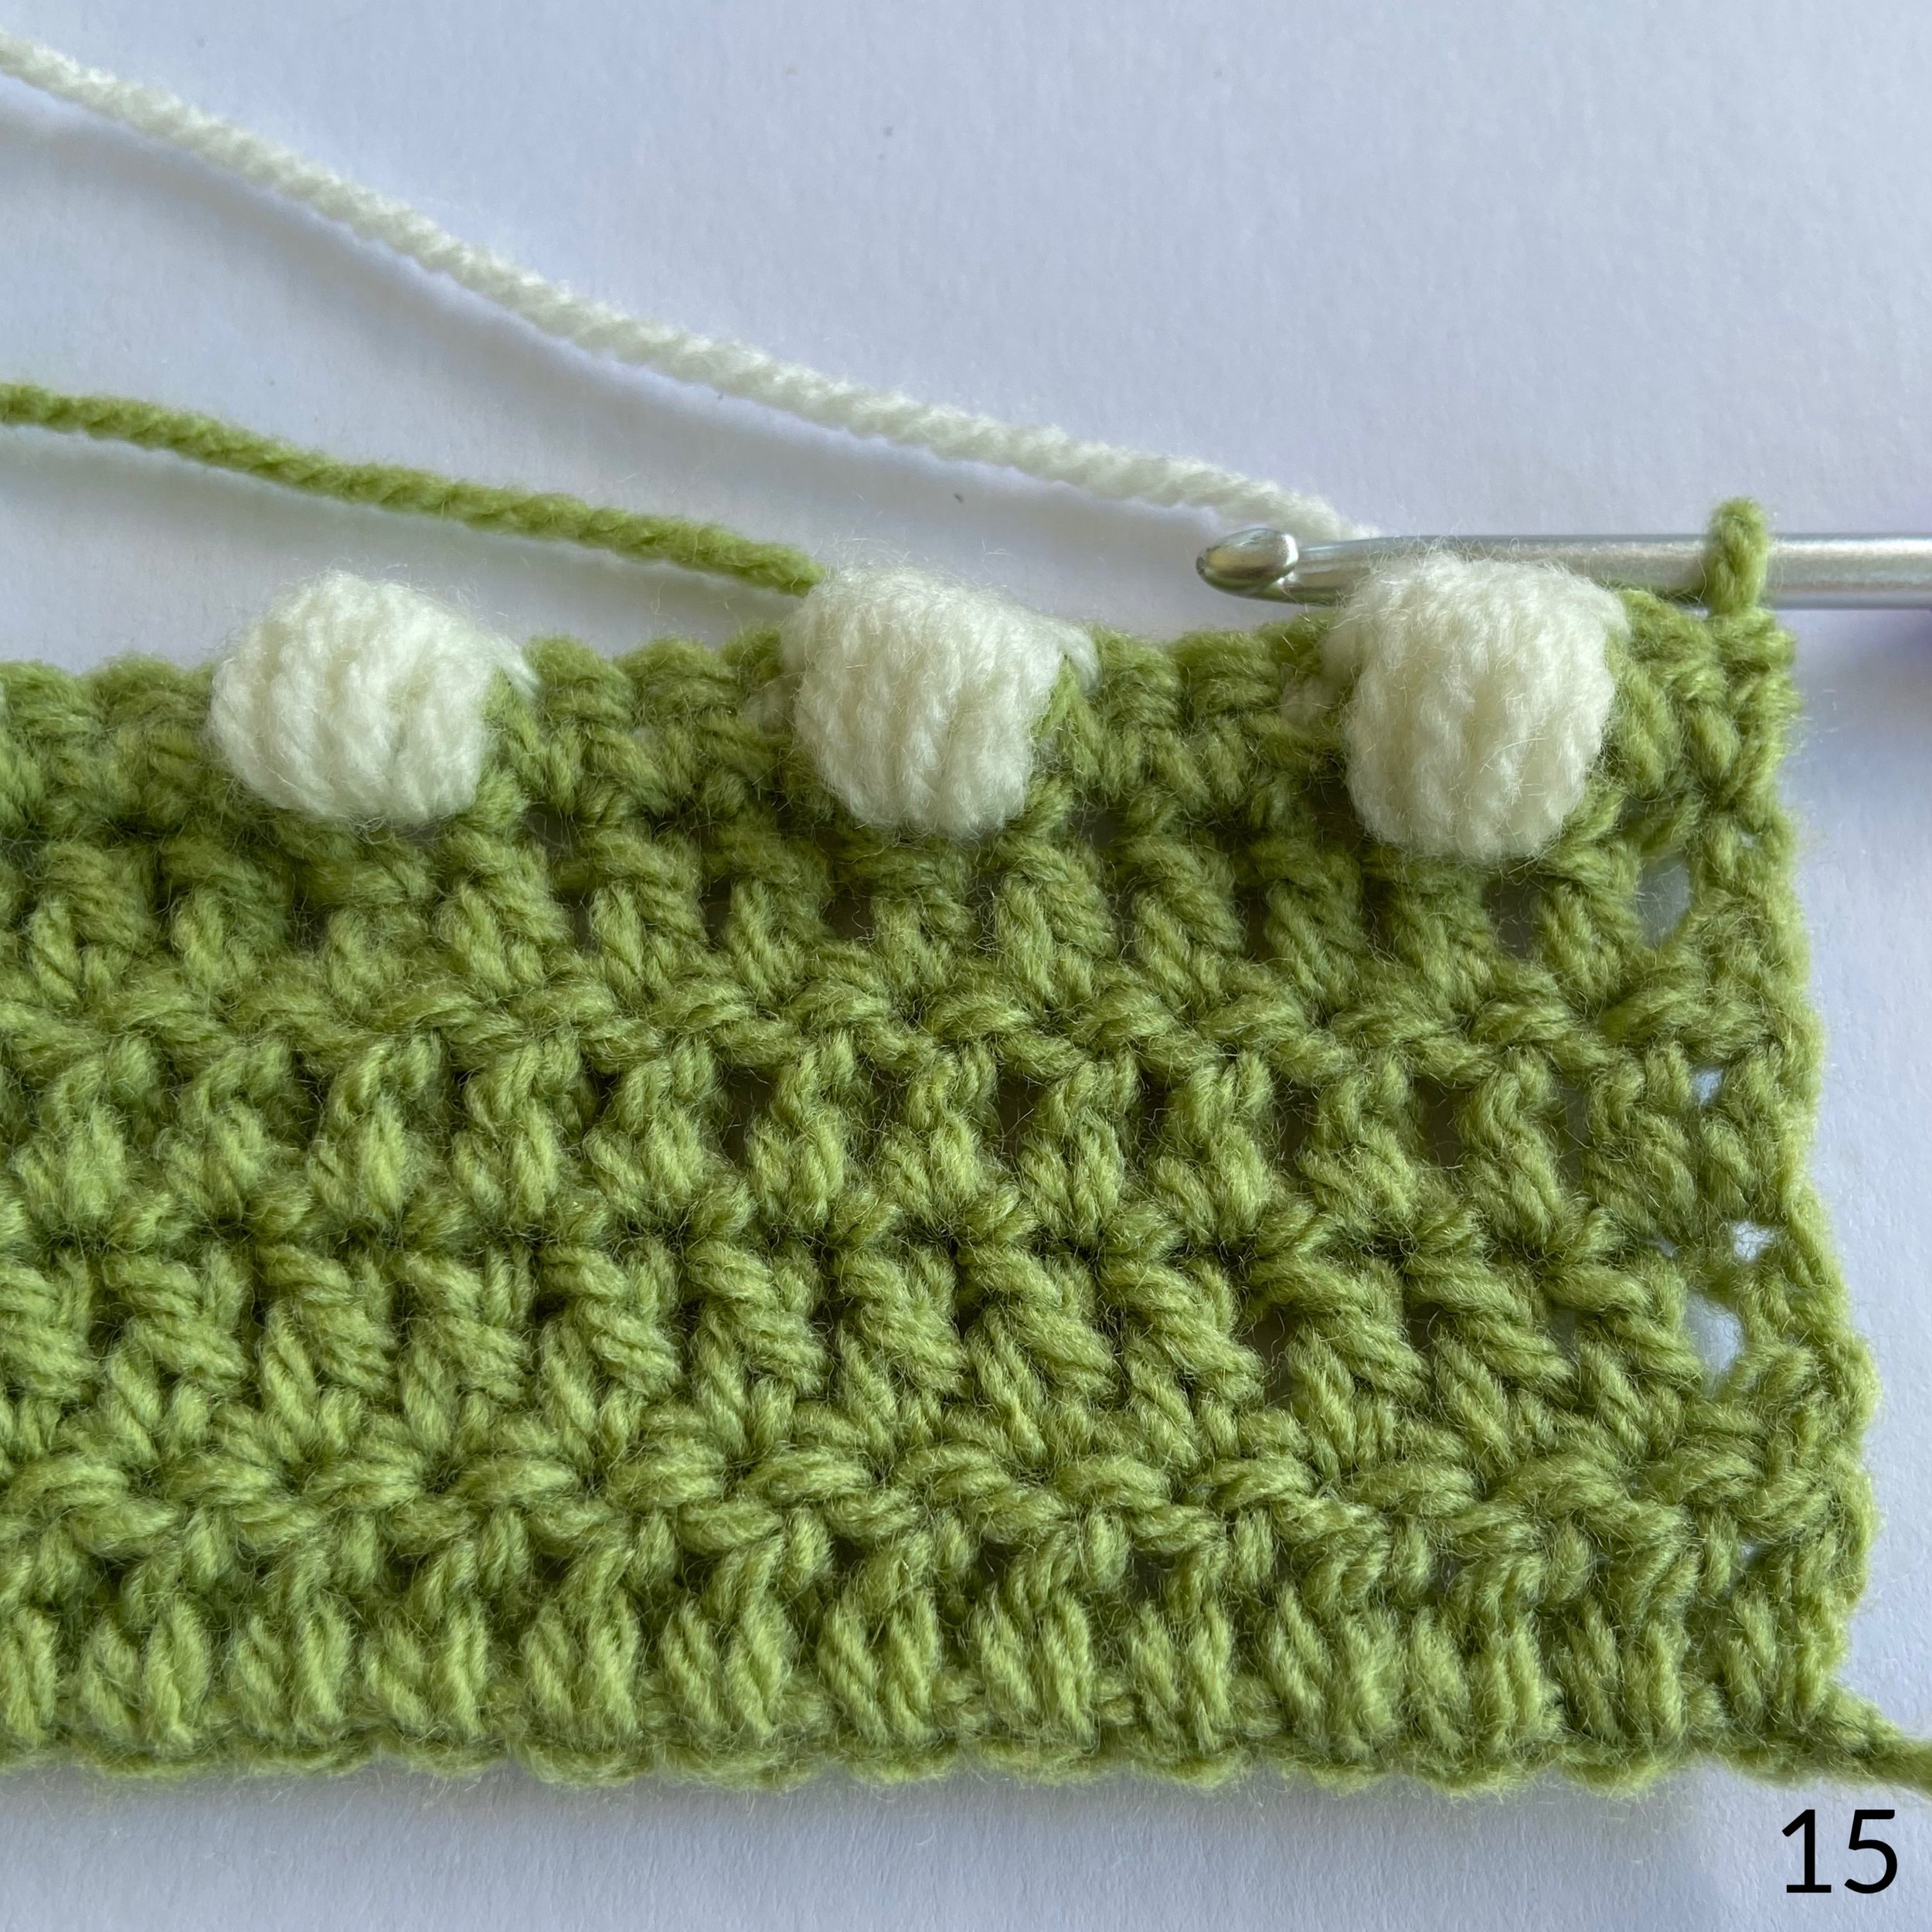
15. Repeat the steps above, working 3 green dc followed by a cream bobble until 2 sts remain. 1 dc in green in each of the last 2 sts. Make sure that you work your green stitches OVER the cream yarn so that it is hidden.
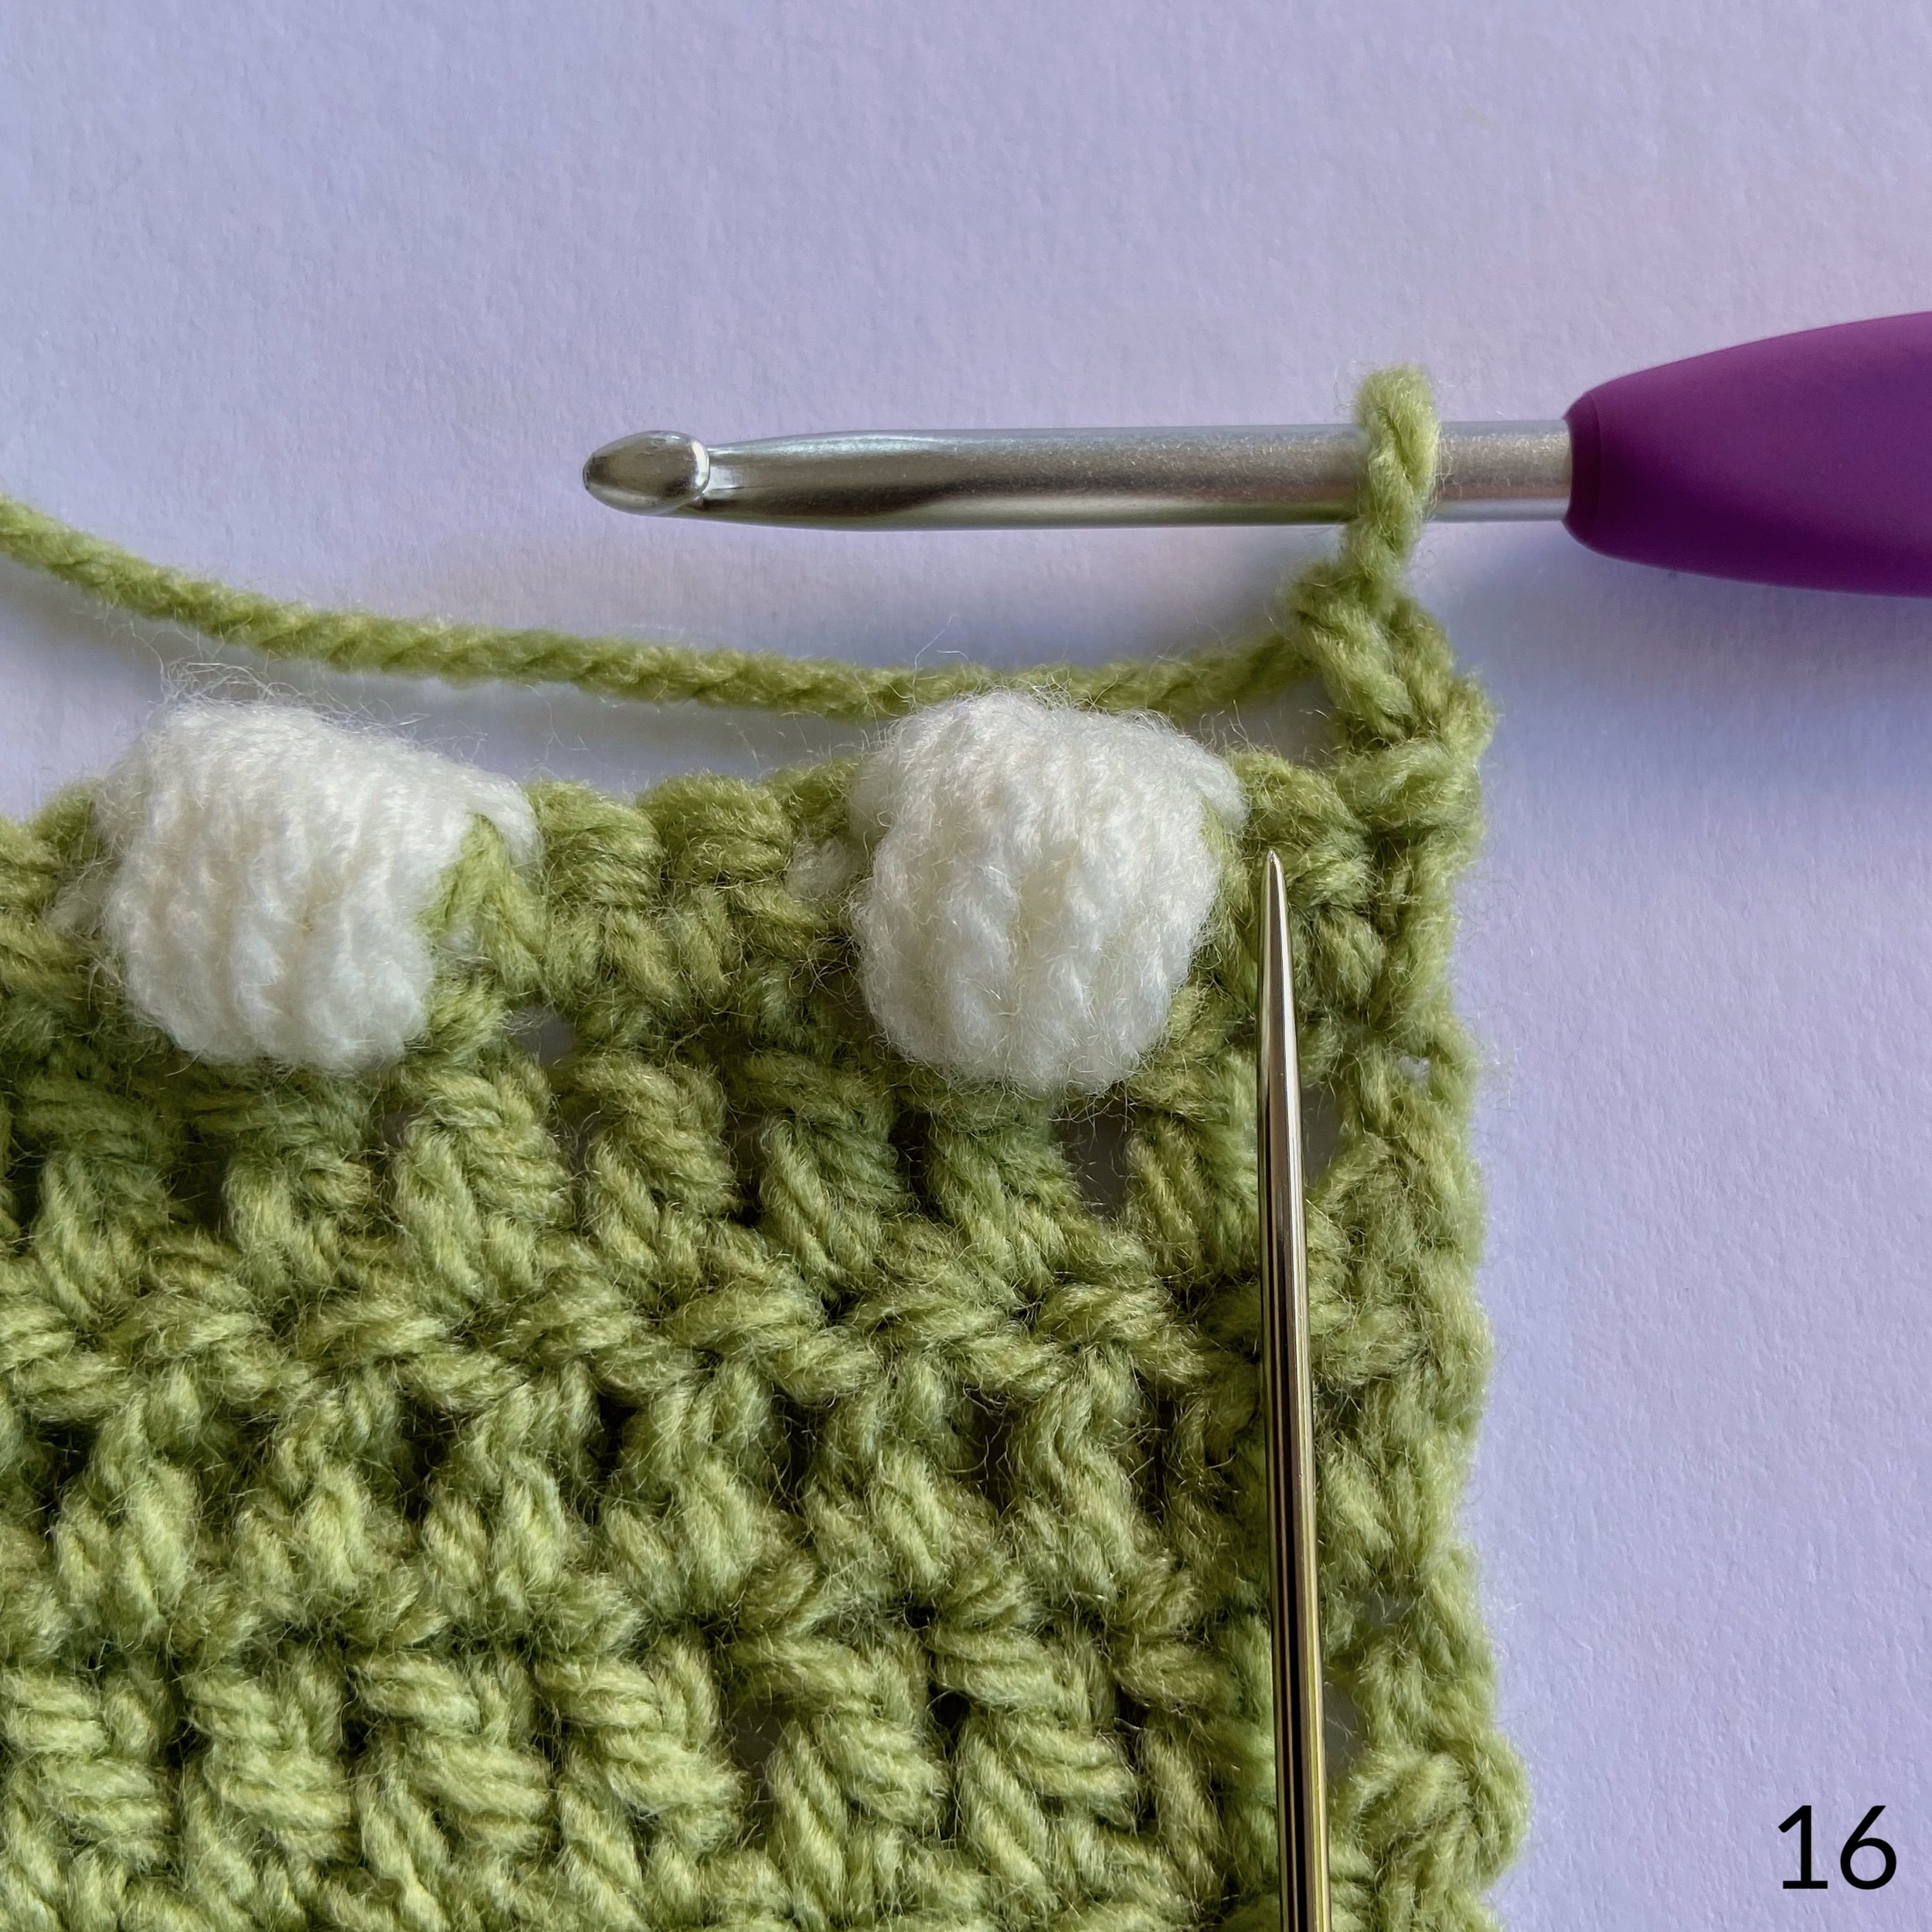


16. Row 6: 2 ch, 1 tr in each stitch across. Place your first tr where the needle is pointing .
17. The next treble goes in the top of the bobble, always skip the second cream stitch on the bobble, indicated by the arrows and place your next 3 tr in the dc in the row below.
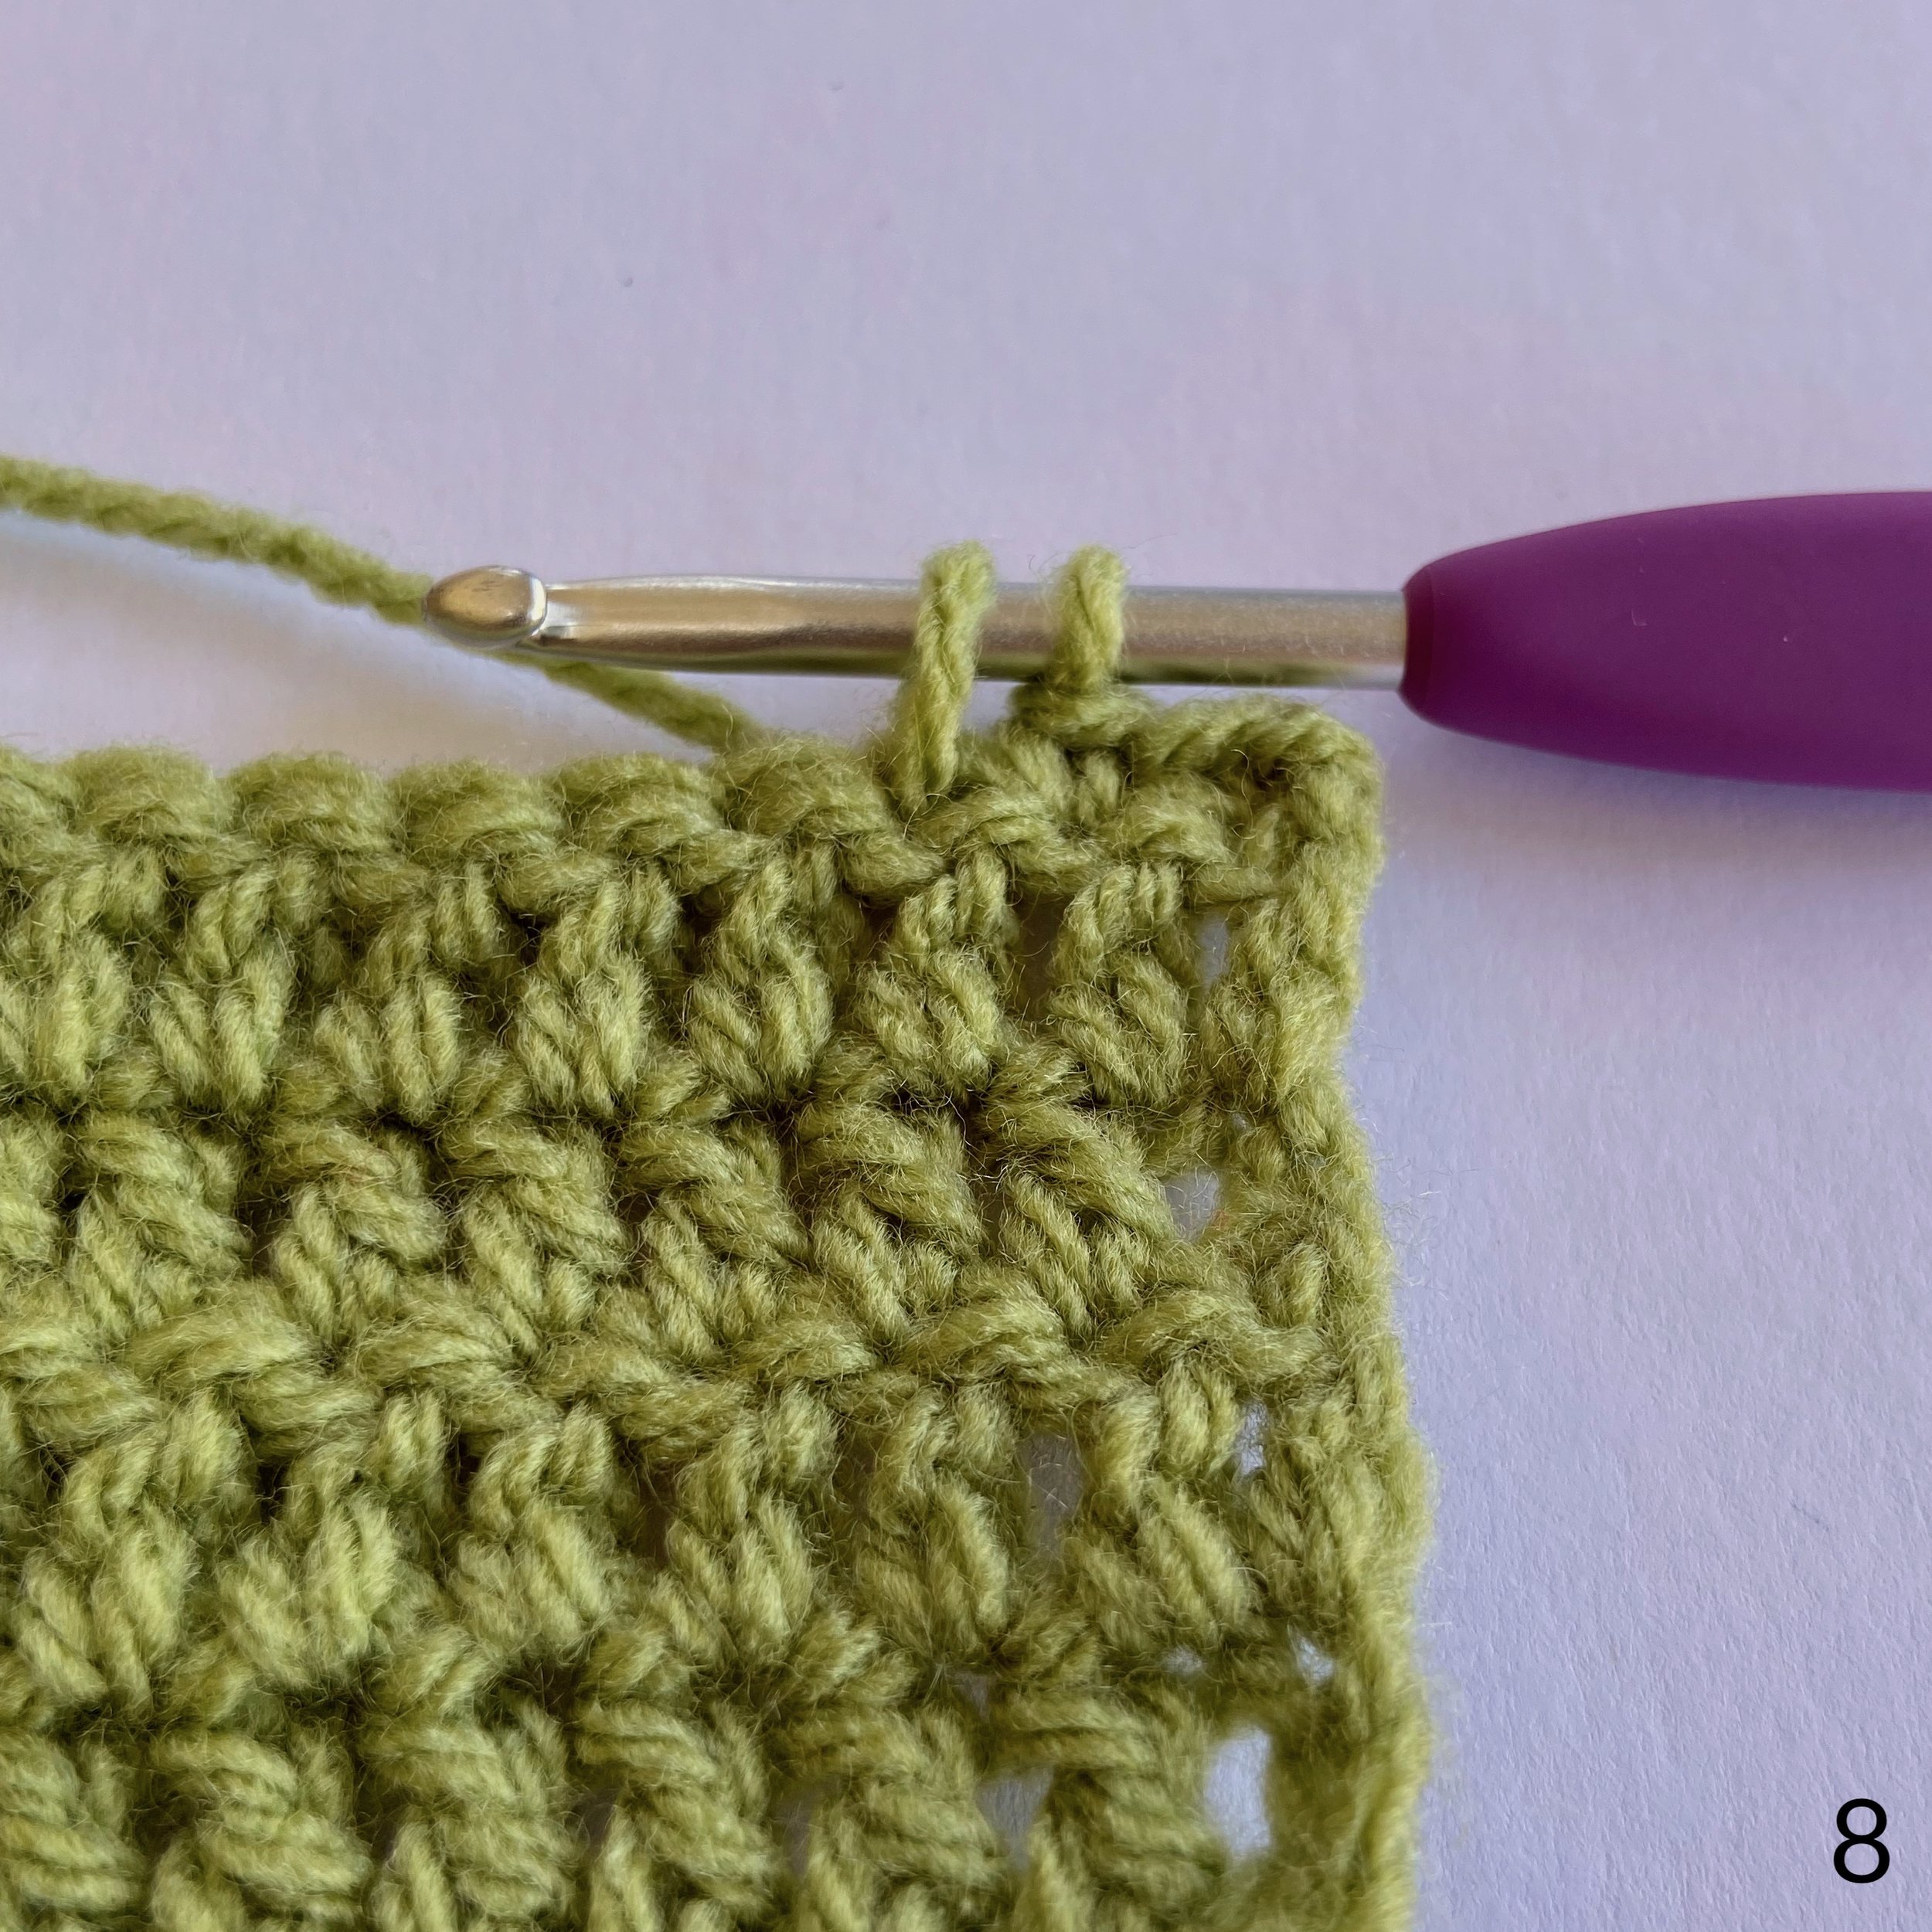
18. Continue working 1tr in the top of the bobble, followed by 3 tr in the dc in the row below. Repeat across. It’s a good idea to check your stitch count is still 150 at this point.
Row 7-9: 2 ch, sk the first st and 1 tr in each st across. (same as row 2)

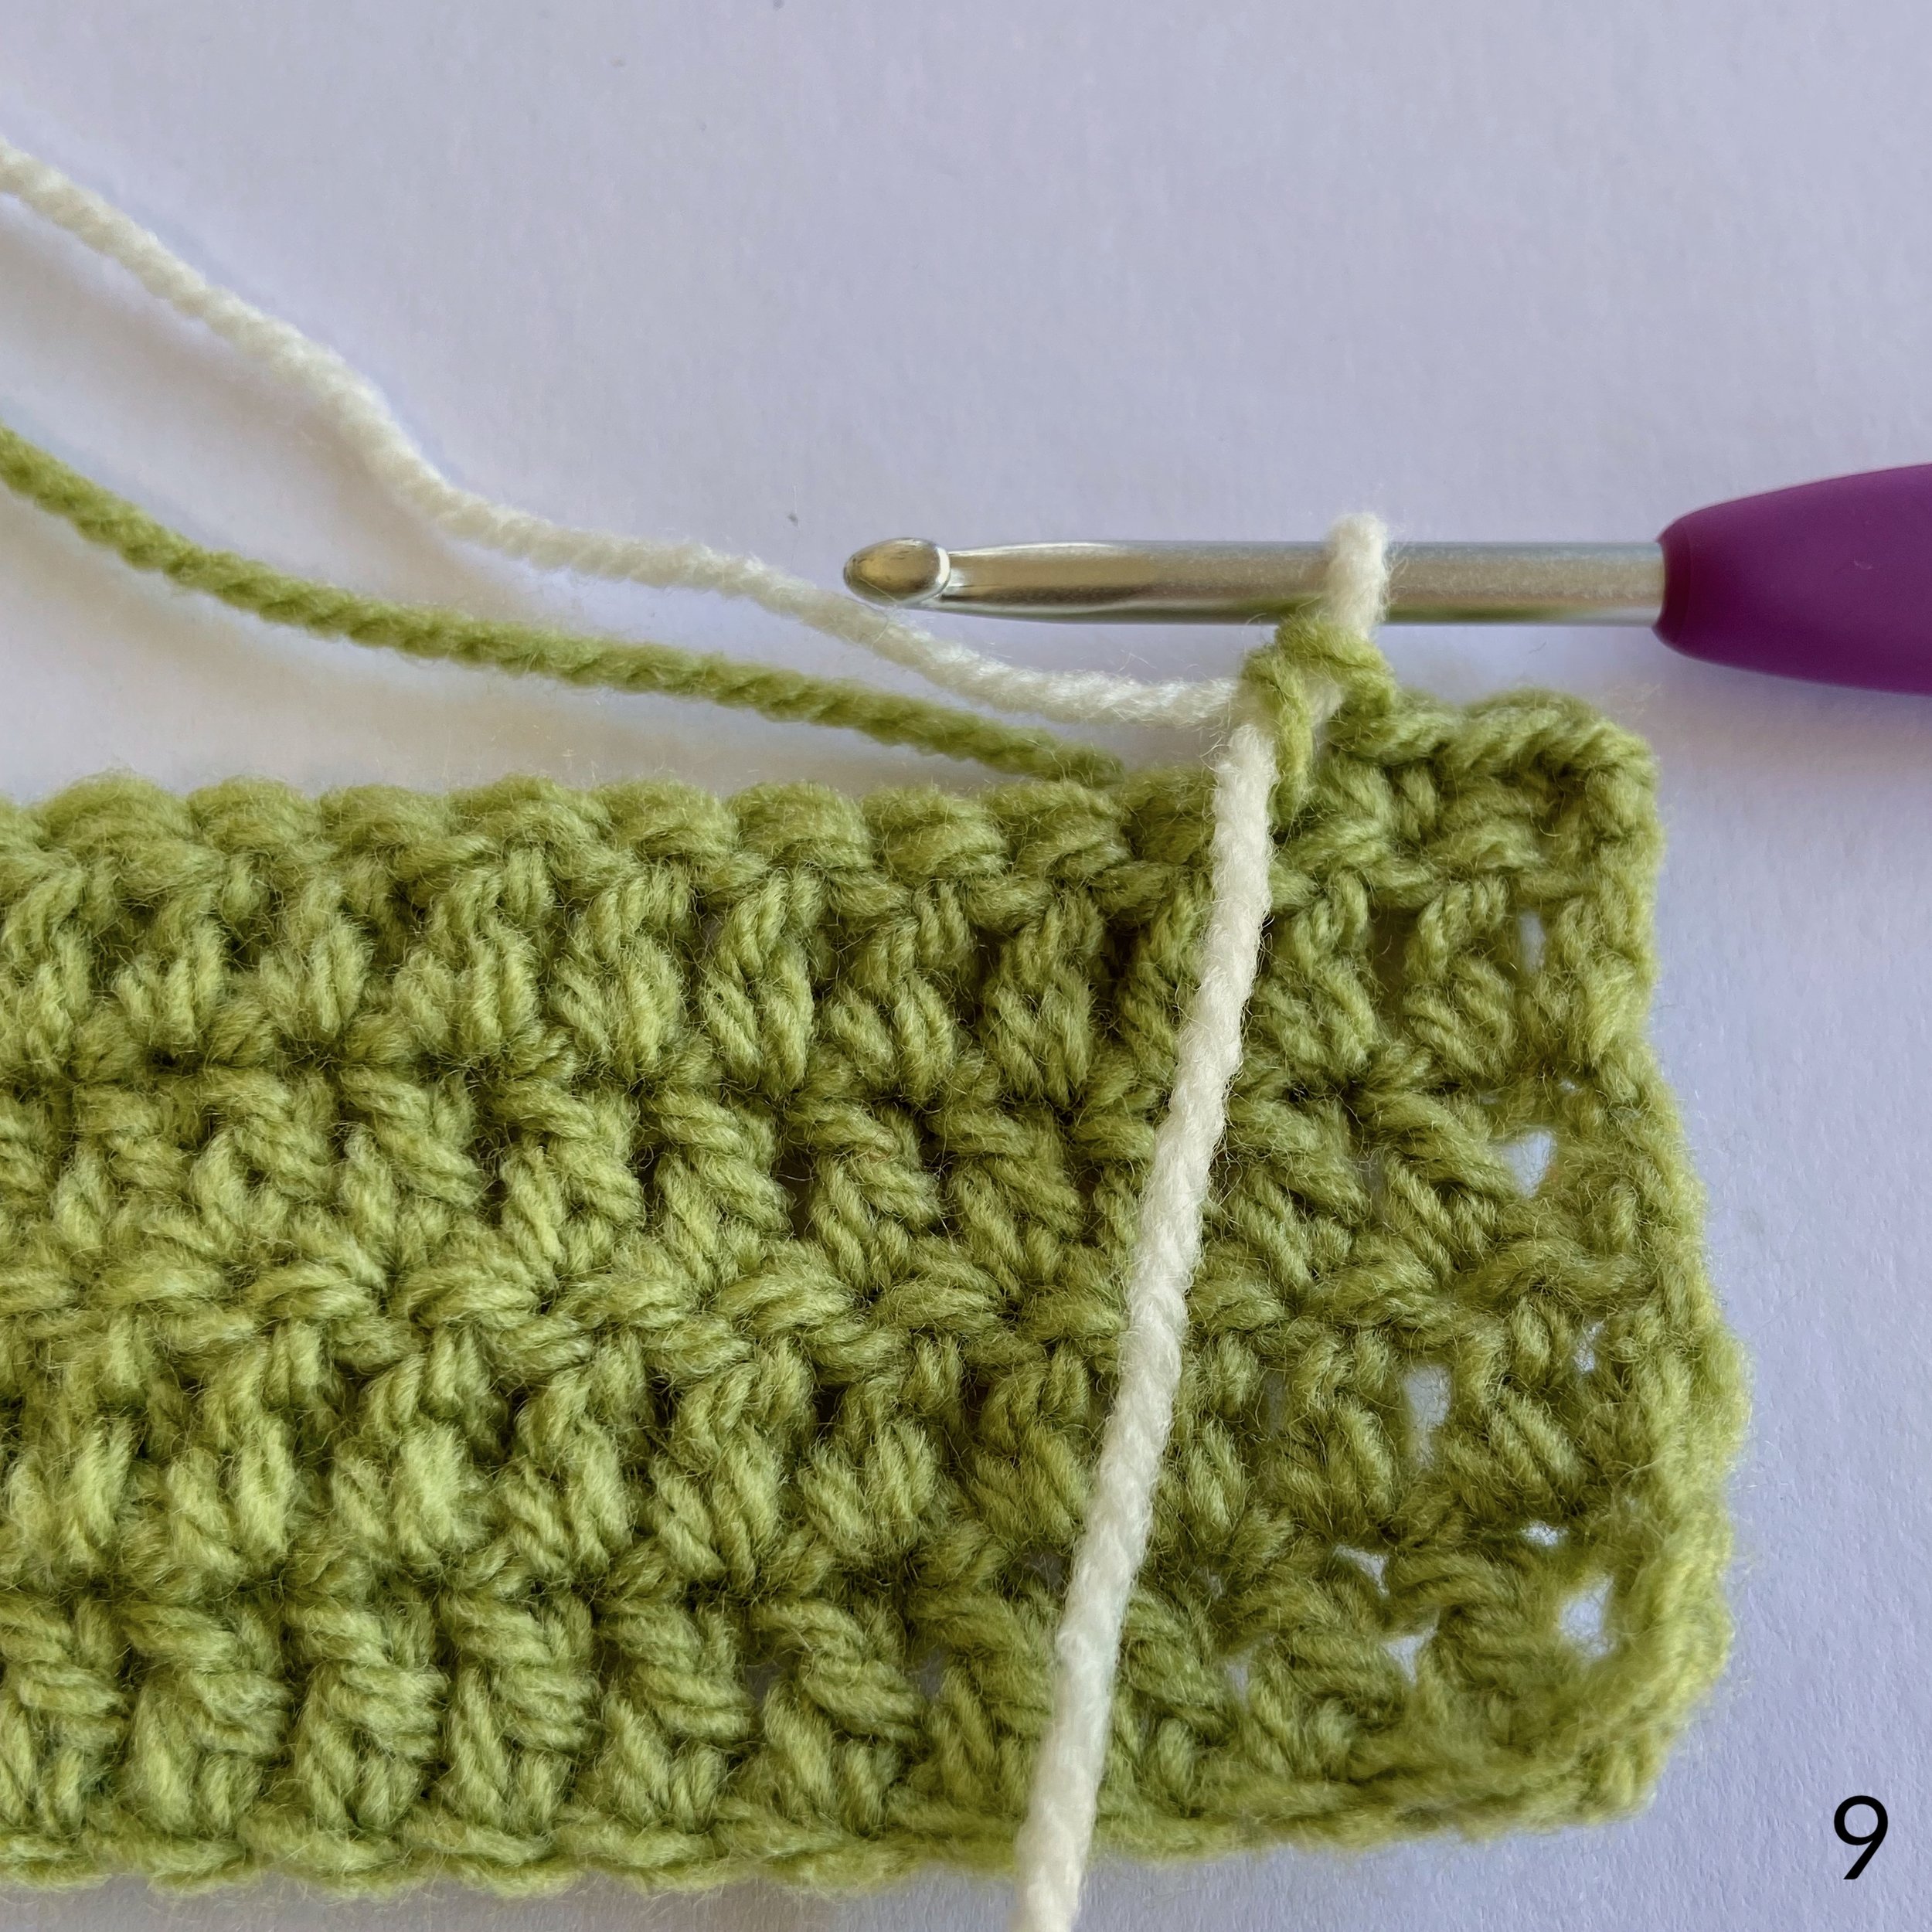
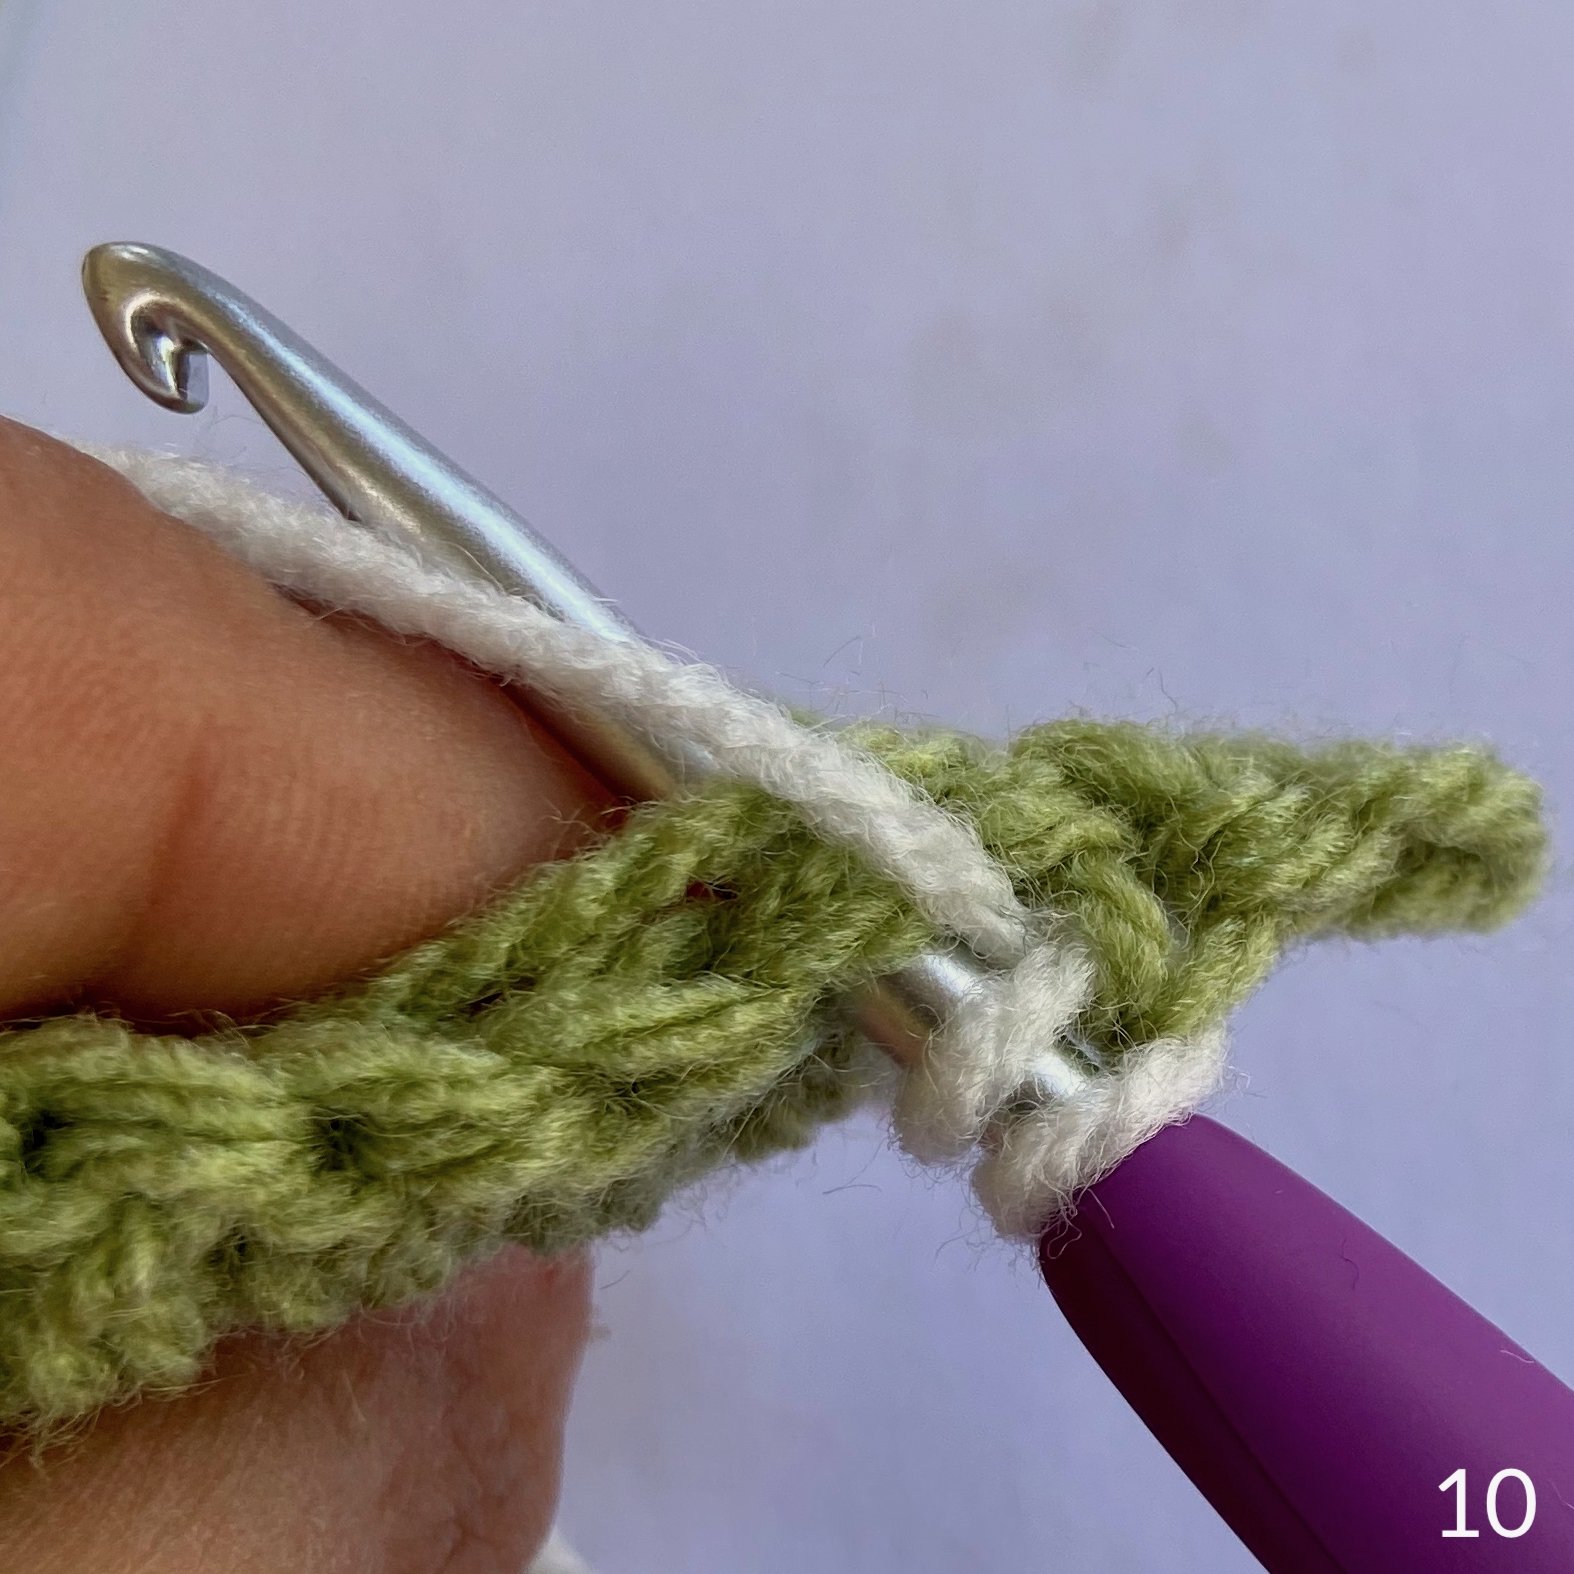
To change colours at the beginning of a row, simply pull through a loop of the new colour. Here I am pulling a loop of red through the cream. Leave tails of about 15cm to sew in later.
Row 10 & 11: Change to cream. 2 ch, sk the first st and 1 tr in each st across.
Row 12: Change to green. 2 ch, sk the first st and 1 tr in each st across.
This next section appears regularly throughout the blanket and I’ve called it the Candy Cane stripe. It consists of 3 rows and will always be worked in the same way.


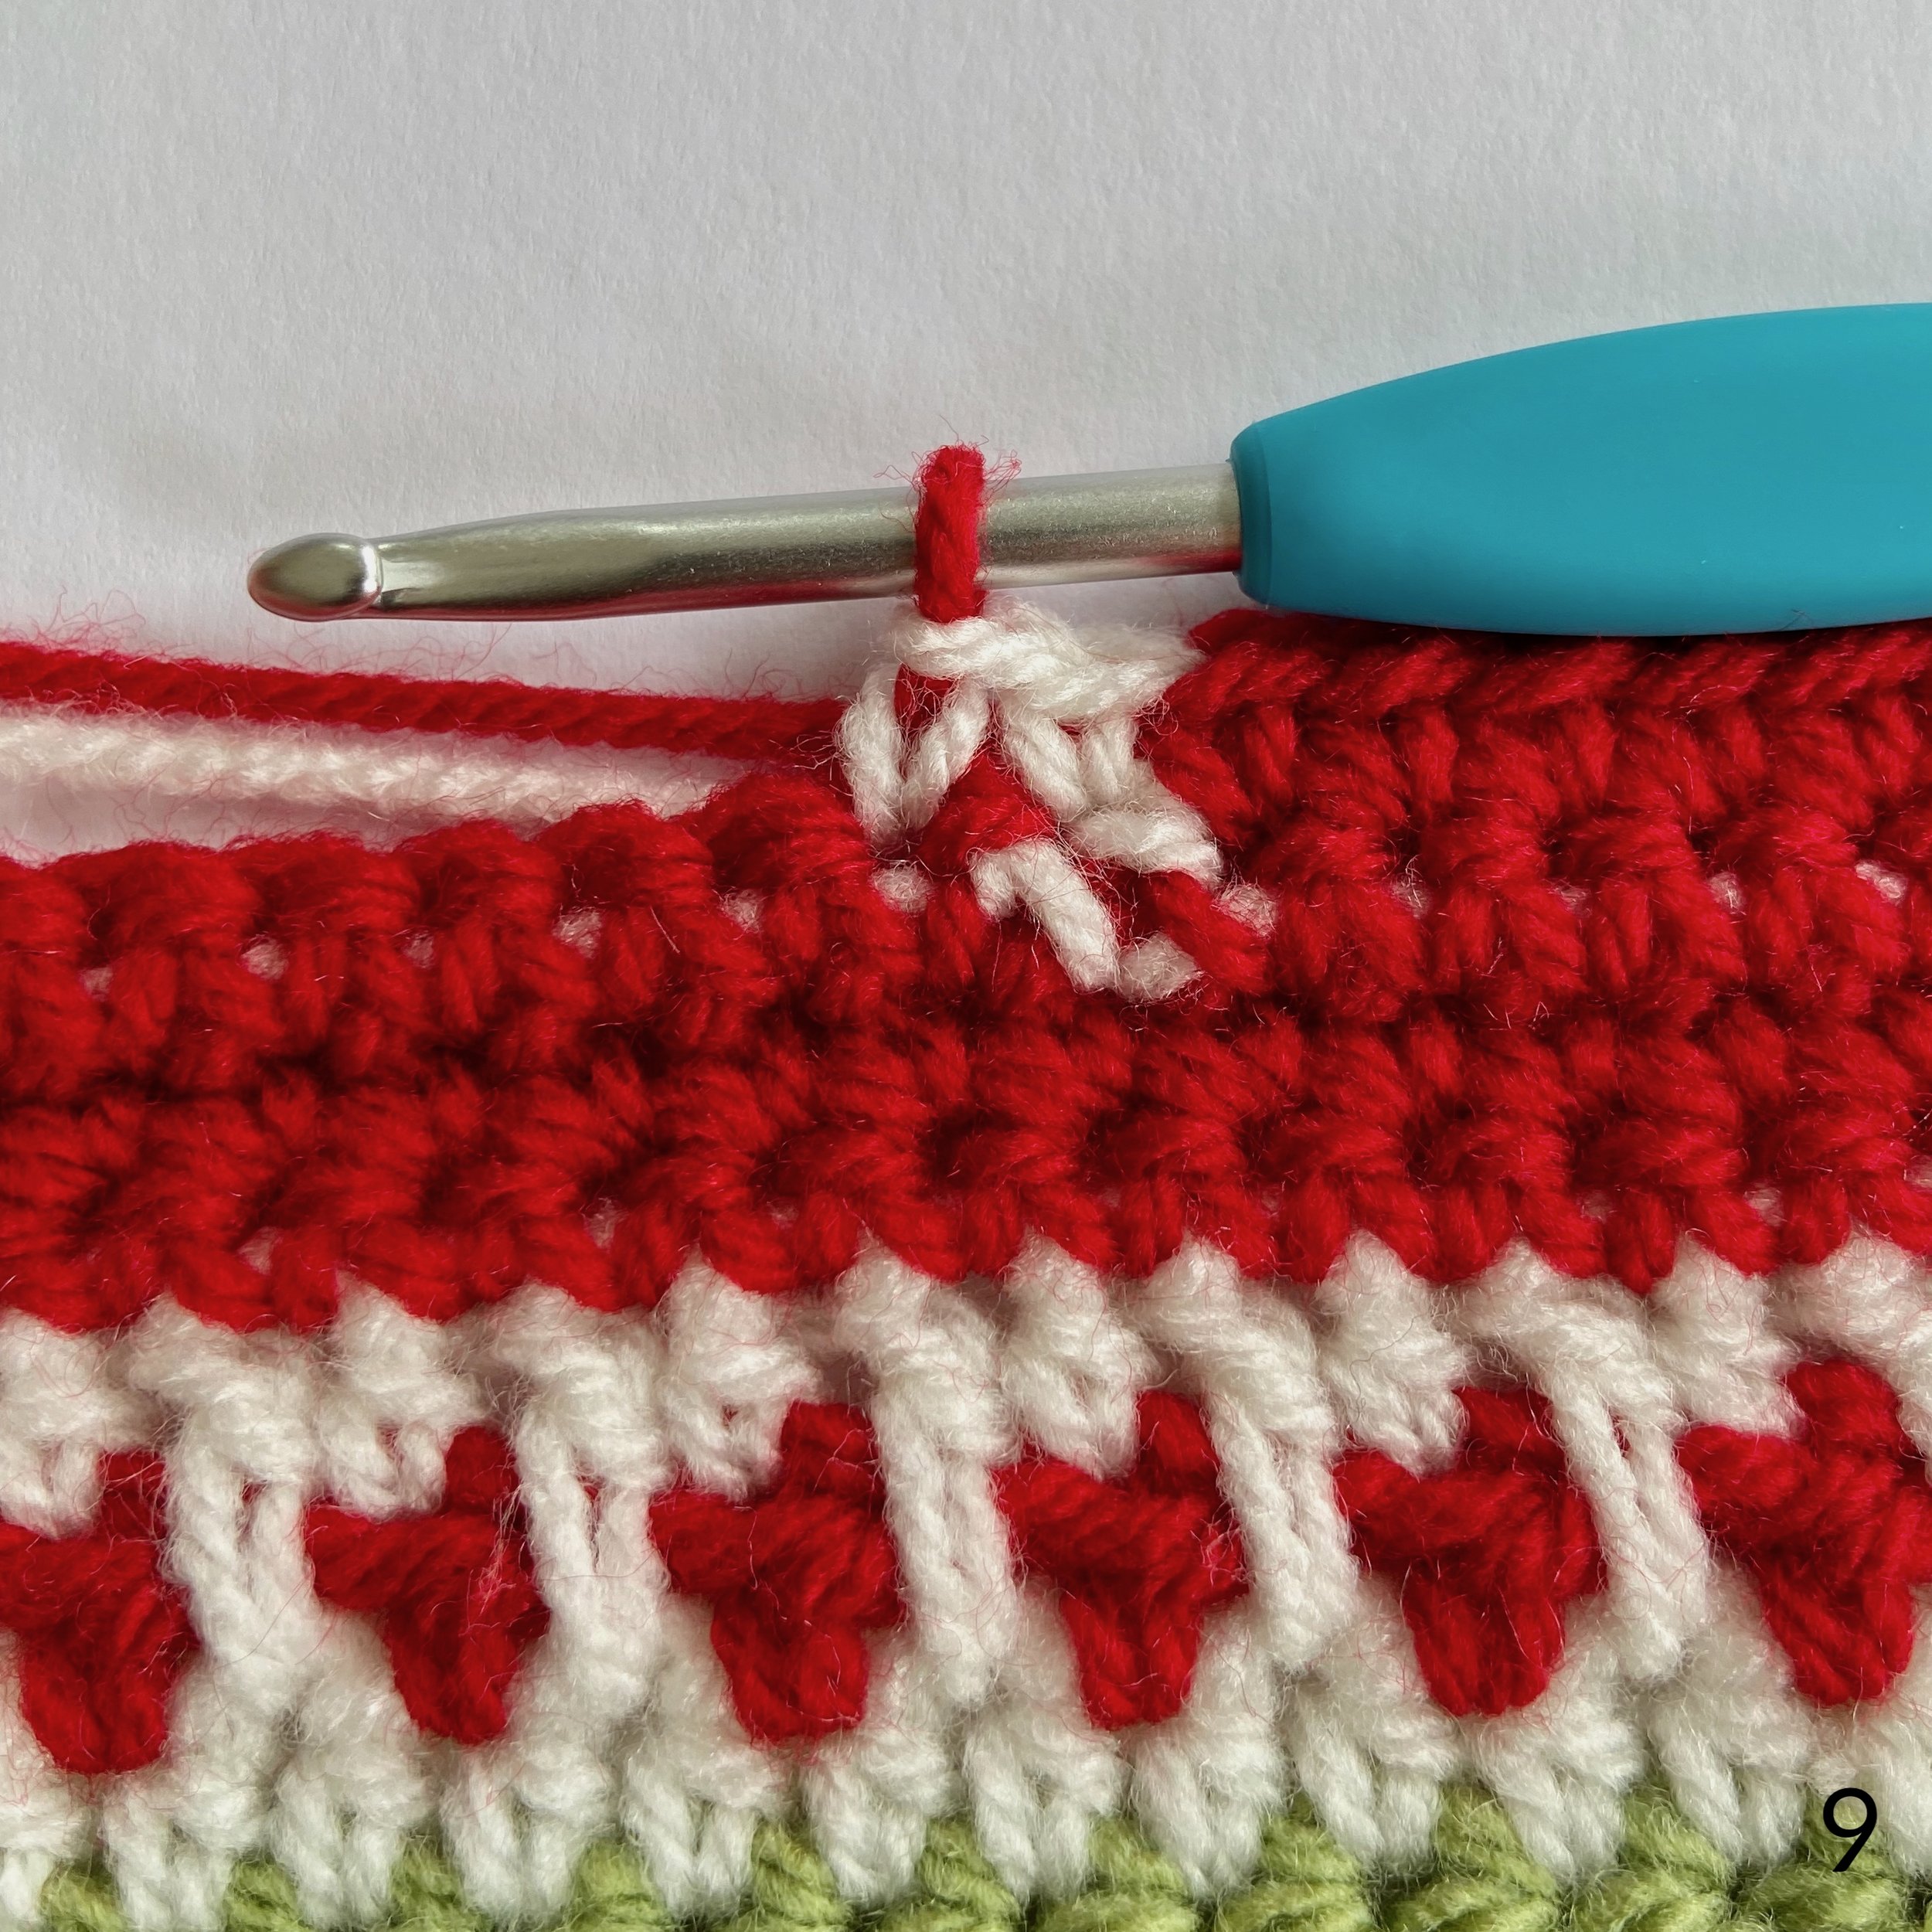
Row 13: Change to cream. 2 ch, sk first st and 1 half treble (htr) in each st across.
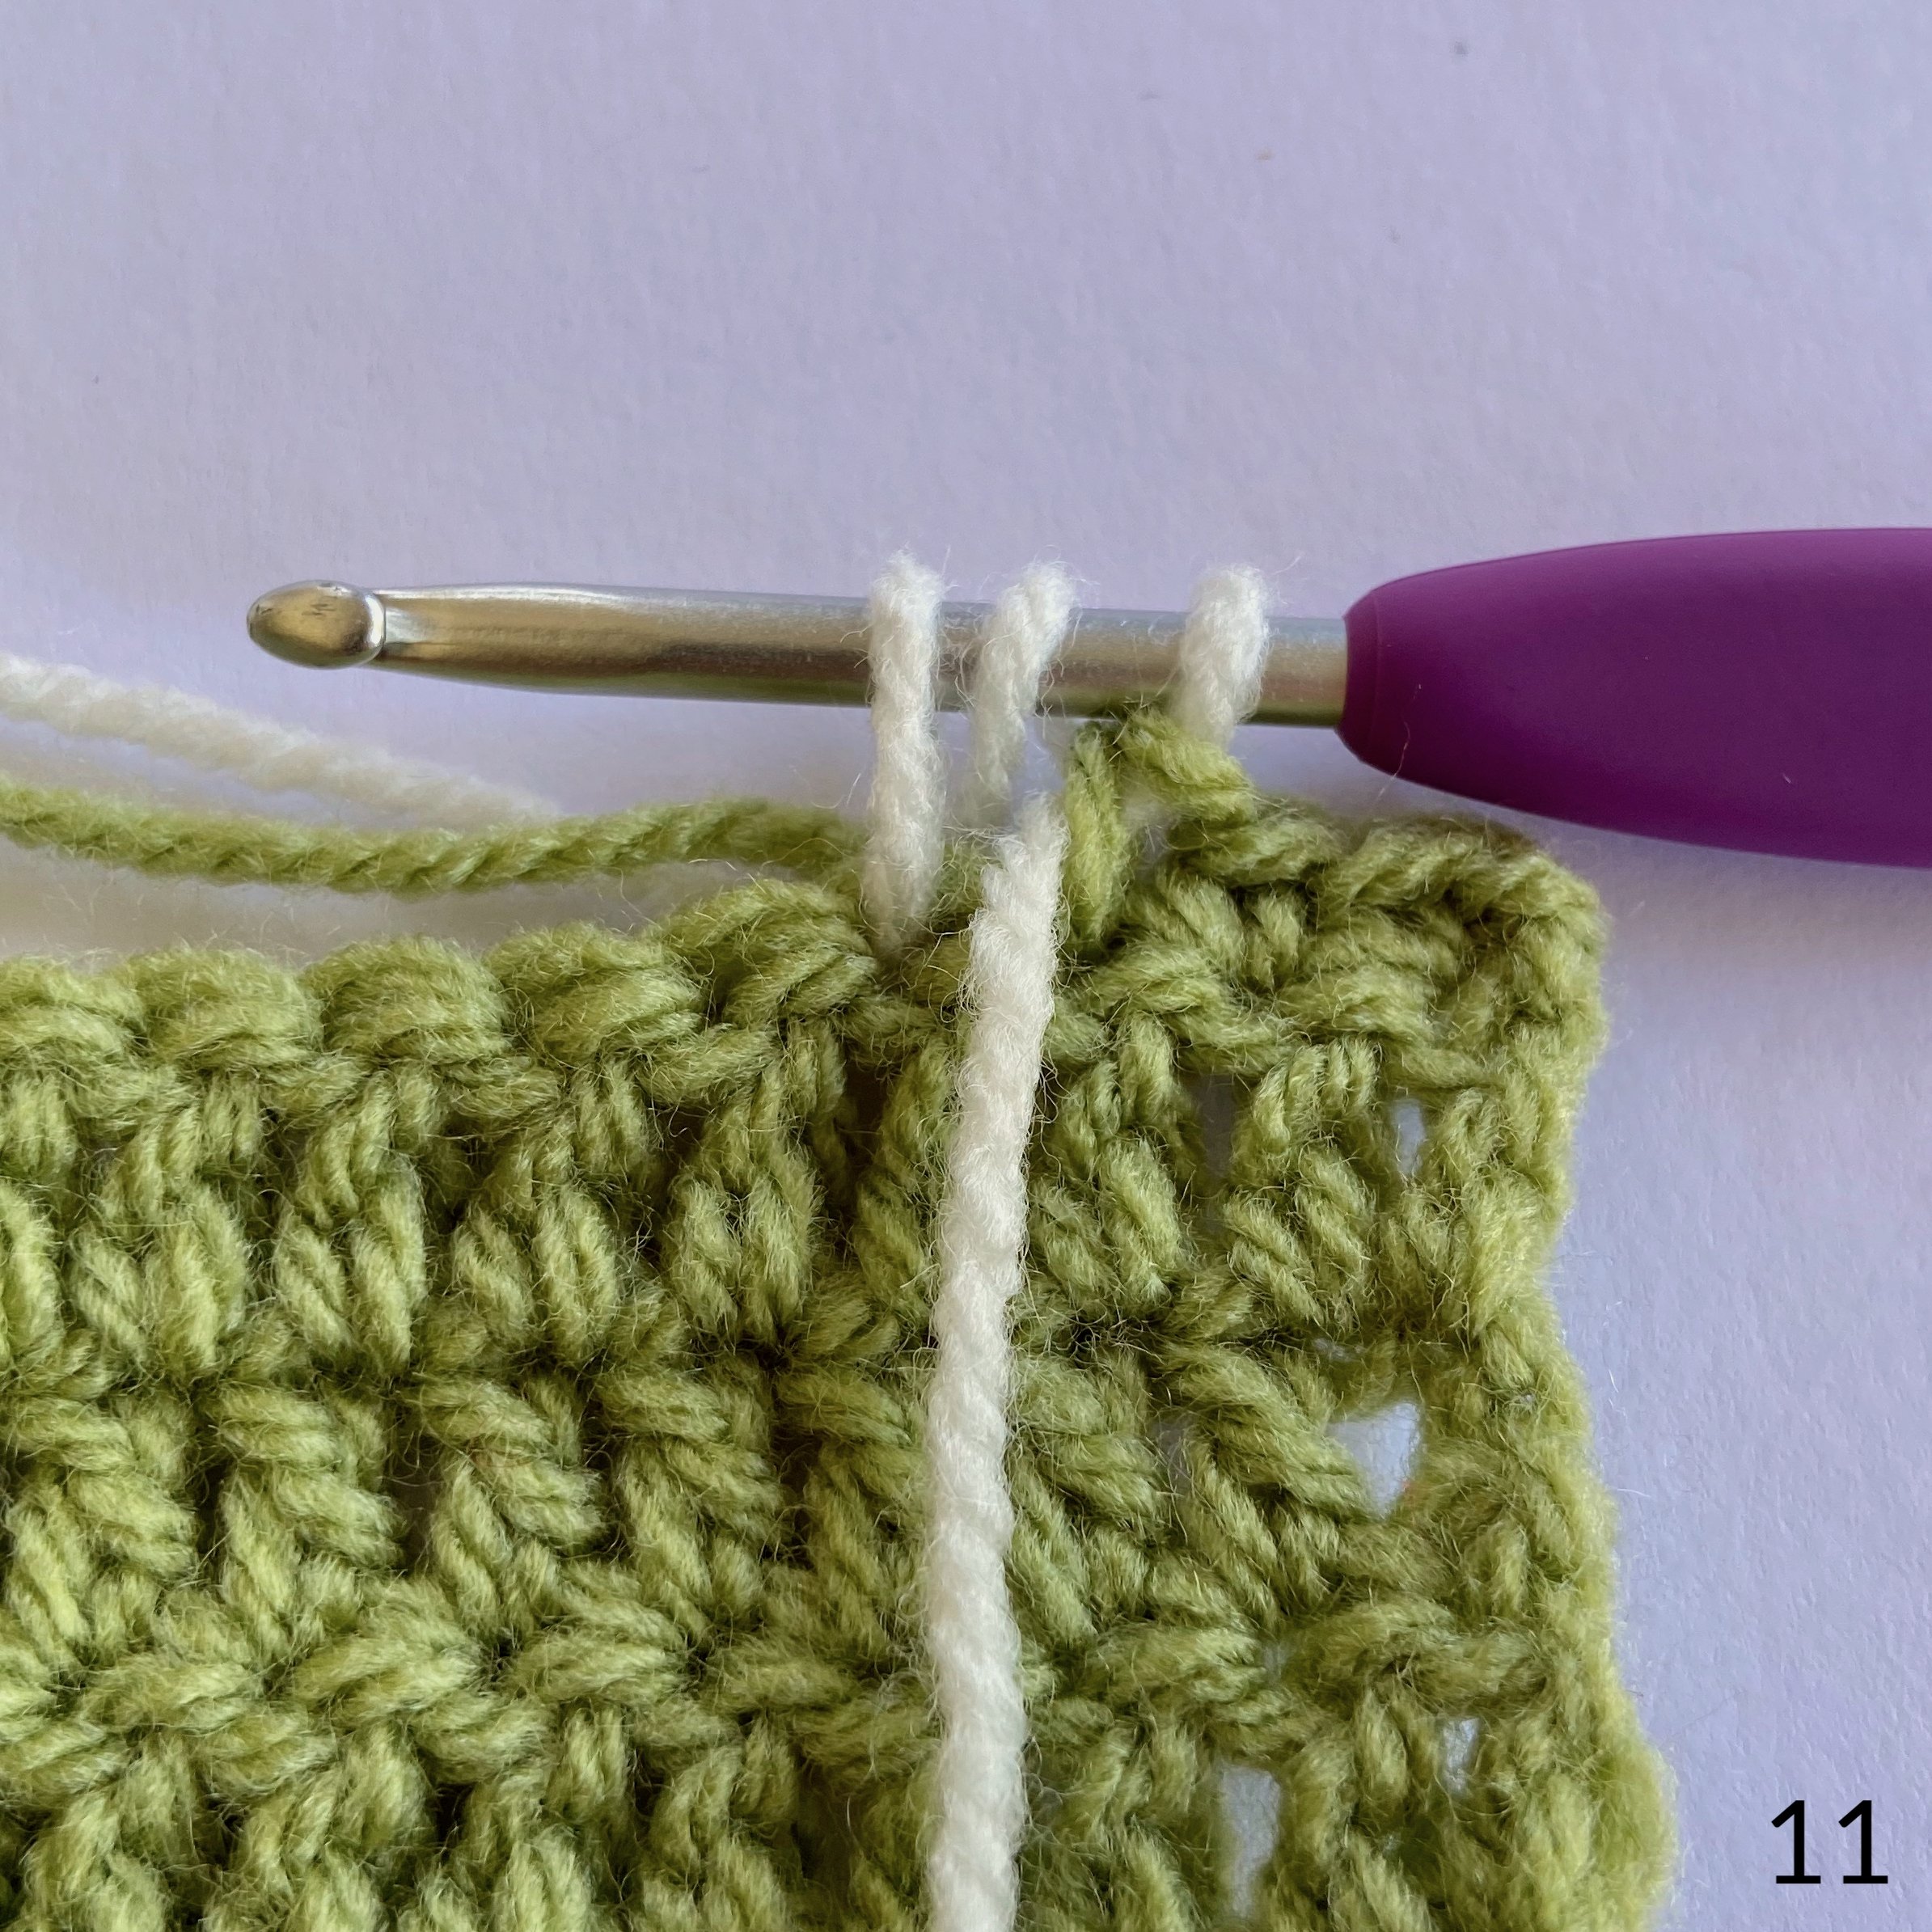
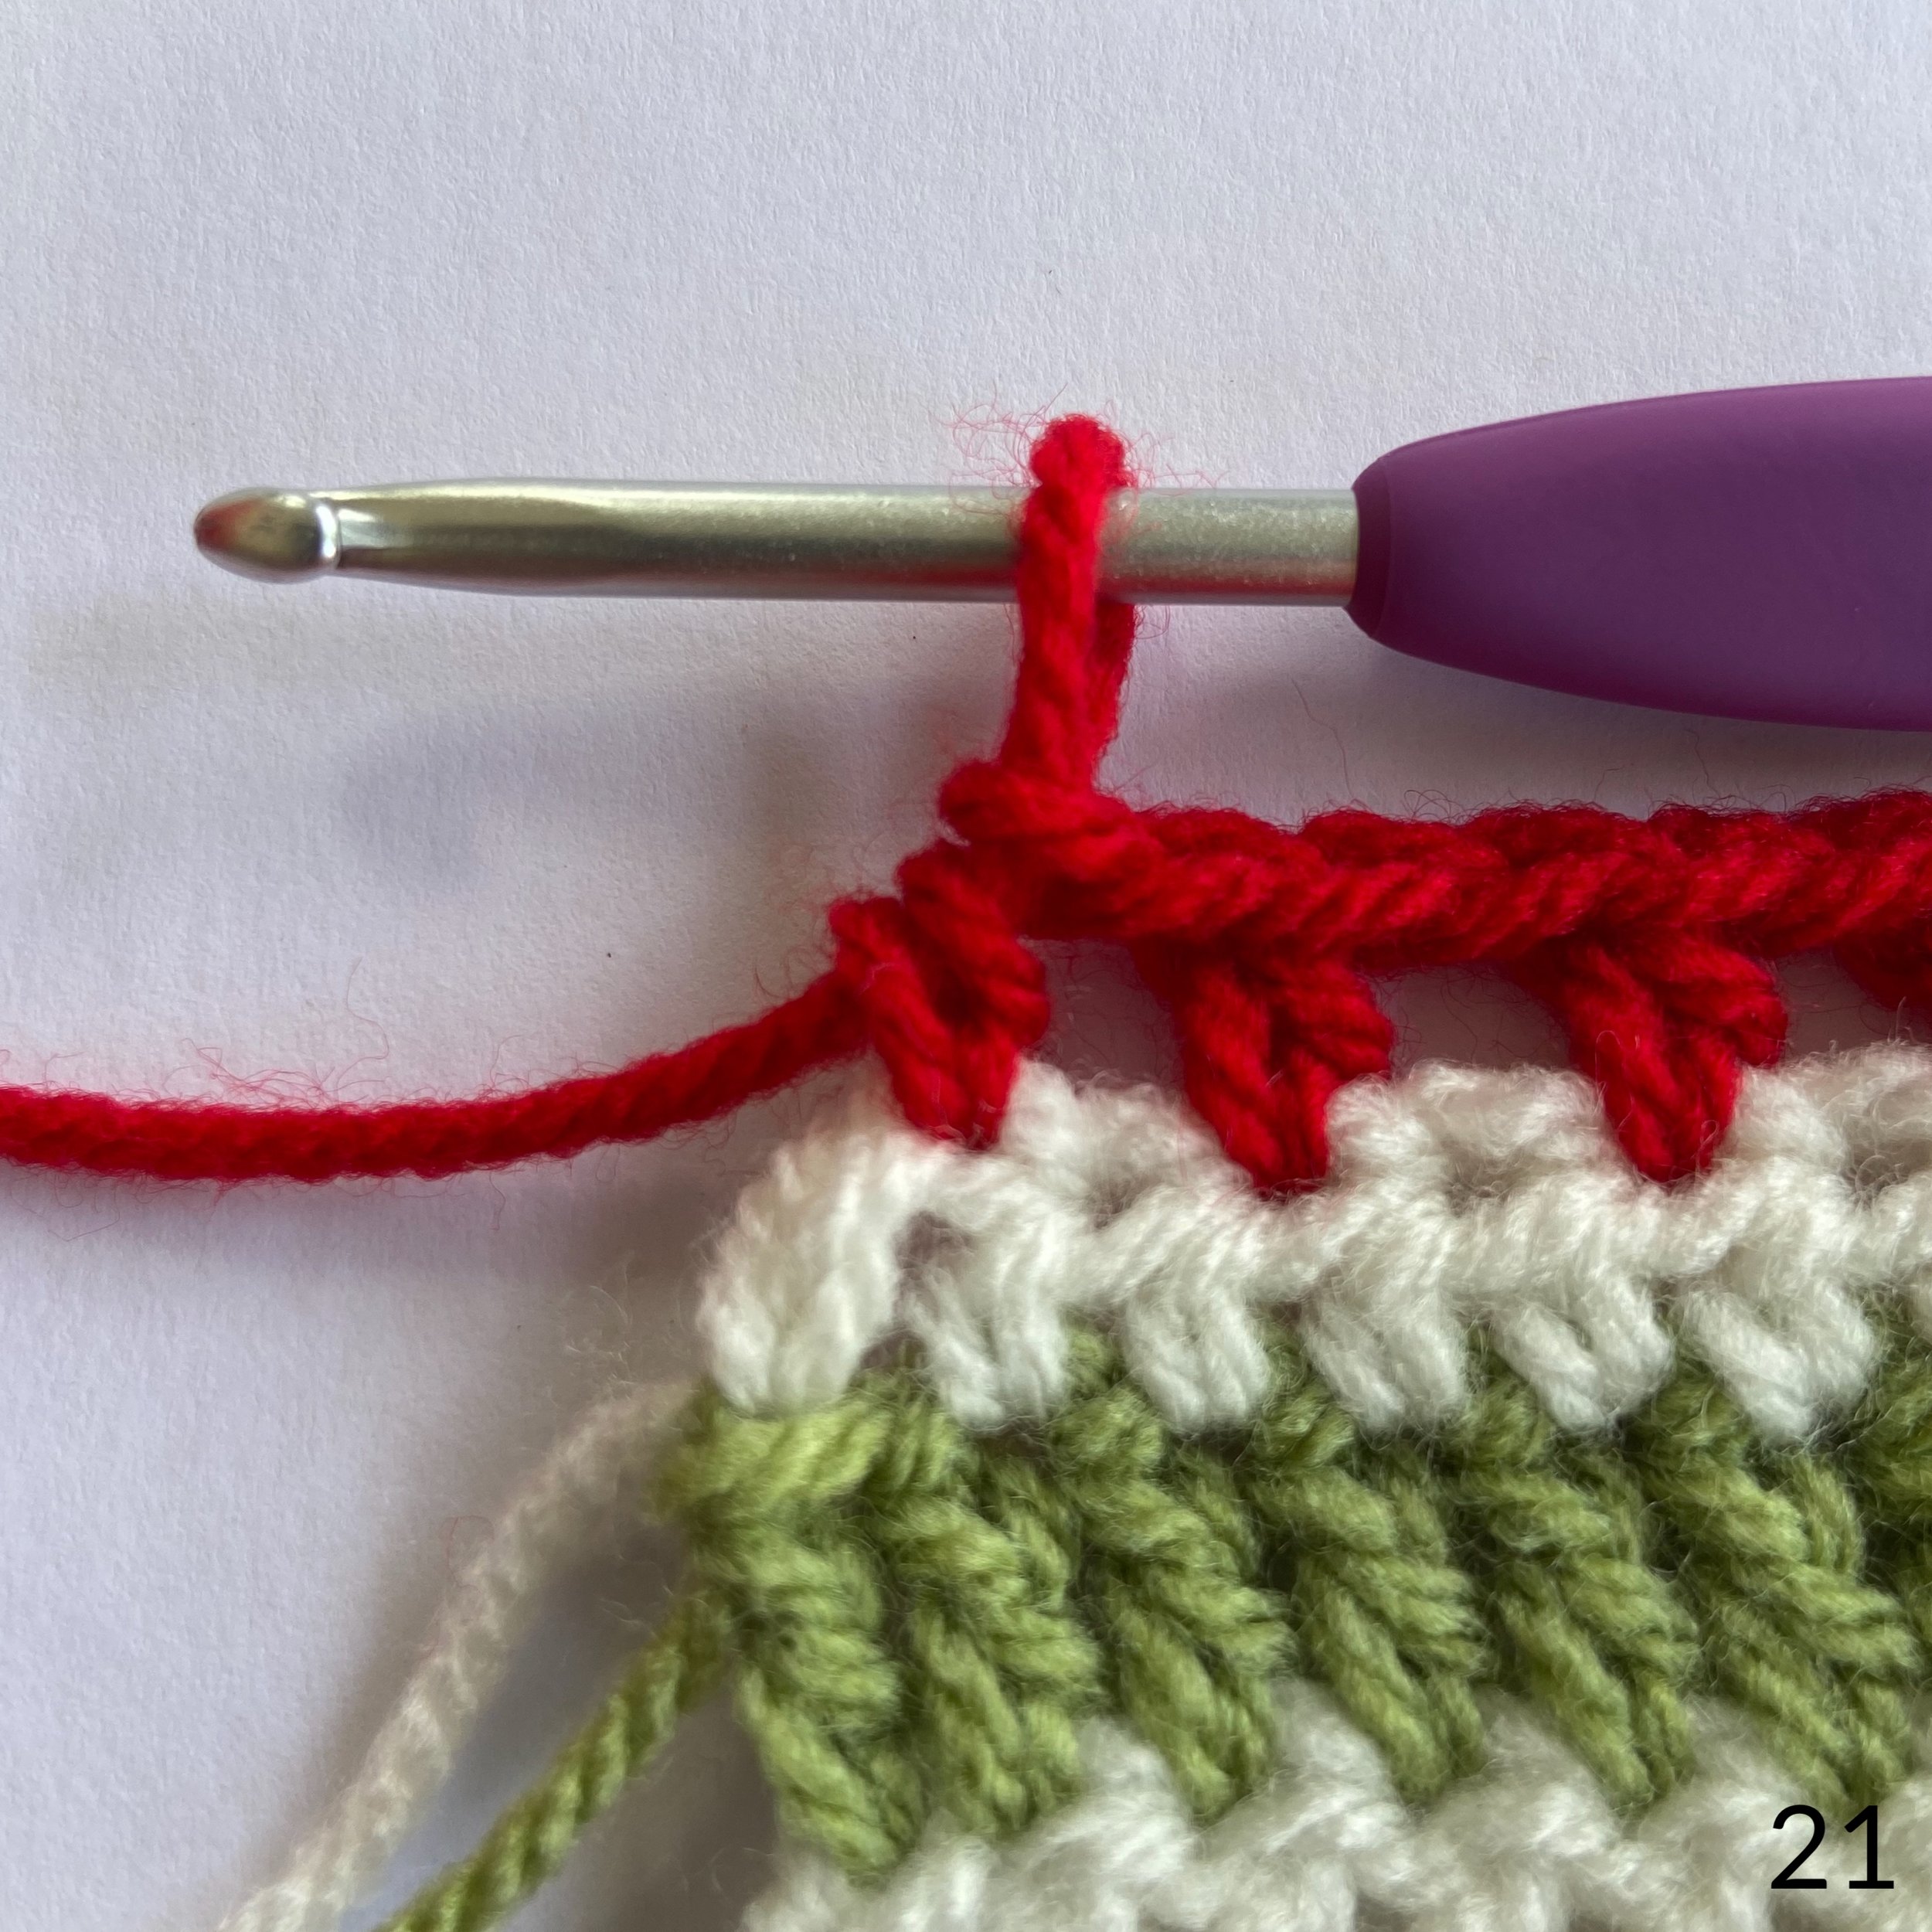
19. Row 14: Change to red and 3 ch. (Counts as first htr and 1 ch).
19 & 20. Sk 2 sts, 1 htr in next st. * 1 ch, sk 1 st, 1 htr in next st *
Repeat from * to * until 1 st remains. The needle in 19 shows you where the first htr goes.
Repeat from * to * just means you repeat whatever is inside the asterisks.
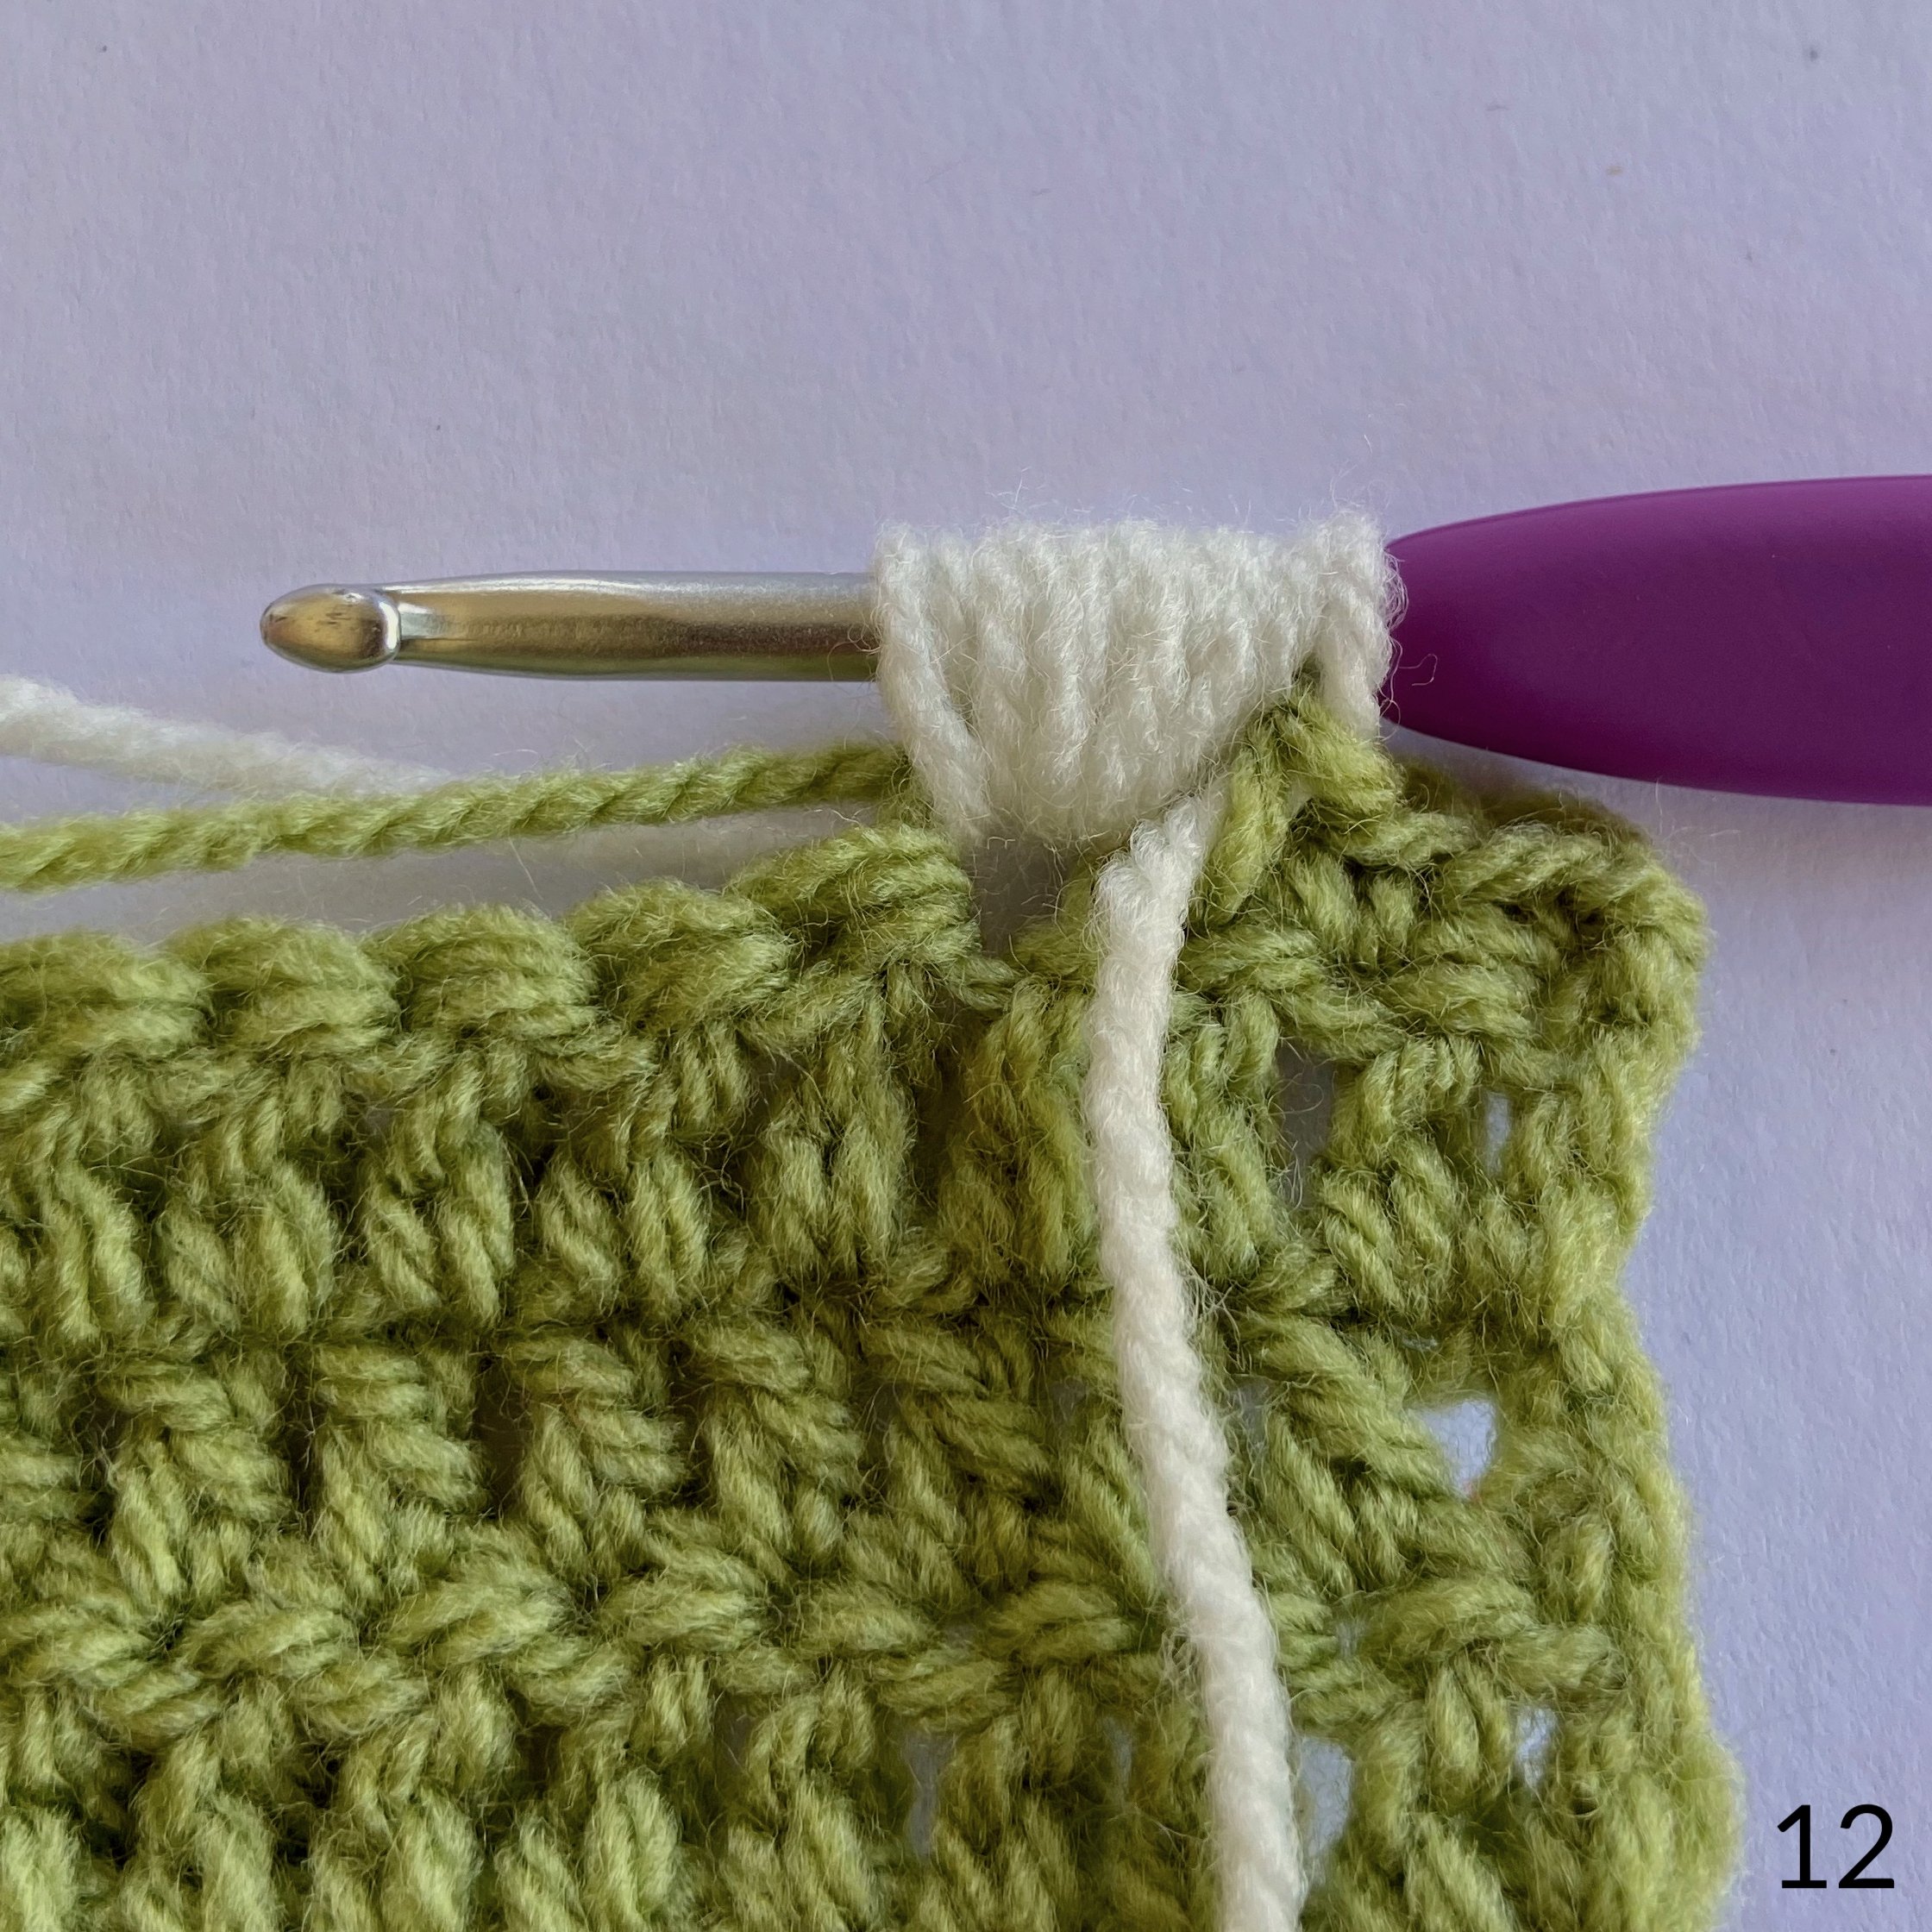
21. Fasten off. Do not turn.

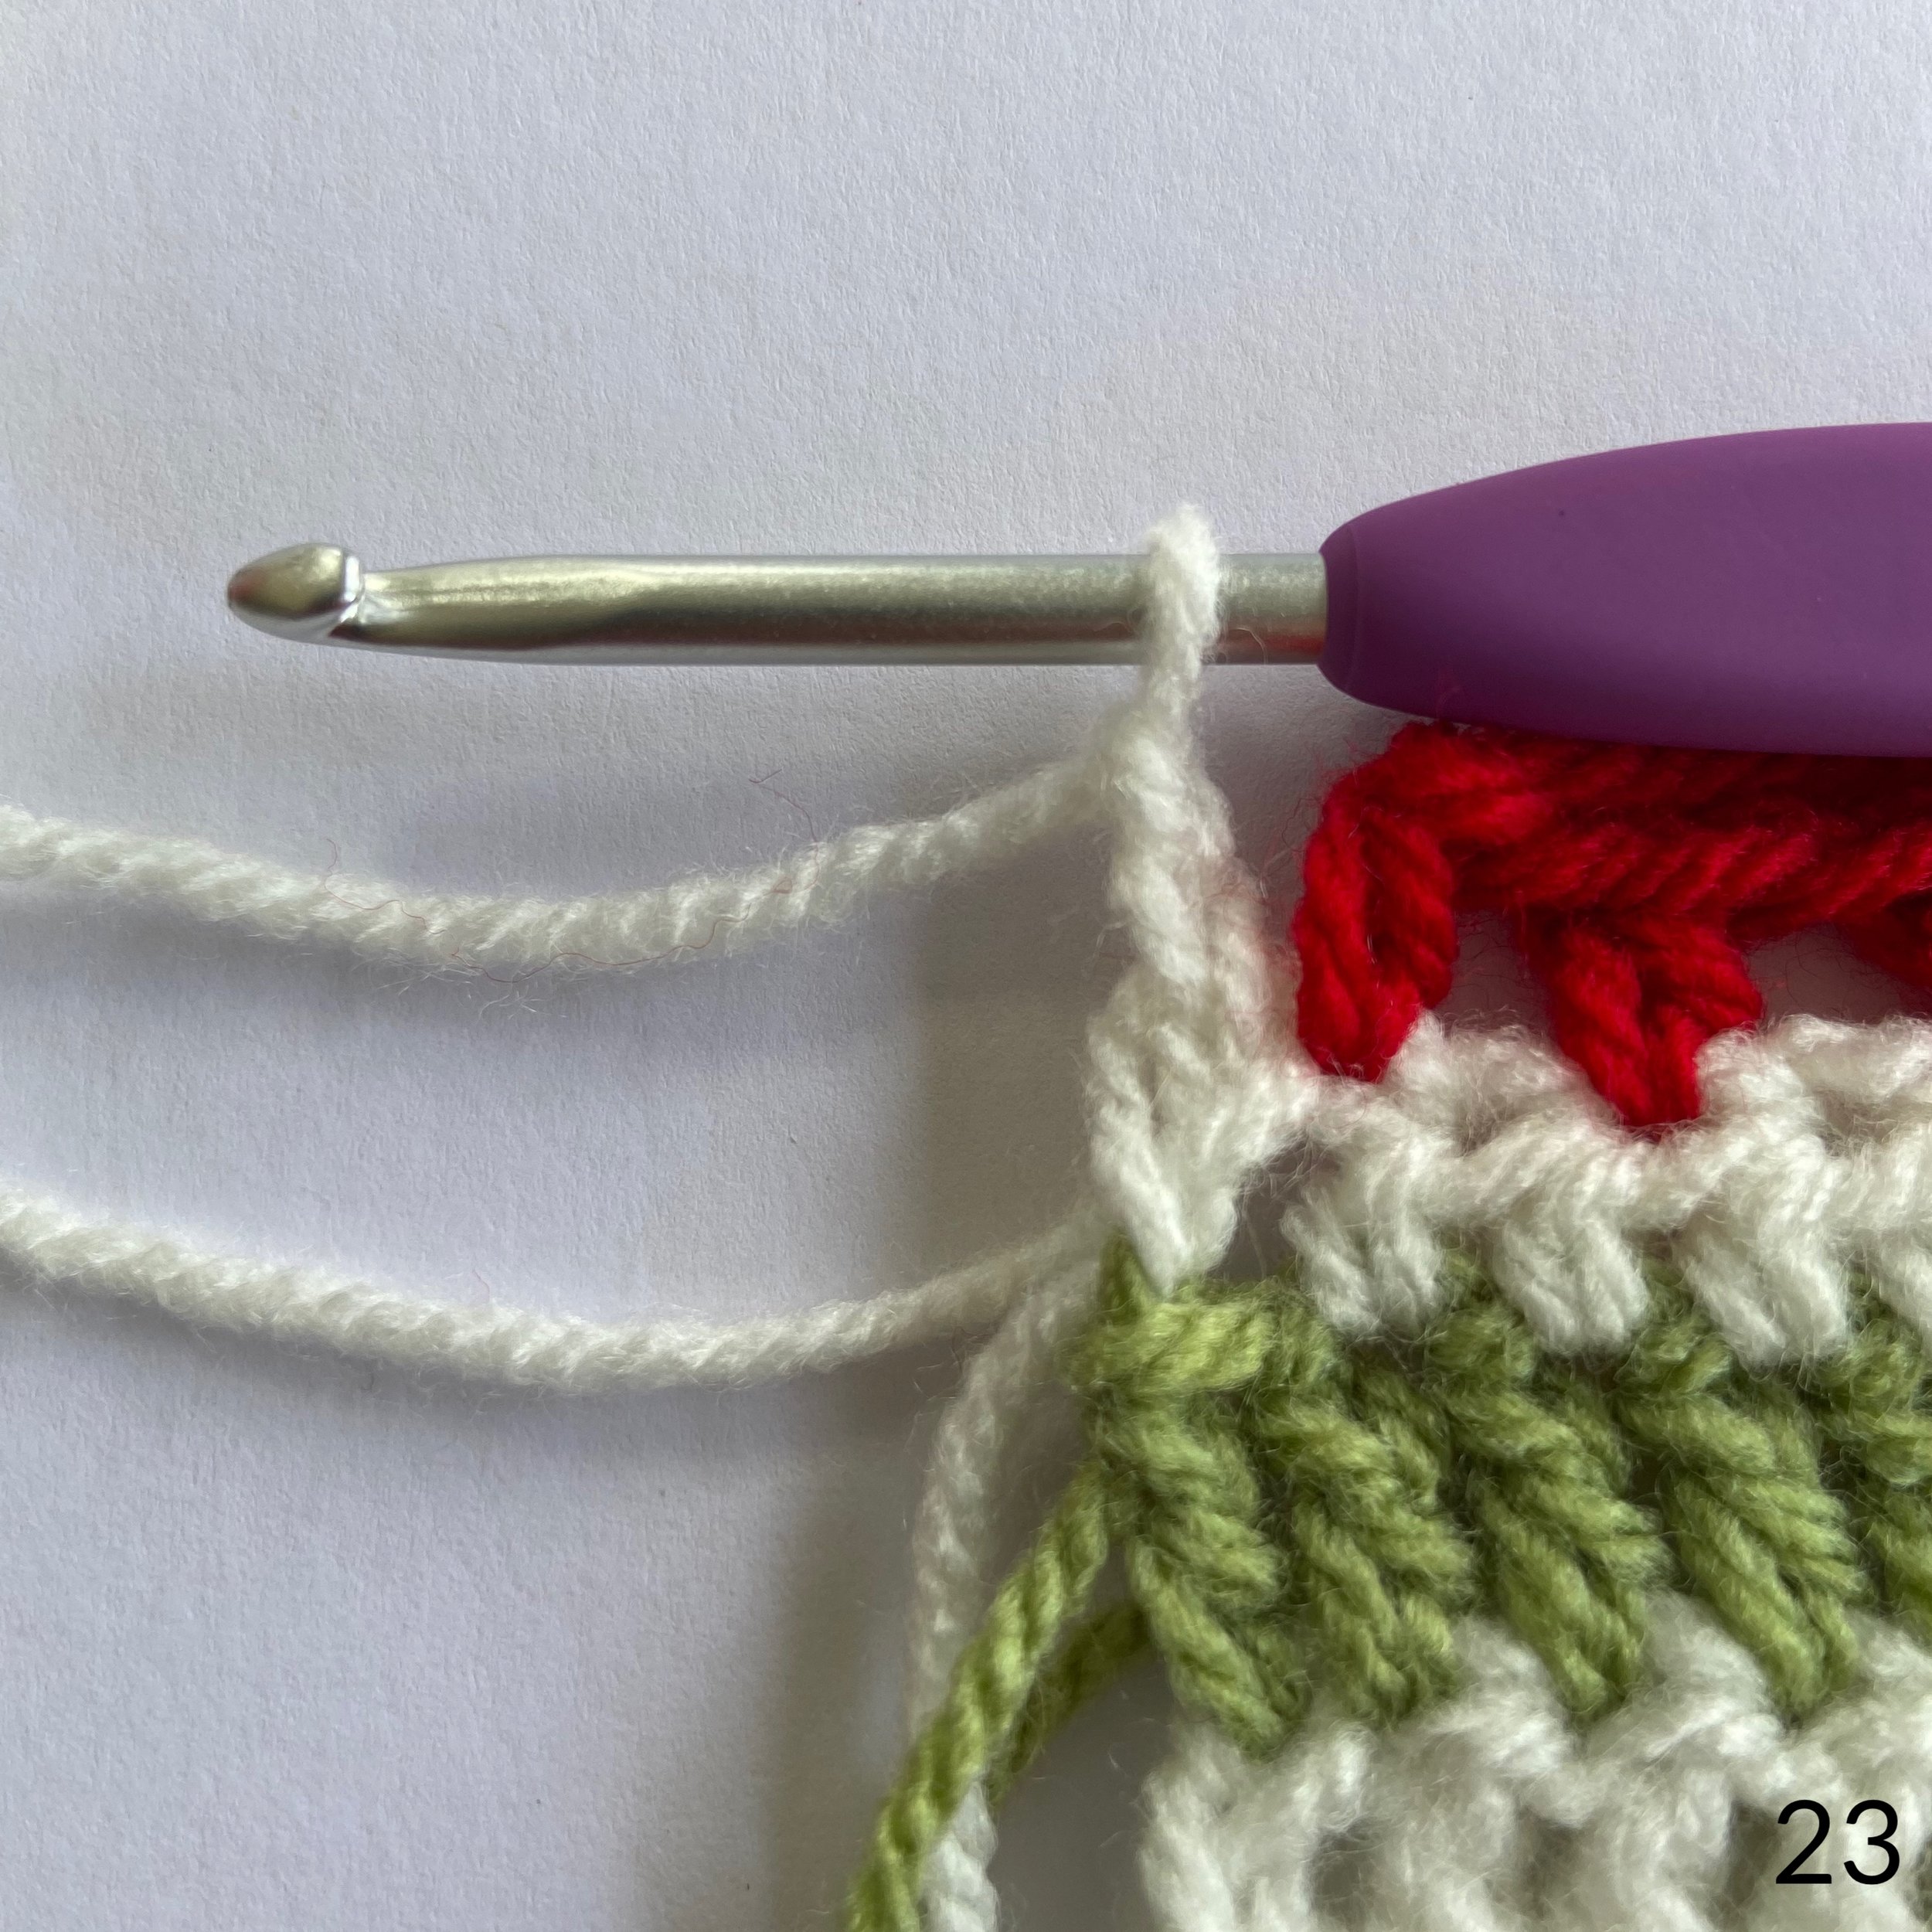


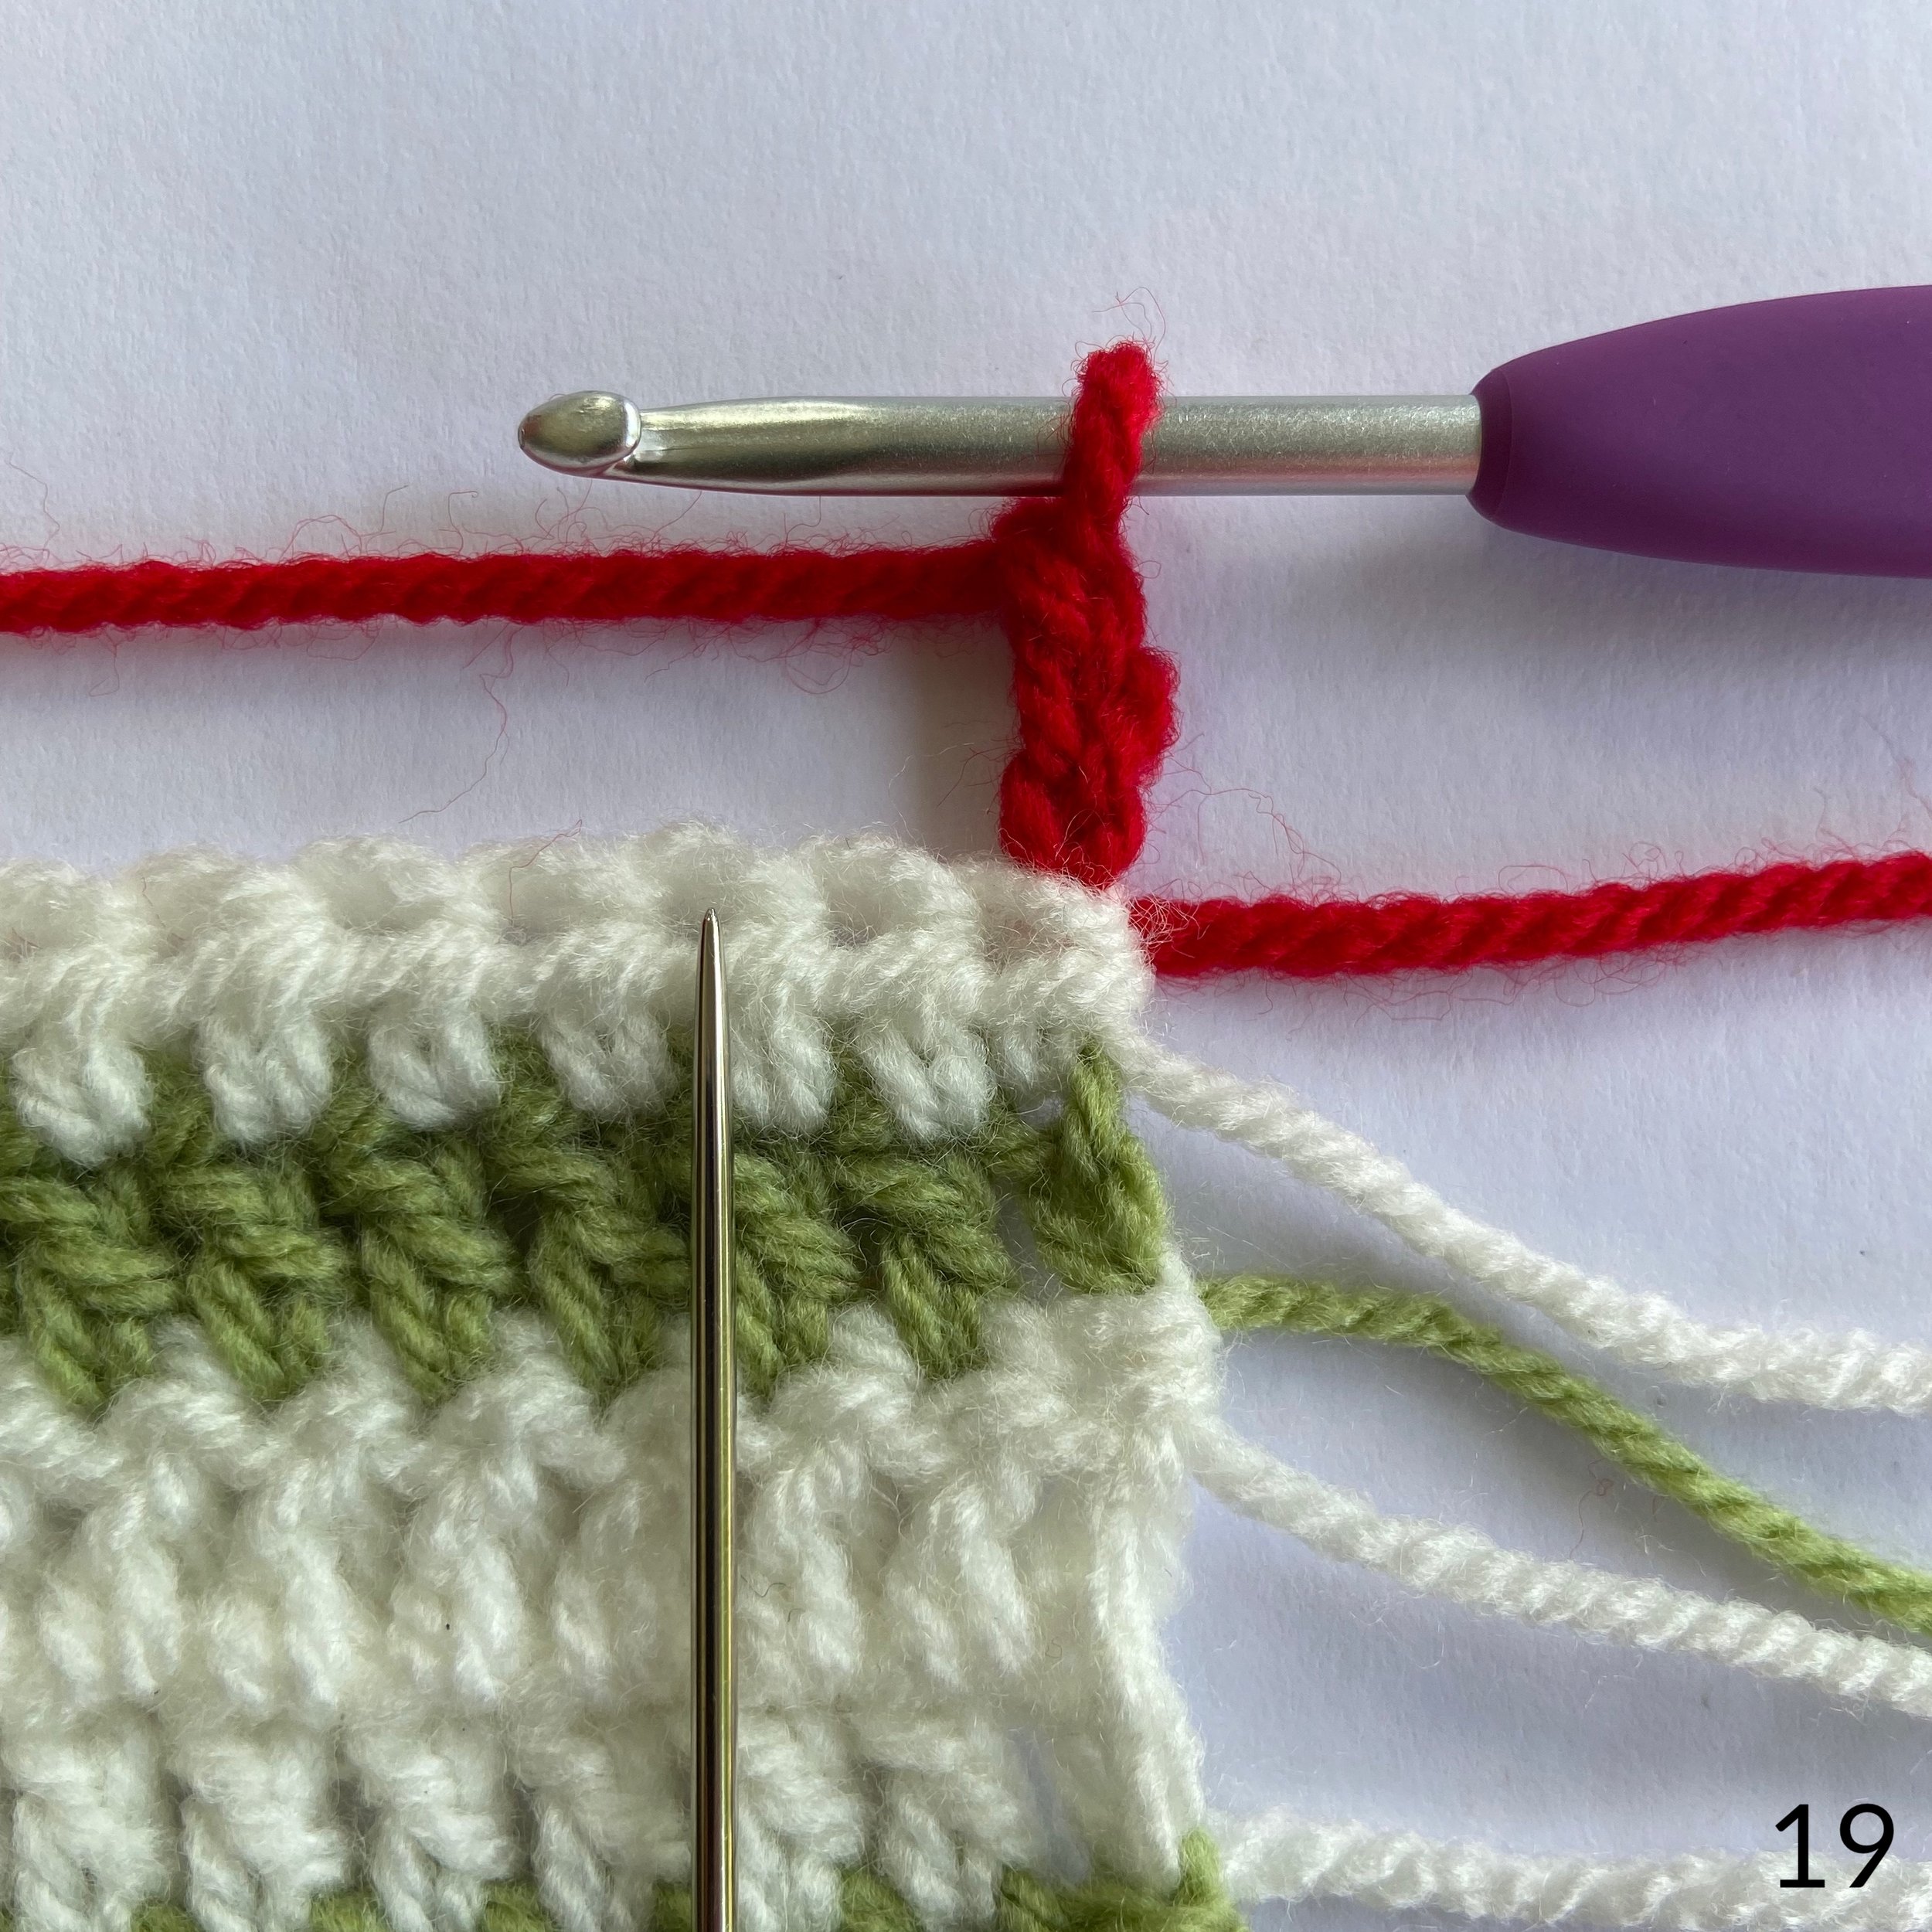
22 & 23. Row 15: Join cream in the last stitch of row 14 and 2 ch. (This is the starting 2 ch, so place your stitch in the second chain up.)
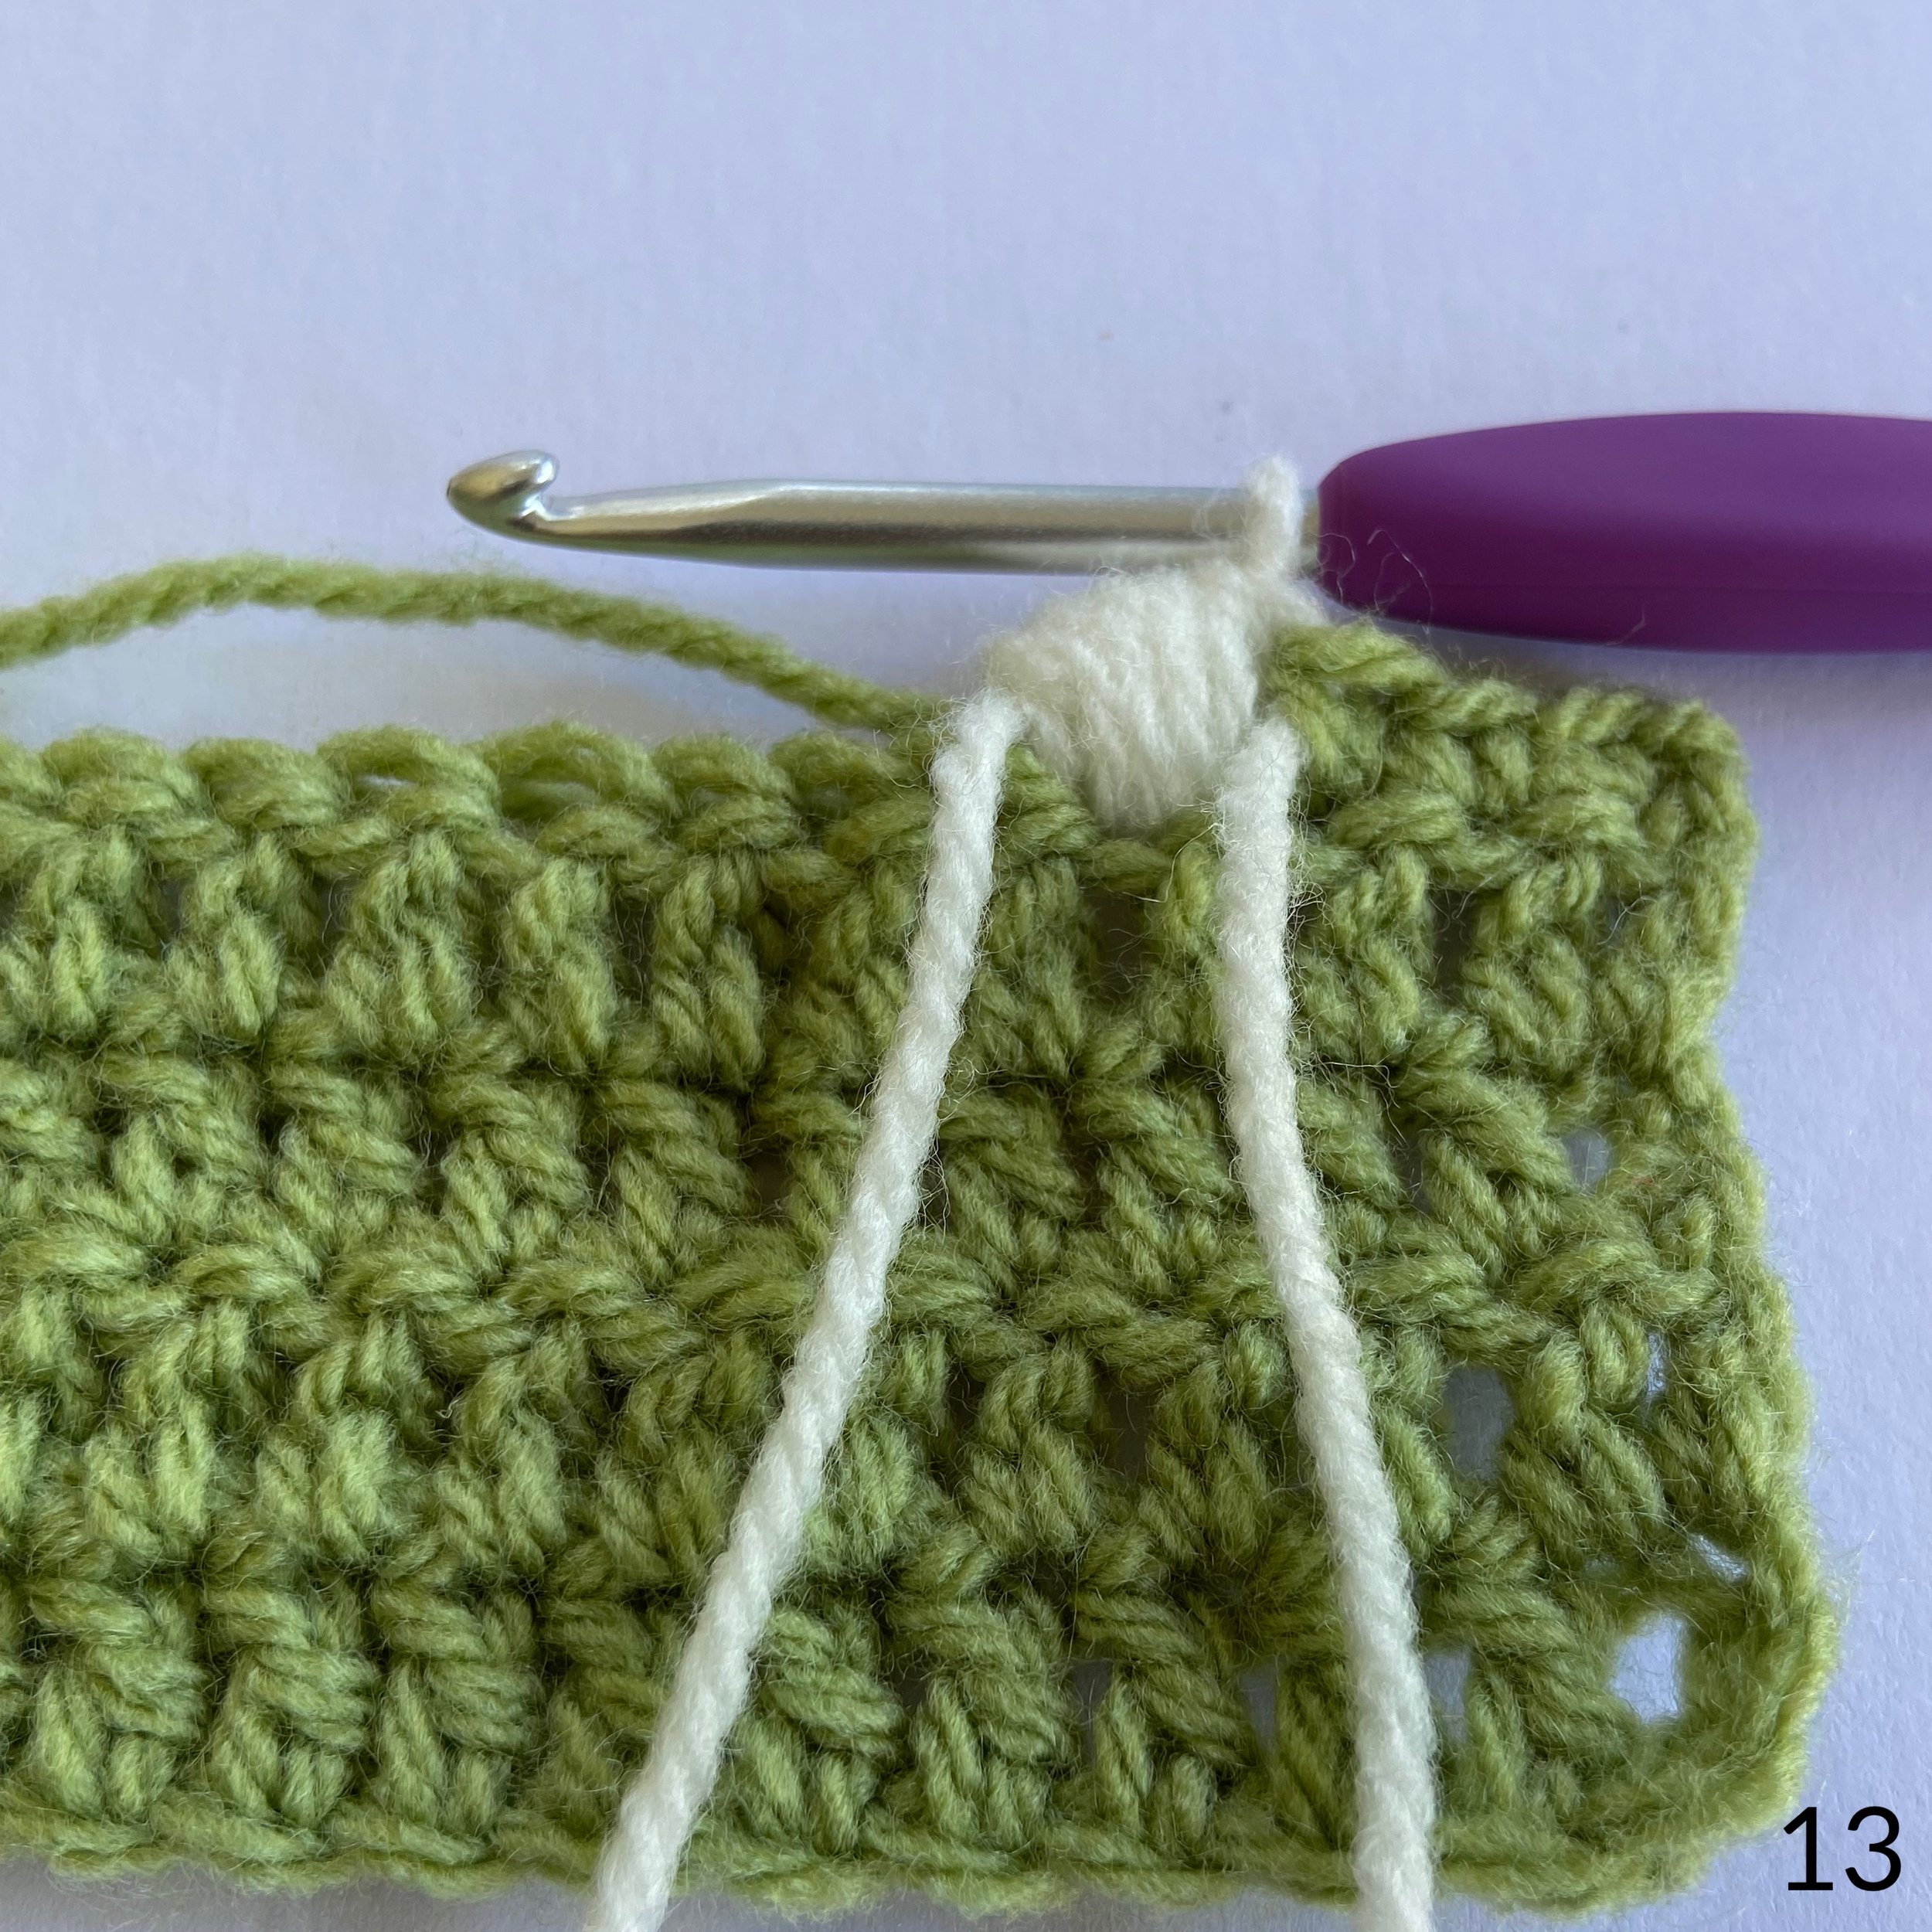
24 & 25. Now turn. * 1 htr in the top of the red htr in row 14. (The needle shows you where to place the stitch.)
26. 1 tr in the skipped htr in row 13 *.
27. Repeat from * to * until 1 red htr remains. 1 htr in this stitch. This htr is actually the starting 3 ch you made. Place your stitch in the second chain up. You can see this more clearly if you zoom in on the picture.
From now on, I will refer to this as Candy Cane stripe and note the colour used for each of the 3 rows.
Now is a good time to sew in your ends to save a big job when you have finished.
Section 2 - Snowflakes

In this section of the blanket you will be working the snowflakes from a chart. The chart makes up rows 16 - 40 of the blanket. To avoid confusion, I will refer to the rows worked from the chart as chart row 1, chart row 2 etc.
Reading charts
Don’t worry about the charts. They are easy to follow once you know how. To make the chart even easier to follow I have made it in the colours the stitches will be worked in. The charts show 1 repeat of the pattern, and you will work the chart multiple times across the width of the blanket. The pattern will tell you how many repeats to work.
You read the chart starting in the bottom right corner at no. 1. Each square represents one double crochet . Odd numbered rows are the front of your blanket and are worked from right to left. Even numbered rows are the back of your blanket and are worked from left to right.
If the pattern says ‘work 5 repeats’ of the chart, you will work row 1, five times across the width of the blanket before moving on to row two etc.

Let’s take a closer look at the snowflake chart. The numbers along the bottom are the stitch numbers. The vertical numbers are the row numbers. We are going to start at stitch 1, row 1 in the bottom right hand corner and work from right to left. In this blanket we will be working 5 repeats of the pattern. Row 1 is 30 red dc, so work it 5 times and you will have worked 150 red dc in all.
Here is the full snowflake chart for the blanket.

Note that this chart is not completely symmetrical. There is one more column of red stitches on the right than on the left. You just need to be aware of this and make sure that you are counting stitches from the correct side of the chart. (odd or even row)
Every row of the chart is dc.
The 1 ch at the start of each row DOES NOT count as a stitch. Always place your 1st dc in the first stitch of the row.
I have changed to a 4.5mm hook for this section to keep tension even and edges straight and even without any pulling. Try not to pull your carried yarn too tight.


1 . Chart row 1: Join red in the first stitch and 1 ch. Work row 1 of the chart 5 times. Turn. [150 dc]
So, you will work 30 red dc 5 times, making 150 dc in total.
Chart row 2: 1 ch, work row 2 of the chart 5 times. Turn.
So, you will work 30 red dc 5 times, making 150 dc in total.
2. Chart row 3: This row has red and cream stitches. We are reading from right to left, so, to start, there are 10 stitches followed by 1 cream stitch. Work 9 red dc and then complete the 10th red dc by pulling through a loop of cream to change colours.
3. Insert your hook into the next stitch and pull up a loop of cream. You can see in the picture that I have inserted the hook under the red yarn. This will trap the yarn inside the stitch so that it can’t be seen from either side. This hidden yarn is called the ‘carried ‘ yarn. It’s a good idea to keep an eye on both sides to make sure the carried yarn is hidden and there are no loops sticking out. You can pull gently to ease them back inside the stitches.
4. Because there is only one cream stitch, change back to red by pulling red through the cream stitch on the hook.
5. This picture shows the cream stitch completed with red.
To prevent your yarns from twisting together, always keep the red yarn to the front and the cream yarn to the back.
6. Complete the row by continuing to follow the chart, remembering to:
- Work over the carried yarn.
- Always change colours in the last pull through of the previous stitch.
- Keep red yarn to the front and cream yarn to the back to prevent twisting.


7. Carry the cream yarn along to the end of the row.
8. Chart row 4: When you turn to start the row, keep the cream yarn to the back and continue to work over it until you need it. Follow the chart, changing colours as required.
Chart rows 5 - 25: Continue following the chart, changing colours as required. Cut the cream yarn at the end of row 12. Join green in row 13. Cut green and join cream in row 14. Cut cream at the end of row 23.
That’s rows 16 - 40 complete. Now we will go back to the regular row numbers.
Rows 41 - 43: Change back to 4mm hook. Candy Cane stripe (same as rows 13 - 15)
Row 41: Cream
Row 42: Red
Row 43: Cream
Row 44: Change to green. 2 ch, sk the first stitch and 1 tr in each st across.
Row 45 & 46: Change to cream. 2 ch, sk the first stitch and 1 tr in each st across.
Section 3 - Gingerbread People

Rows 47 - 49: Candy Cane Stripe
Row 47: Red
Row 48: Cream
Row 49: Red
The next section is the gingerbread people and is worked from the chart below. The chart has 39 rows and makes up rows 50 - 88 of the blanket.
The method for working the chart is the same as the snowflakes in the previous section.
Use a 4.5mm hook and the cream and beige yarn.
When changing colours, keep the cream yarn to the front and the beige yarn to the back to prevent them twisting together.
Work five repeats of the pattern. Check your stitch count is 150 at the end of the first row of the chart before moving on. This is much quicker than pulling out loads of stitches if you’ve missed one somewhere.

Rows 89 - 91: Change back to 4mm hook. Candy Cane stripe.
Row 89: Red
Row 90: Cream
Row 91: Red
Section 4 - Father Christmas Hats

Row 92 & 93: Change to cream. 2 ch, sk the first st and 1 tr in each st across.
Row 94 & 95: Change to red. 2 ch, sk the first st and 1 tr in each st across.
Row 96: Bobble Row - (This row is the same as row 5)
Using red, 1ch * 3dc, make 1 bobble in cream * Repeat from * to * until 2 sts remain. 2dc in red.
Row 97: Using red, 1 tr in each st across. (Refer to row 6 for stitch placement).
Row 98: 2 ch, sk the first st and 1 tr in each st across.
Row 99 & 100: Change to cream. 2 ch, sk the first st and 1 tr in each st across.
Rows 101 - 103: Candy Cane stripe
Row 101: Red
Row 102: Cream
Row 103: Red
The next section is the Father Christmas hats and is worked from the chart below. The chart has 16 rows and makes up rows 104 - 119 of the blanket. The method for working the chart is the same as the snowflakes and gingerbread people in the previous sections.
Use a 4.5mm hook and the green, cream and red yarn.
When changing colours, keep the green yarn to the front and the cream or red yarn to the back to prevent them twisting together.
Work ten repeats of the pattern. Check your stitch count is 150 at the end of the first row of the chart before moving on.
In chart row 15, make 1 cream bobble on the top of each hat.

Rows 120 - 122: Change back to 4mm hook. Candy Cane stripe
Row 120: Red
Row 121: Cream
Row 122: Red

Section 5 - Snowflakes

Row 123 & 124: Change to cream. 2 ch, sk the first st and 1 tr in each st across.
Row 125: Change to green. 2 ch, sk first st and 1 tr in each st across.
Row 126 - 128: Candy Cane stripe
Row 126: Cream
Row 127: Red
Row 128: Cream
Rows 129 - 153: Using a 4.5mm hook, work five repeats of the snowflake chart.
Rows 154 - 157: Candy Cane stripe
Row 154: Cream
Row 156: Red
Row 157: Cream
Row 158: Change to green. 2 ch, sk the first st and 1 tr in each st across.
Rows 159 & 160: Change to cream. 2 ch, sk the first st and 1 tr in each st across.
Rows 161 - 164: Change to green. 2 ch, sk the first st and 1 tr in each st across.
Row 165: Bobble Row
Using green, 1ch * 3dc, make 1 bobble in cream * Repeat from * to * until 2 sts remain. 2 dc in green.
Rows 166 - 169: Using green, 2 ch, sk the first st and 1 tr in each st across.
Section 6 - Finishing, faces and border.
The last stage of the blanket is to bring the gingerbread people to life and add a border. I kept my people simple, but you could really go to town with crocheted buttons and bows.


1 . To make the faces easy to embroider, I have used the natural grid that appears when you work lines of double crochet. The white dots show the positions of the stitches.
2. Using the brown yarn and the yarn needle, pull the yarn through from back to front. Leave a tail to sew in later.
3. Make your first stitch.
4. Now make 7 more stitches, on top of one another to form the eye. As you make each stitch, try to encourage them to lay above and below your original stitch. Don’t pull them too tightly. This will give you a nice rounded eye shape.
5. Repeat for the other eye.
6. Now follow the dots to make the mouth. Make 2 stitches between each dot to give more definition to the mouth.
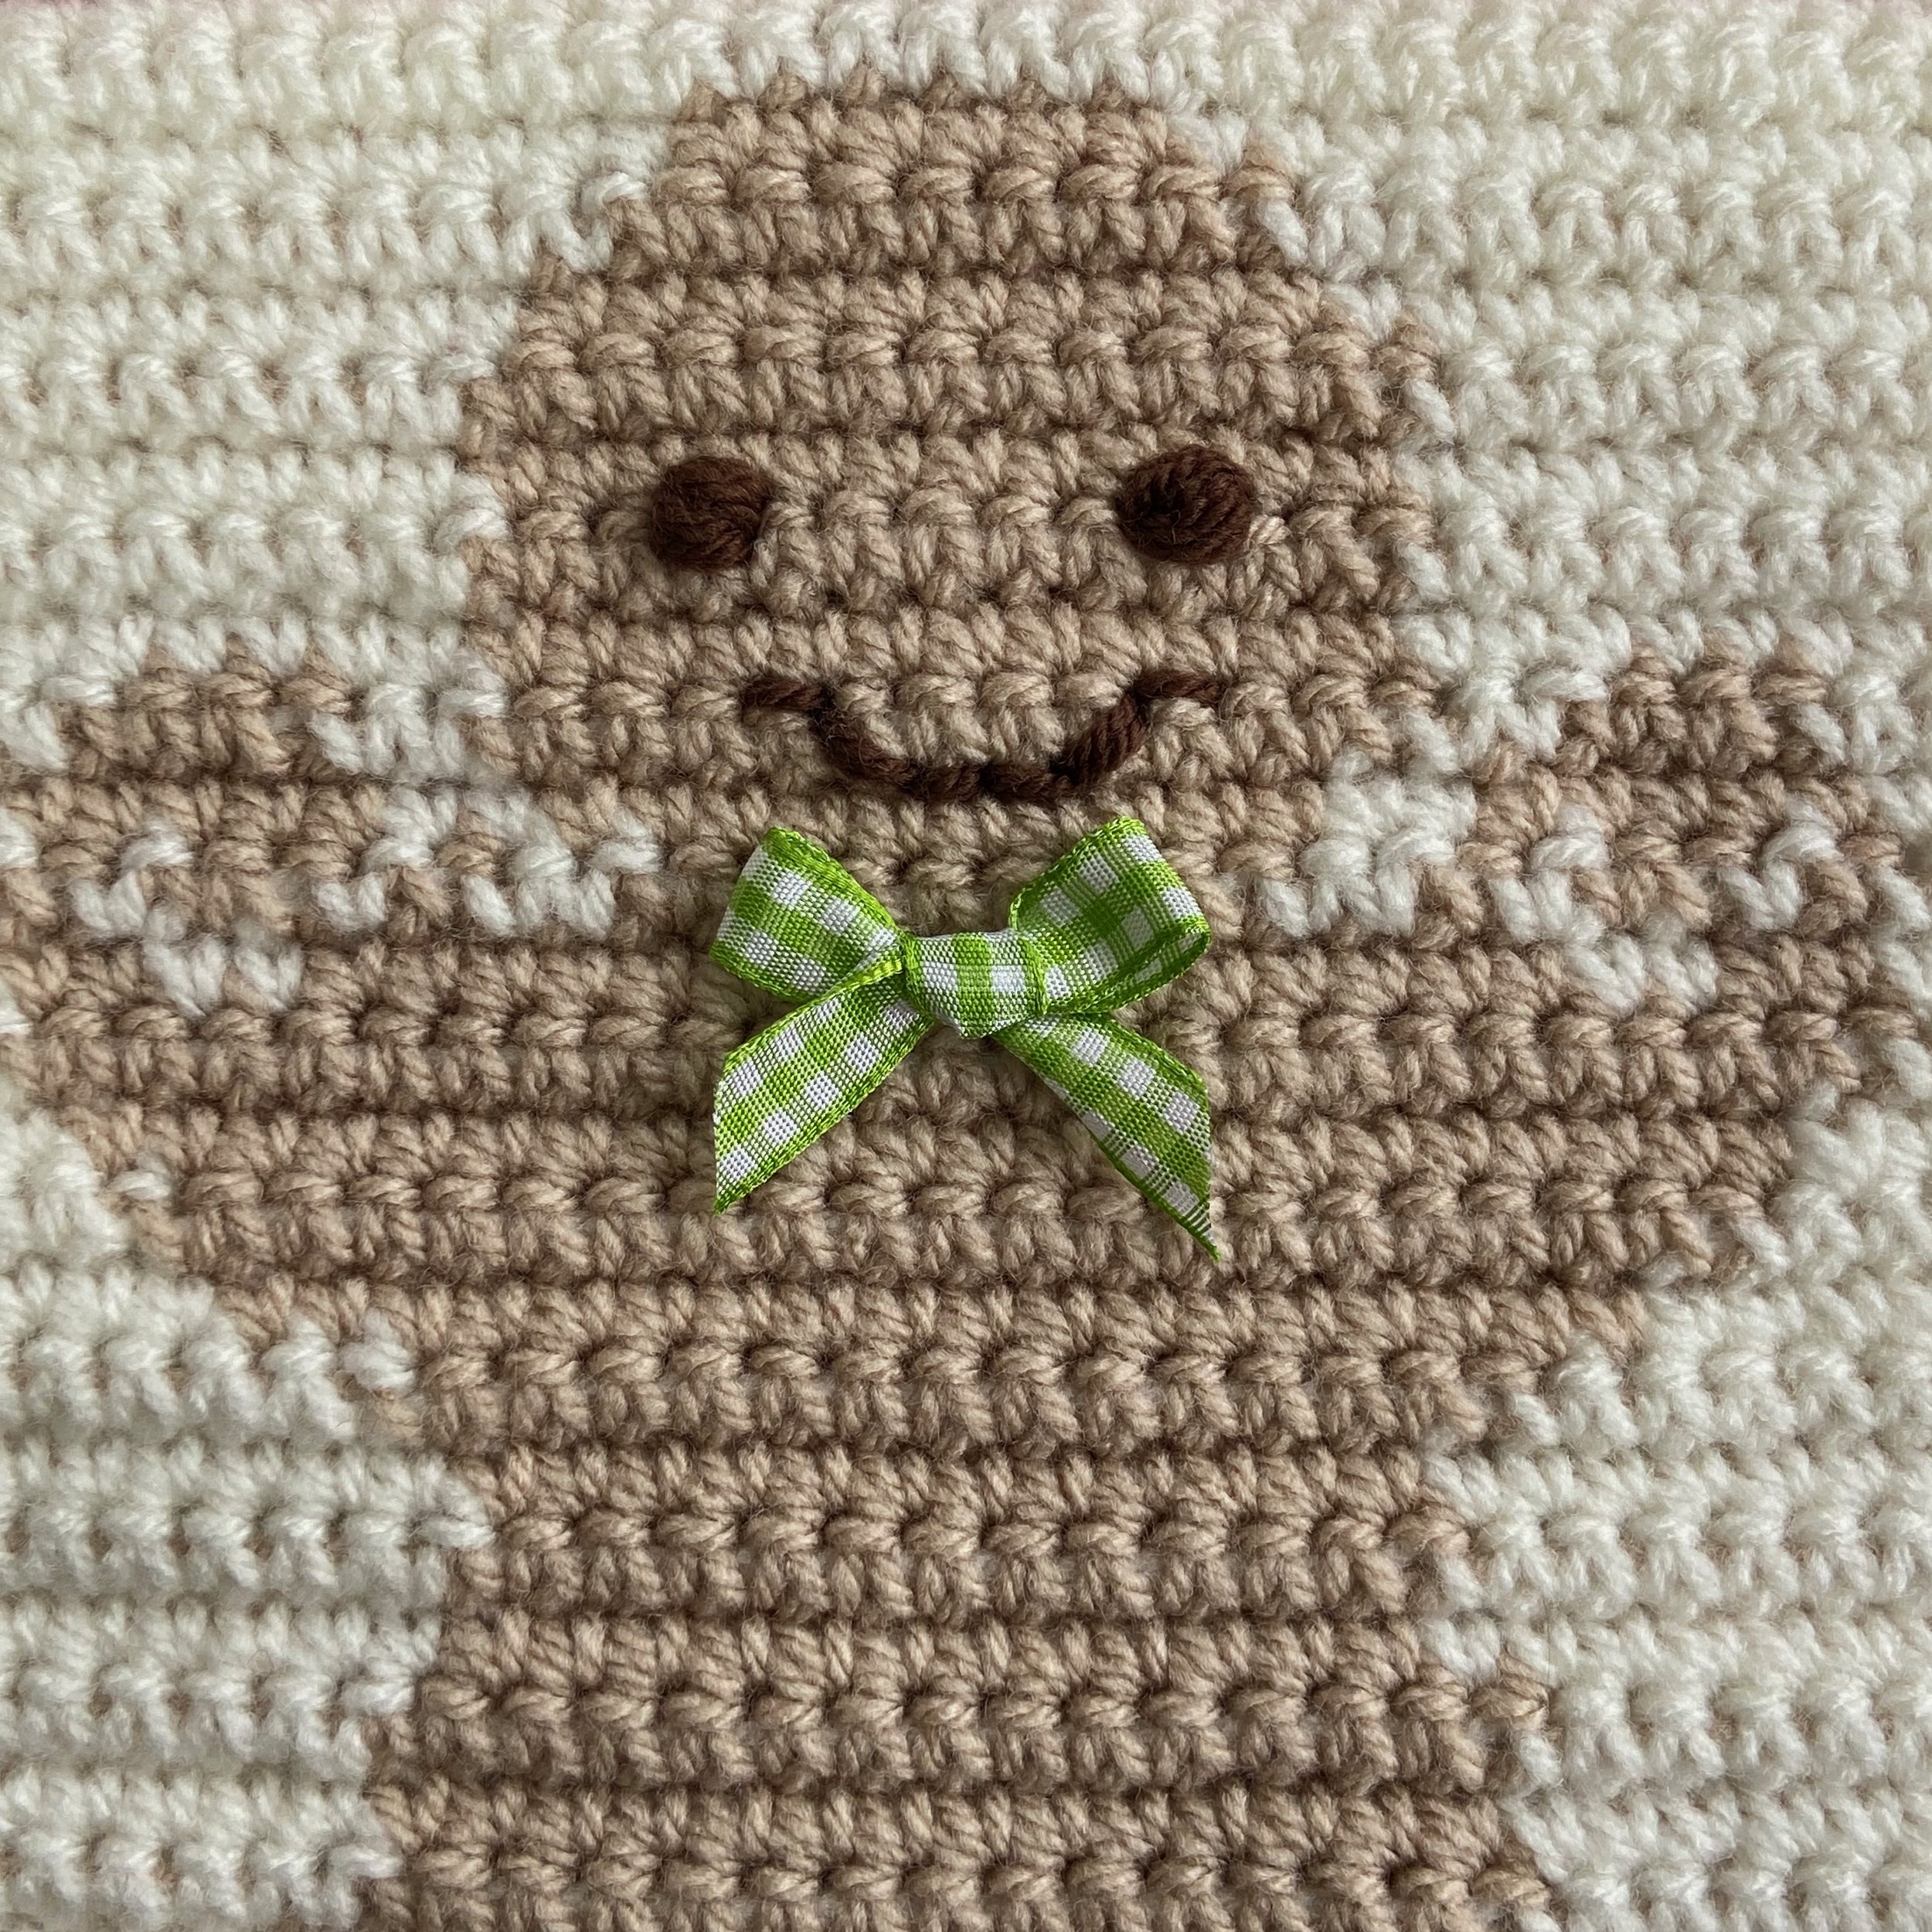
The bow ties are just little bows made from gingham ribbon. I sewed the bows with regular sewing thread to prevent them being undone by little hands and then sewed them securely to the blanket.
Border
Lastly, there is the border. As there is so much going on in the blanket, I’ve decided to keep it simple.

Using a 4mm hook, Join your cream yarn at any point on one of the short sides. Dc in each stitch until you reach a corner. 1dc, 2ch,1dc in the same stitch to turn the corner.
Now it’s time to tackle the long side. I have a very easy way to make sure you have the perfect number of evenly spaced stitches.
At the end of every treble crochet row, make 2 double crochets. If it’s a half treble row or a double crochet row, just make 1 double crochet.
This is the perfect amount of stitches to ensure your border lays flat and is completely straight. There’s no need to count stitches.
Work around the edge and slip stitch to join. I chain and dc in the same stitch. Work one more round in cream, making 1 dc in each stitch and 1dc, 2ch,1dc in the corner spaces.
Repeat in red.
Repeat in cream to finish off. Fasten off and sew in any remaining tails. Now is the time to add pom poms if you want to. I used a 2” pompom maker and all the leftover bits of yarn to make them.

I really hope you have enjoyed this pattern. I’m working on a printable PDF and I will be announcing more details about the October CAL soon. I’m very excited to make this again when the weather cools down!
If you have any questions or find any errors, please drop me an email at hello@madebyanita.co.uk
