
The Big Stashbuster Blanket
I make no secret of the fact that I love making granny squares. I also make no secret of the fact that I love buying yarn! But there comes a time when the piles (baskets, bags, boxes, drawers…) of leftover yarn become too big to ignore. This project will help you turn all of your bits and bobs into a blanket that will be both beautiful and satisfying.
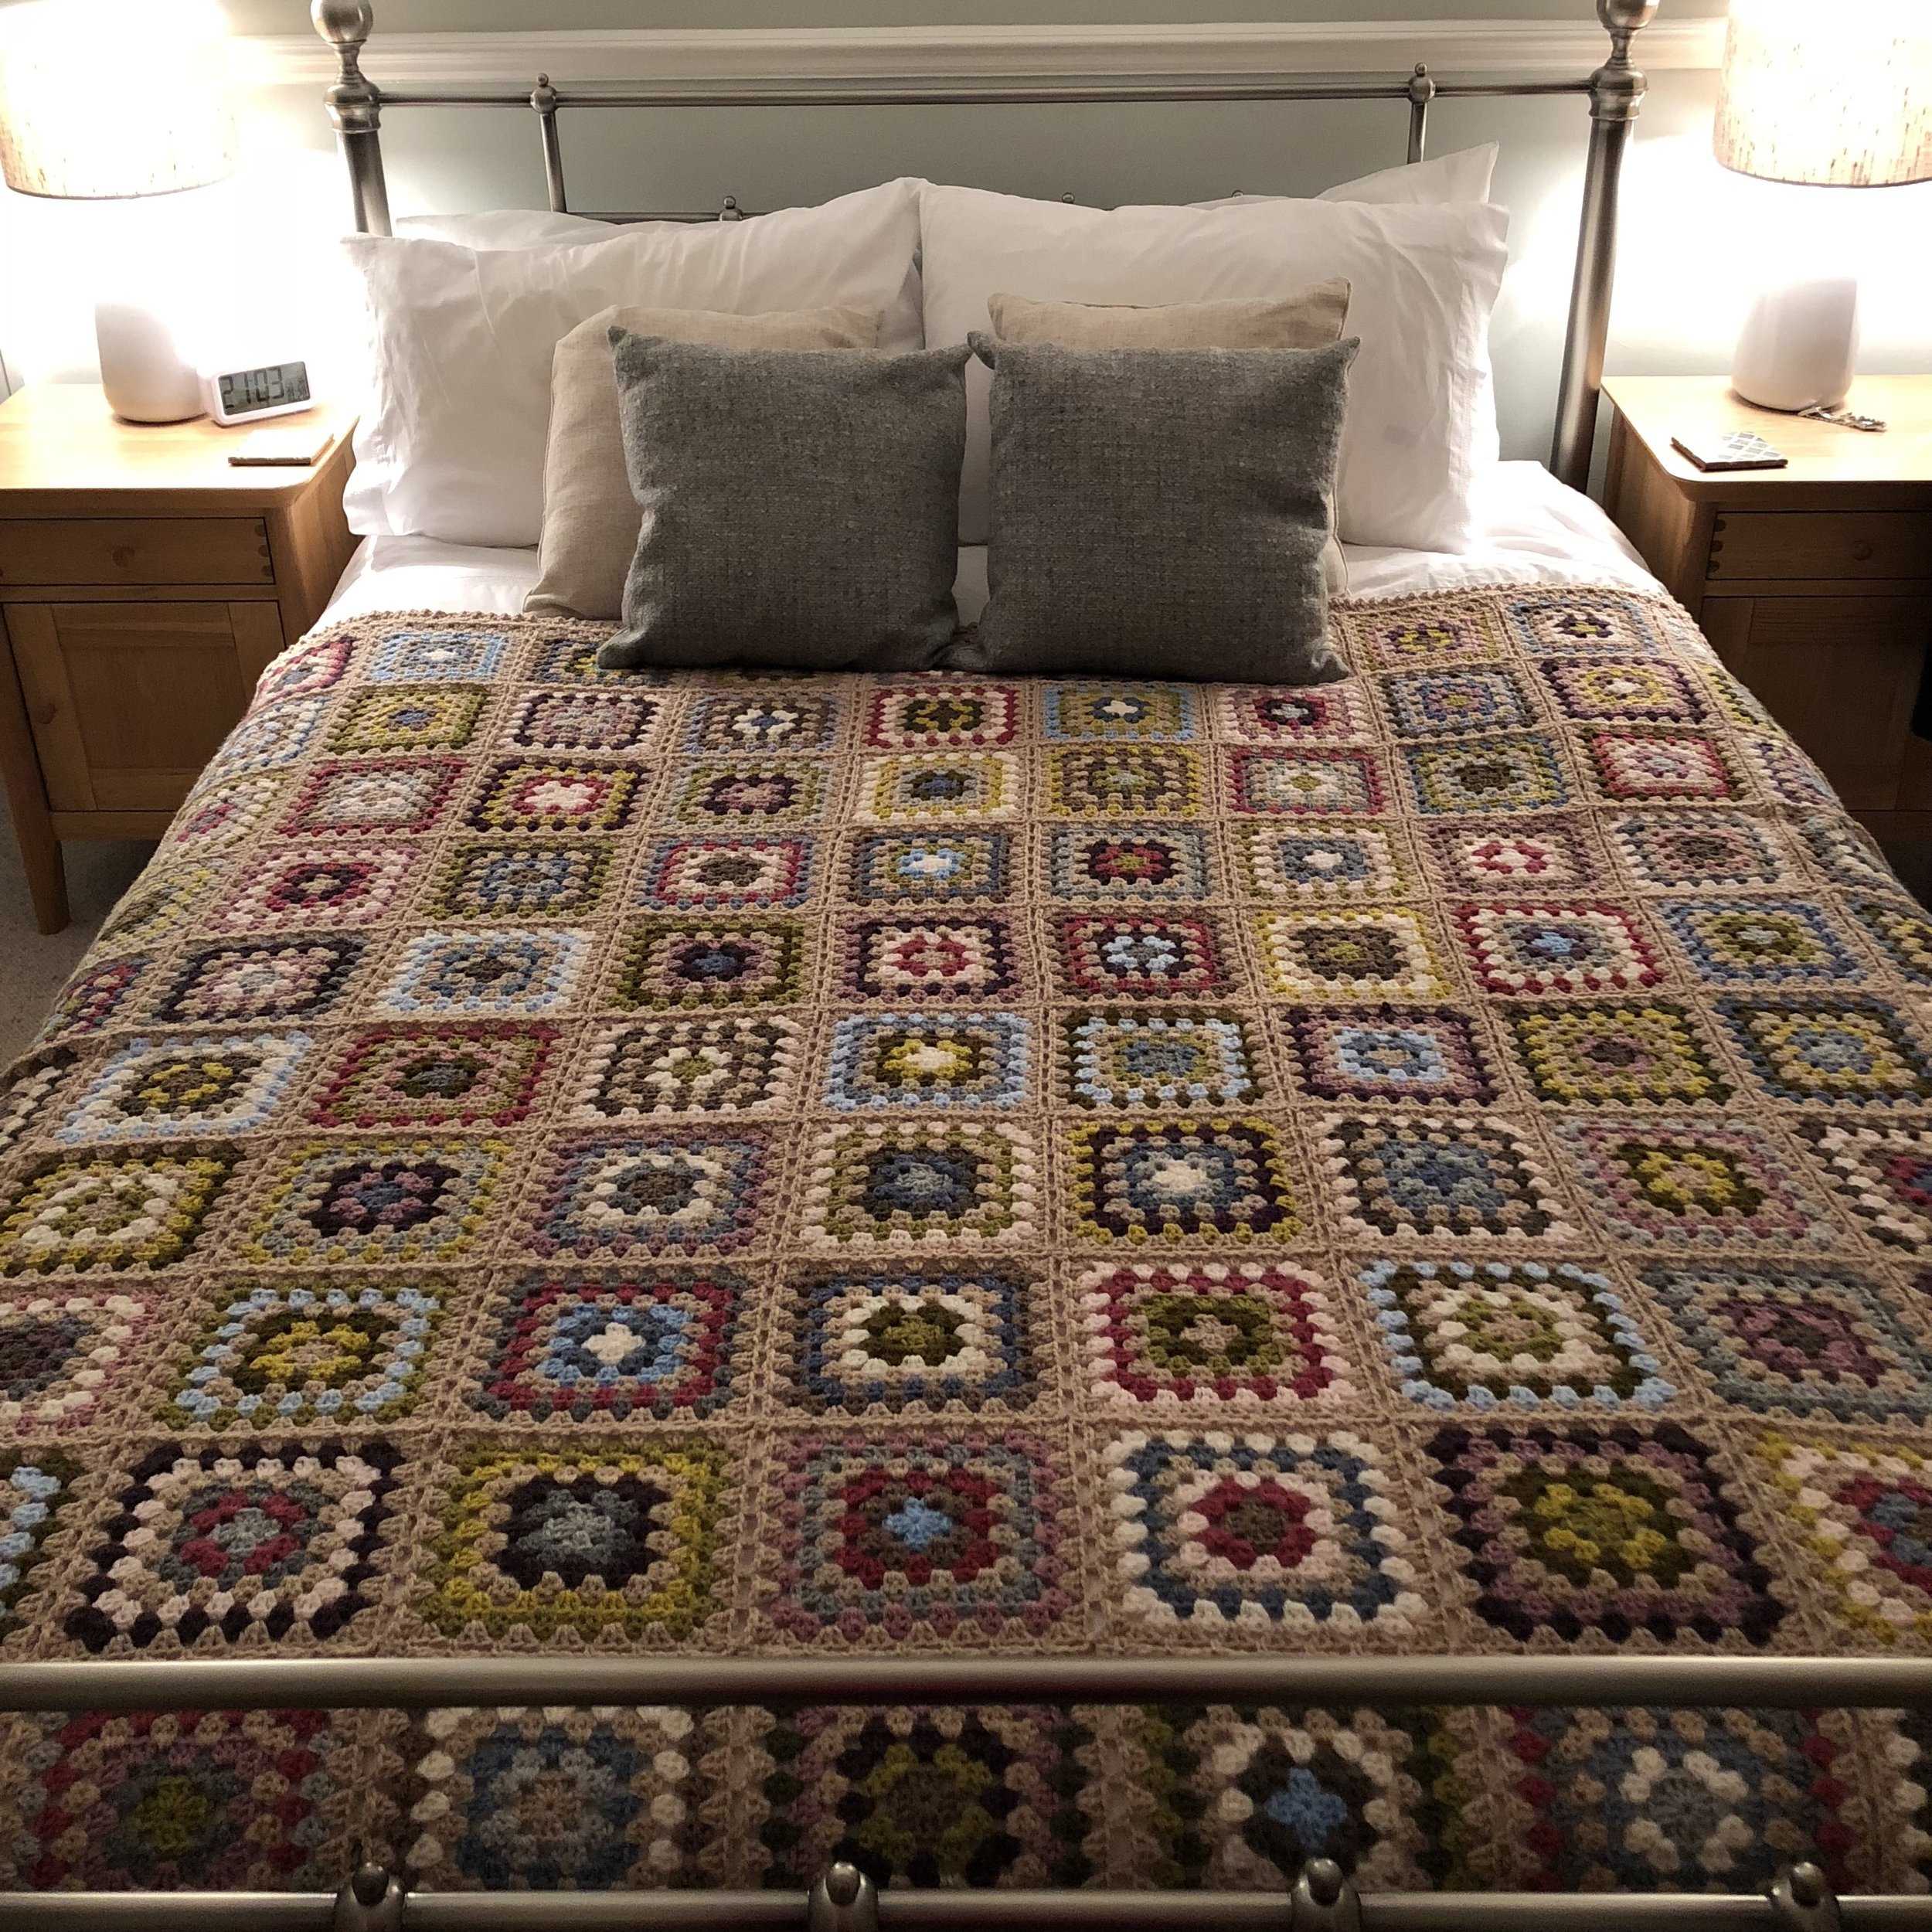
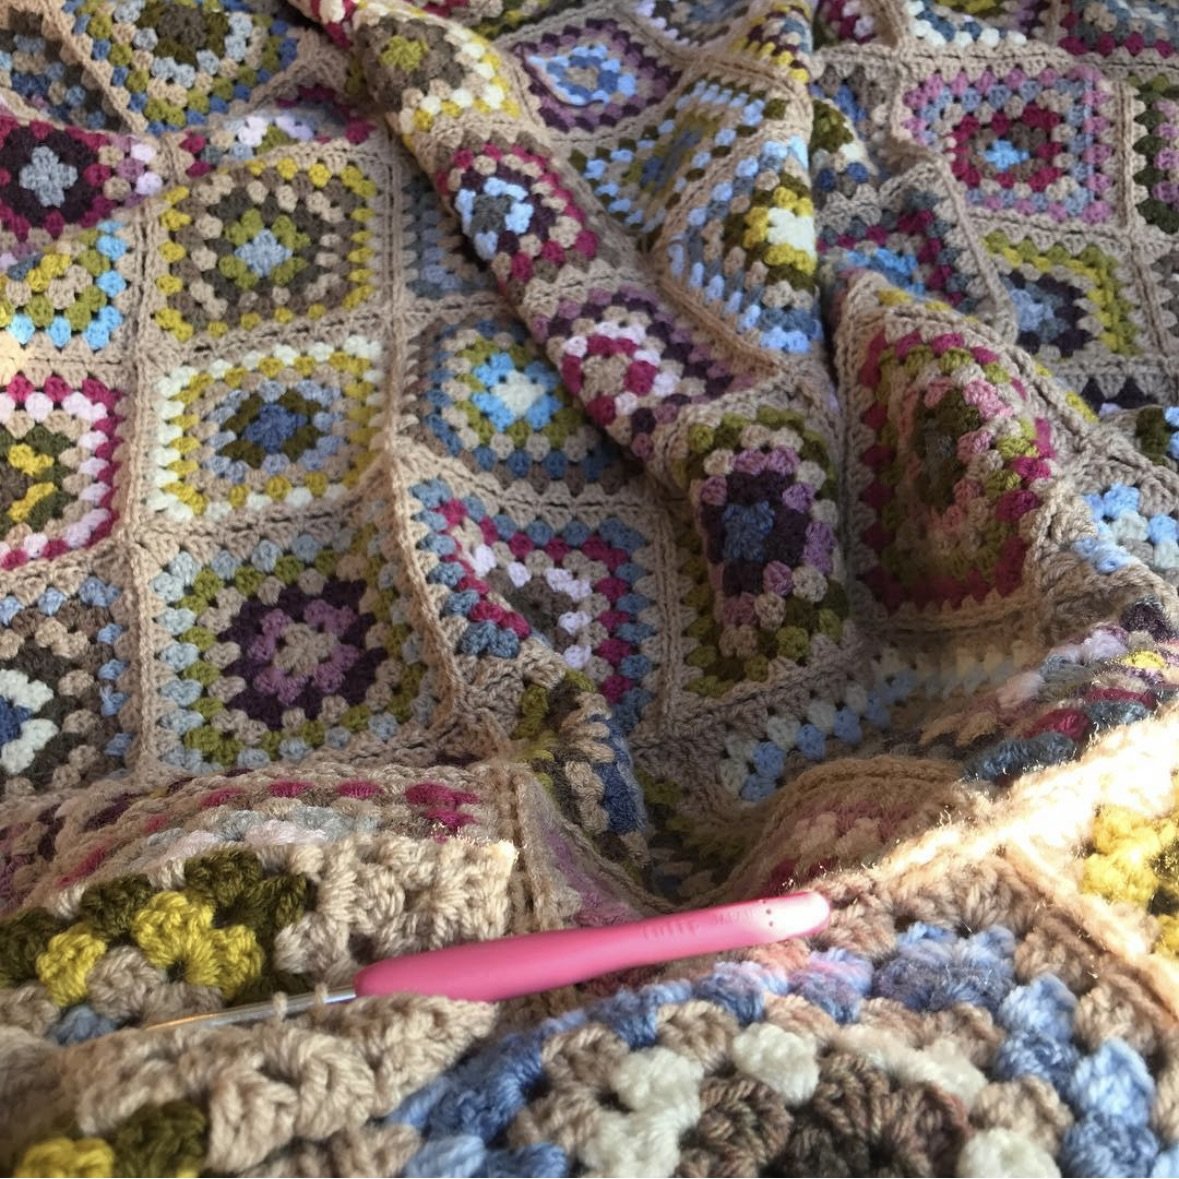
One of the blankets that I get the most questions about is pictured above. It doesn’t have a name, but lives in my head as ‘Big Blanket’. It’s made with 10 x 10, 7 round granny squares, joined with continuous join and finished with a simple border. The difficult question to answer is what yarn I used. It’s actually just a huge stash buster and made up of an assortment of different brands, mainly Sirdar Hayfield Bonus Dk, Stylecraft Special Dk and some King Cole and Cygnet. A lot of the Sirdar shades I used are sadly discontinued now. It’s mainly acrylic, but I used a scrap of 100% wool that I didn’t have washing instructions for. It disintegrated in the first wash meaning a repair job was needed. Fortunately it was only in a couple of squares, but lesson learned!
I don’t have “Big Blanket"‘ anymore as Nala loved it to death. But Iiked how cosy it made my bedroom feel in the winter , so I’m going to make myself a new one.
Before we get into the specifics of ‘Big Blanket’ and how to make it, I will talk you through how I go about using up EVERY bit of yarn and turning nothing into something.

Gather your yarn
First of all, gather together all the yarn that you would like to use up. Whole balls, part balls, all the little bits, even the tiniest ones. But also WIPs that you know are never going to get finished. In this picture from 2014, you can see what I referred to as my ‘crochet graveyard’. There’s all sorts in there, including abandoned projects and test pieces. It can all be used. Try to gather together yarn that is all the same weight, i.e. all DK or all Aran. A few variations in thickness won’t matter too much, but you will get a better result overall if you stick to one weight. Be careful of mystery wool yarns that you don’t know will wash well…
Think about a palette
This will depend on what you have and what colours you tend to lean towards as that’s what you’ll have most of. Do you have mainly pastels? Brights? Do you have a room in mind that you would like the blanket to match? Start sorting through your yarn and picking out colours that you think you would like to include. In this example I’ve picked all the pink, purple, blue, green and yellow shades out of my jumble to make my squares and joined them all together with cream.
Get your yarn ready to use
If you have nice tidy balls you can skip this part. But if your available options resemble spaghetti you will need to do some prep first. Unravel any half finished projects, untangle and wind. Start grouping them into like colours, i.e. pale pink, blue etc. It doesn’t matter if they are slightly different shades or brands, it will all pull together in the finished blanket.

Make and join your squares
Start making your squares using your favourite method. I’ll share my favourite techniques for making and joining later, but you can make your granny squares however you prefer. You can either make a pile of squares and then join at the end, either by sewing or crocheting together. I’ve used continuous join in the example above. Or you can use a method like Join as you go to join each square as you make it.
The size of your blanket will depend entirely on how much yarn you have, but a good plan is to start making squares and see where your stash takes you. You can always add more squares later when you have more yarn to use up.

Add a border
Add a border if you want to. This could be a few rounds of double crochet or something wider and more intricate. I’ve used a few granny rounds on this blanket and finished with a pretty edging.
Pretty Edging (UK terms)
Round 1 With right side facing you, join edging colour in any corner space. 1ch (does not count as a stitch), 1dc, 2ch, 1dc to form corner.
3ch, 1dc in space between trebles all round. 1dc, 2ch, 1dc in each corner space. Ss to join.
Round 2 Ss into corner space, 1dc, 2ch, 1dc to form corner. 2dc, 2ch, 2dc in each 3ch space all around. 1dc, 2ch, 1dc in each corner space. Ss to join. Fasten off.
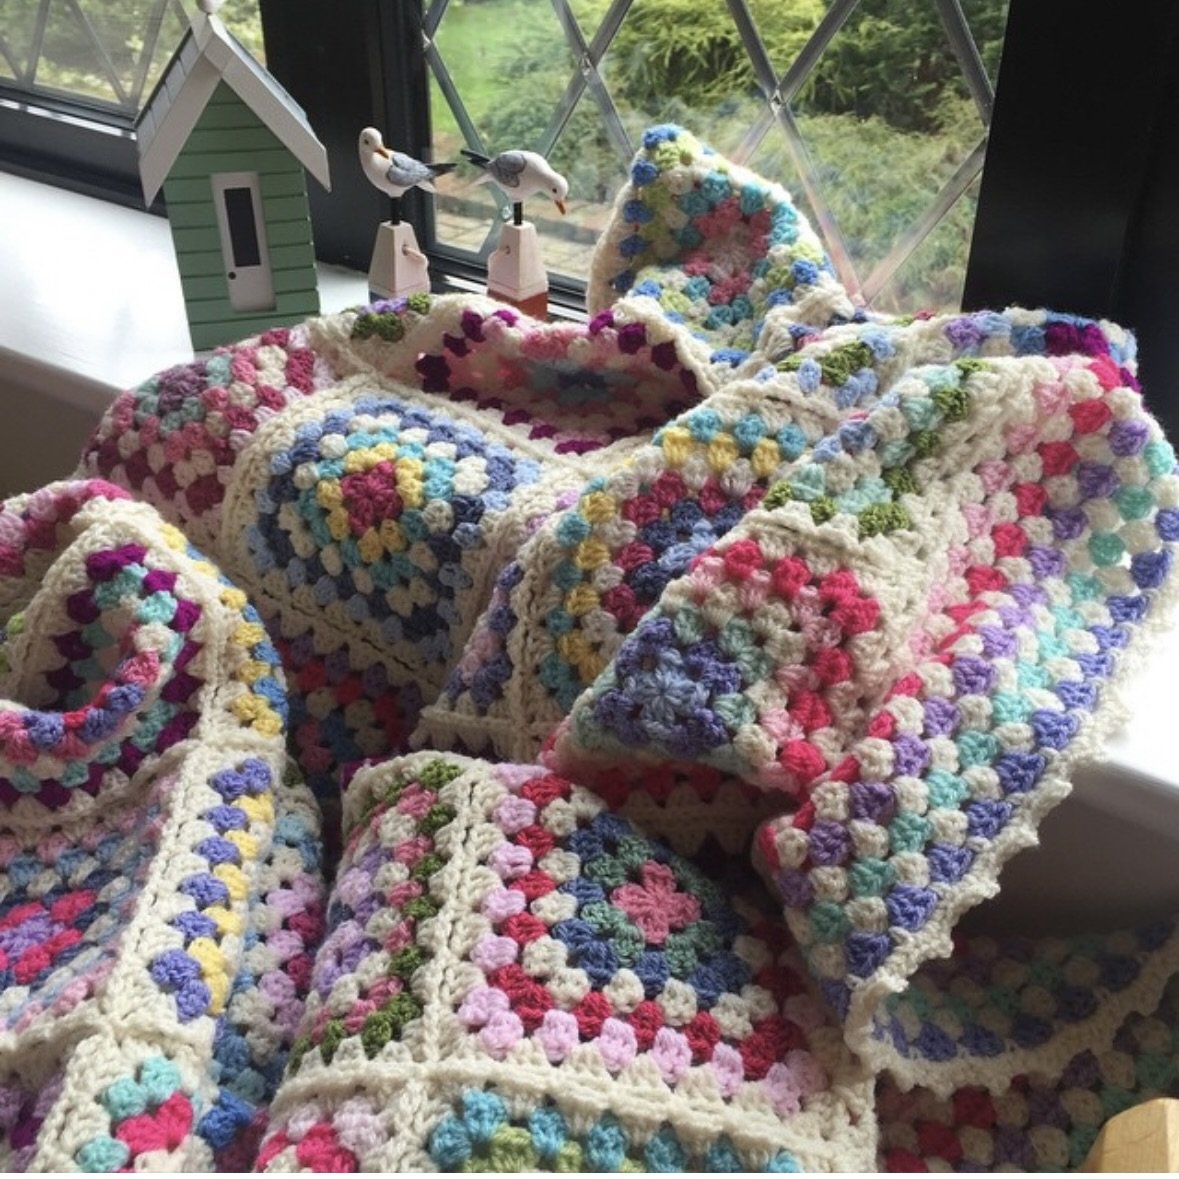
TA DAA, a blanket!! Not bad considering the yarn I used started as a tangled mess.
But what, if like me, you find all that randomness difficult (and a little bit stressful)? I can help with that and show you how to design your very own pattern using the Crochet Studio App. In just a few minutes, you can make and download your own pdf pattern, exactly to your requirements and know exactly how much yarn you will need and have a colour layout to follow. Sound good? Ok, let’s use it to make ‘Big Blanket’

A Recipe for ‘Big Blanket’
Download the Crochet Studio App
The first step is to download the app. If you’re not familiar with Crochet Studio, it’s an app I designed and created with my son, Matthew. It’s full of useful tools and features to help crocheters. It’s very simple to use and has in app help guides, but the best way to discover what it can do is just to have a play with it. It’s free to download and use (with adverts) or you can subscribe if you want to remove the ads.
Find it in the App Store or Google Play store.
Sort out your yarn

Start by sorting out your yarn to see what you have to work with.
This is what I started with. I don’t like to throw anything away and with all the crochet I do, a pile like this builds up quickly. Can you spot leftovers from my recent blankets?

Here I’ve picked out the yarn that I think I want to use to make my new “Big Blanket’ and have sorted them by colour. As in the original blanket, they are a mix of brands. I have a few variegated yarns in the mix this time too. Don’t worry if you haven’t got much of a shade. I haven’t got much brown, so I’ve popped in some grey as well.

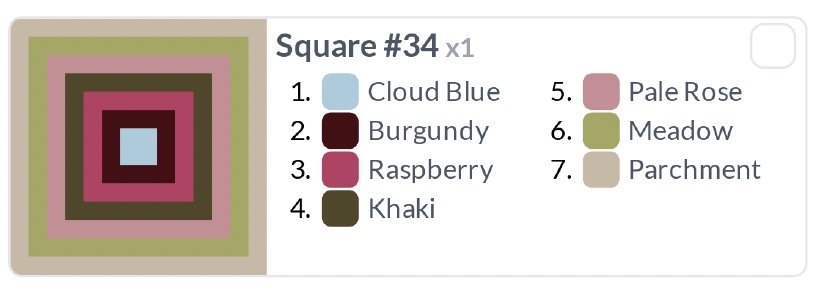
Now weigh each colour and pop them in bags or containers labelled with the weight. I’ve used freezer bags. You can label the bags with the colour they match as well if you like. All of these odments will be represented by Raspberry when I design my pattern. Obviously you don’t need to do this if your stash has yielded nice big balls. Just weigh to check if they’ve been part used.
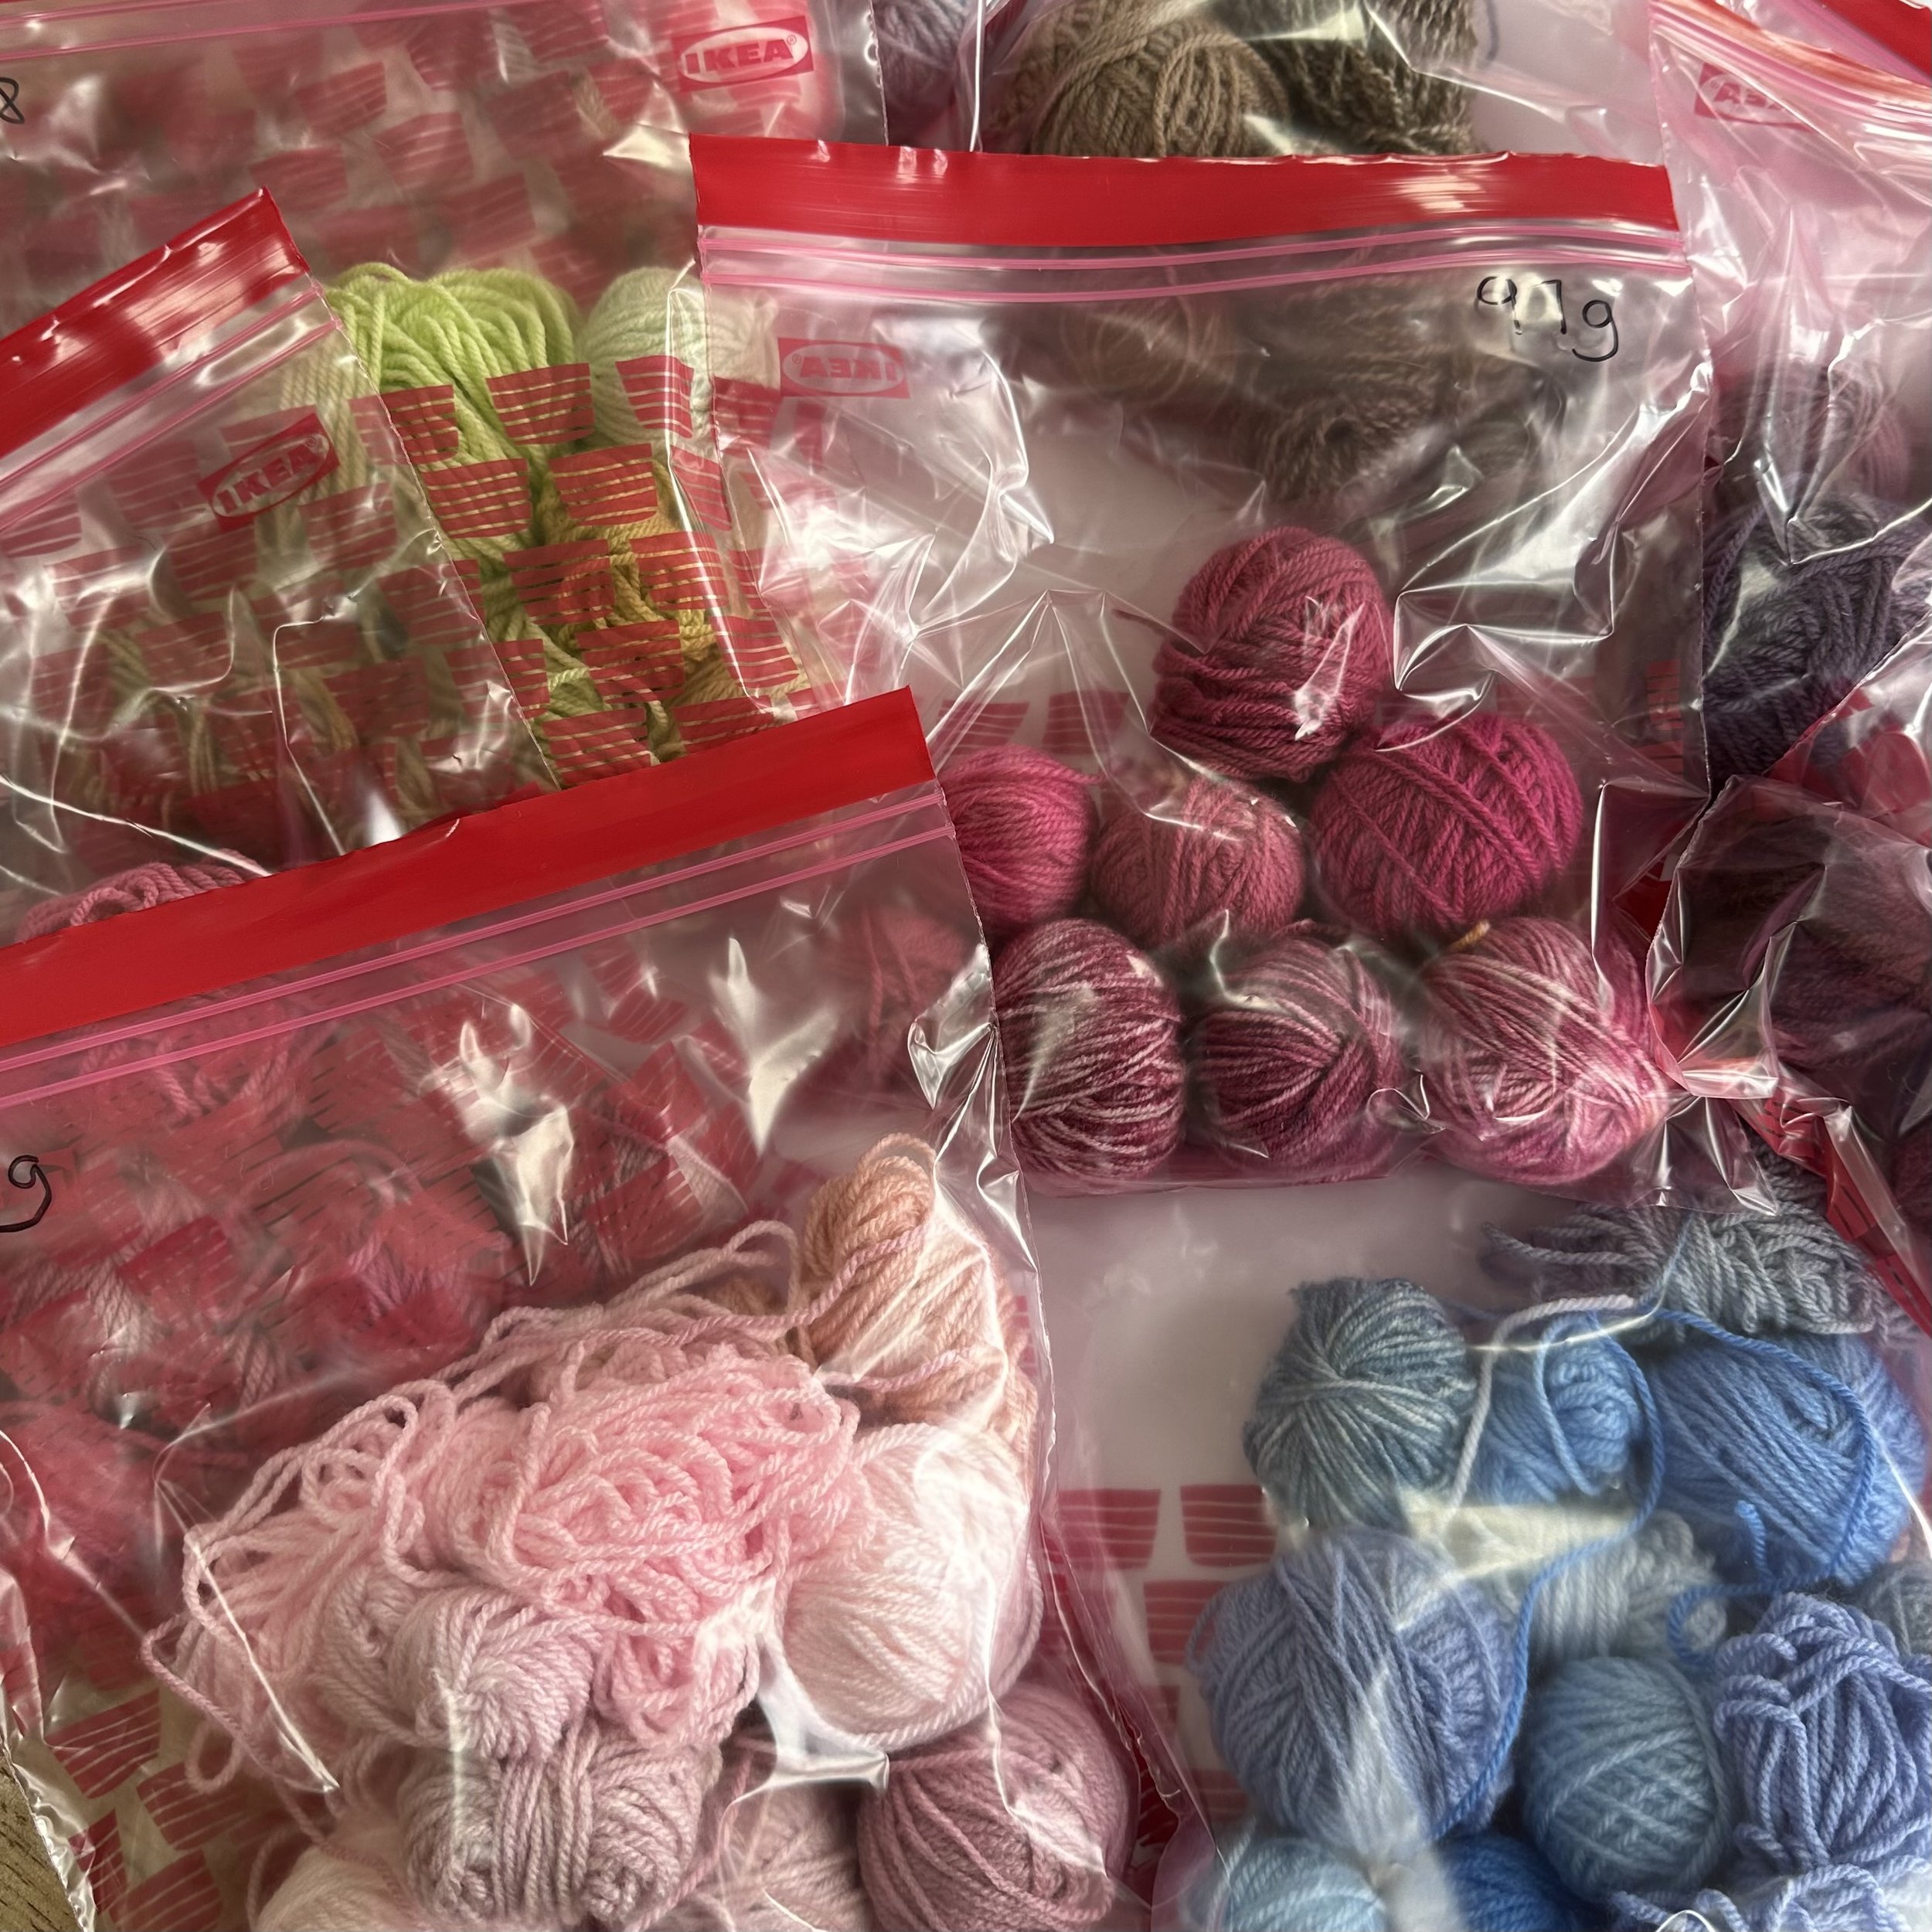
Here are all my yarns, ready to go. I was really surprised by how quickly those little scraps add up. I have around 100g of each shade!
How Satisfying!!
I don’t have any beige yarn for the joining colour so I will need to buy a few balls of that, but I have enough of the other colours to make a King size blanket.
Design your pattern
Now we are going to create a pattern that will work with the yarn you want to use. In the video, I show you how to make a pattern for ‘Big Blanket’, but you can make ANY size and ANY colour combination you want to. The pattern you make will tell you how much of each colour you need, give you a square by square colour layout to follow and a written pattern.

This is the colour palette I made in the video to represent the colours in the blanket. This is because I’m using a wide variety of scrap yarn. If the pattern says Raspberry, I will dip into my bag of various ‘Rasperry ish’ yarns and pull out one at random to use. The variation in tones that this type of stash busting gives, creates a very stylish effect. Of course, you can use any colours you like and it doesn’t have to be scraps. You can make a palette and buy new yarn if you don’t have any stash to use up!
Make your squares
Follow the colour layouts in the pattern for stress free crochet. It will give you a round by round plan for each square and a box to tick when you’ve completed it. Dip into your bags and use up your scraps. I make my squares using the method in the app generated pattern, but you can make yours in whatever way you prefer. I have a technique that will give you only one tail to sew in, no matter how many rounds you do. You can see that in action below:
Join your squares
I have joined my ‘Big Blanket’ squares using continuous join with the 7th round in beige. There’s a video for that below by Laurelin of Snufflebean Yarn. If you prefer, you can make all of your squares and then sew or slip stitch them together.
Add a border
For ‘Big Blanket’ I used a super simple granny border. It’s quite narrow as I didn’t have much of the beige yarn left. In my new version, I think I will make it a bit wider. You can go as big as you like.
2 x 100g balls will be enough to make the border below on ‘Big Blanket’
Round 1 - With right side facing up, join border colour in any corner space. 2ch (Counts as 1st tr), 2tr, 2ch, 3tr in same space to form corner. 3tr in each space until you reach a point where 2 squares join. 1tr in 1st corner space, tr2tog starting in 1st corner space and finishing in 2nd corner space, 1tr in 2nd corner space. Continue working in the same manner around the blanket. At the corners work 3tr, 2ch, 3tr. When round is complete, ss to join. Turn.
Round 2 - Work one granny round. Turn.
Round 3 - Work one granny round. Turn.
Round 4 - With right side facing down, 2ch (counts as 1tr), ss in next stitch, then work alternating tr and ss all around. At the corners, work one of each stitch in the order they appear in the alternating pattern. There are no chains in the corners for this round. Ss to join and fasten off.
Sew in all tails.
That’s it. Everything you need to know to design your own ‘Big Blanket’
I’d love you to share your designs and colour palettes with me
Crochet with Madebyanita Facebook Group
Happy Stashbusting!
Anita x