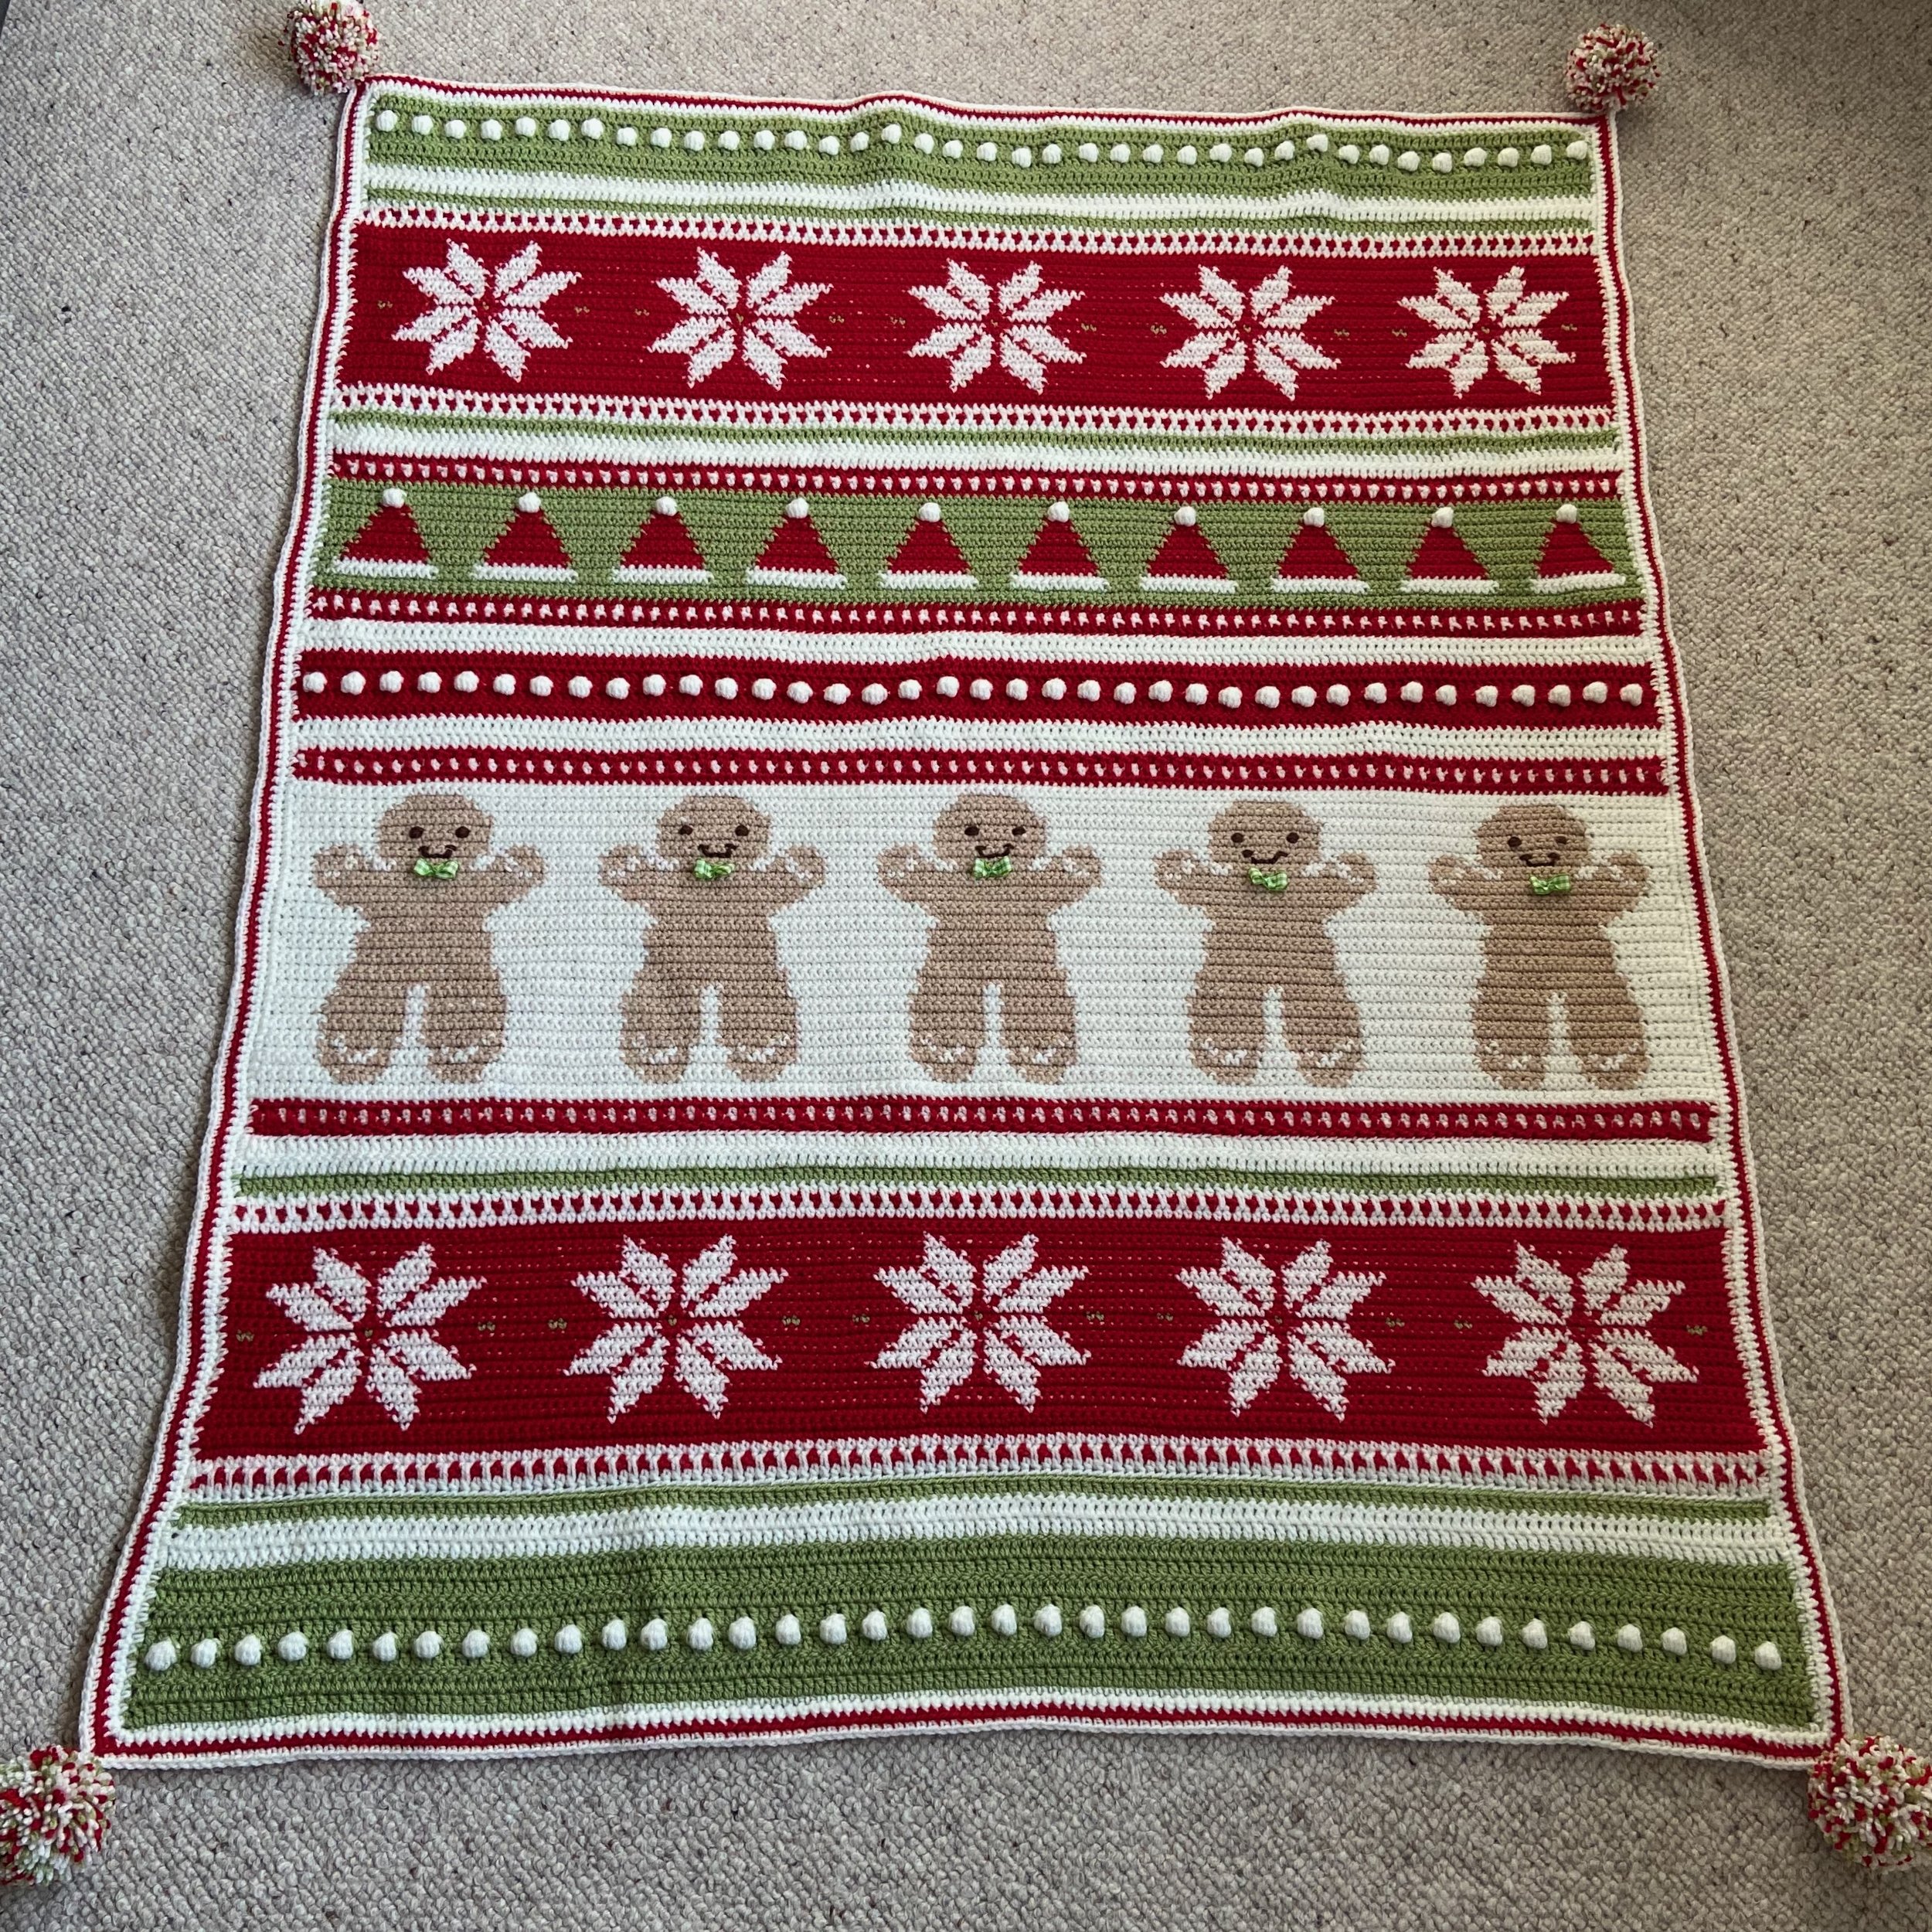
Christmas Eve Wishes CAL - Week Two
UPDATE: This pattern is now available to buy as an advert free pdf download. The pattern includes all six parts of the original CAL in one document. It is available in UK and US terms. You can find it in my shop here.
It’s time for week two of the Christmas Eve Wishes CAL!
If you have just found this CAL and haven’t seen any of the buildup posts, I will link them for you below:
Click here to read my CAL Introduction post. This has all the information you need to know such as dates and materials required. This post also includes links to buy yarn packs.
Click here to read FAQs. In this post I have gathered together questions I have been asked about the CAL. You can find instructions to make the blanket larger or smaller here too.
If you missed it, you can download week one here. You can find a link to the week one video here as well.
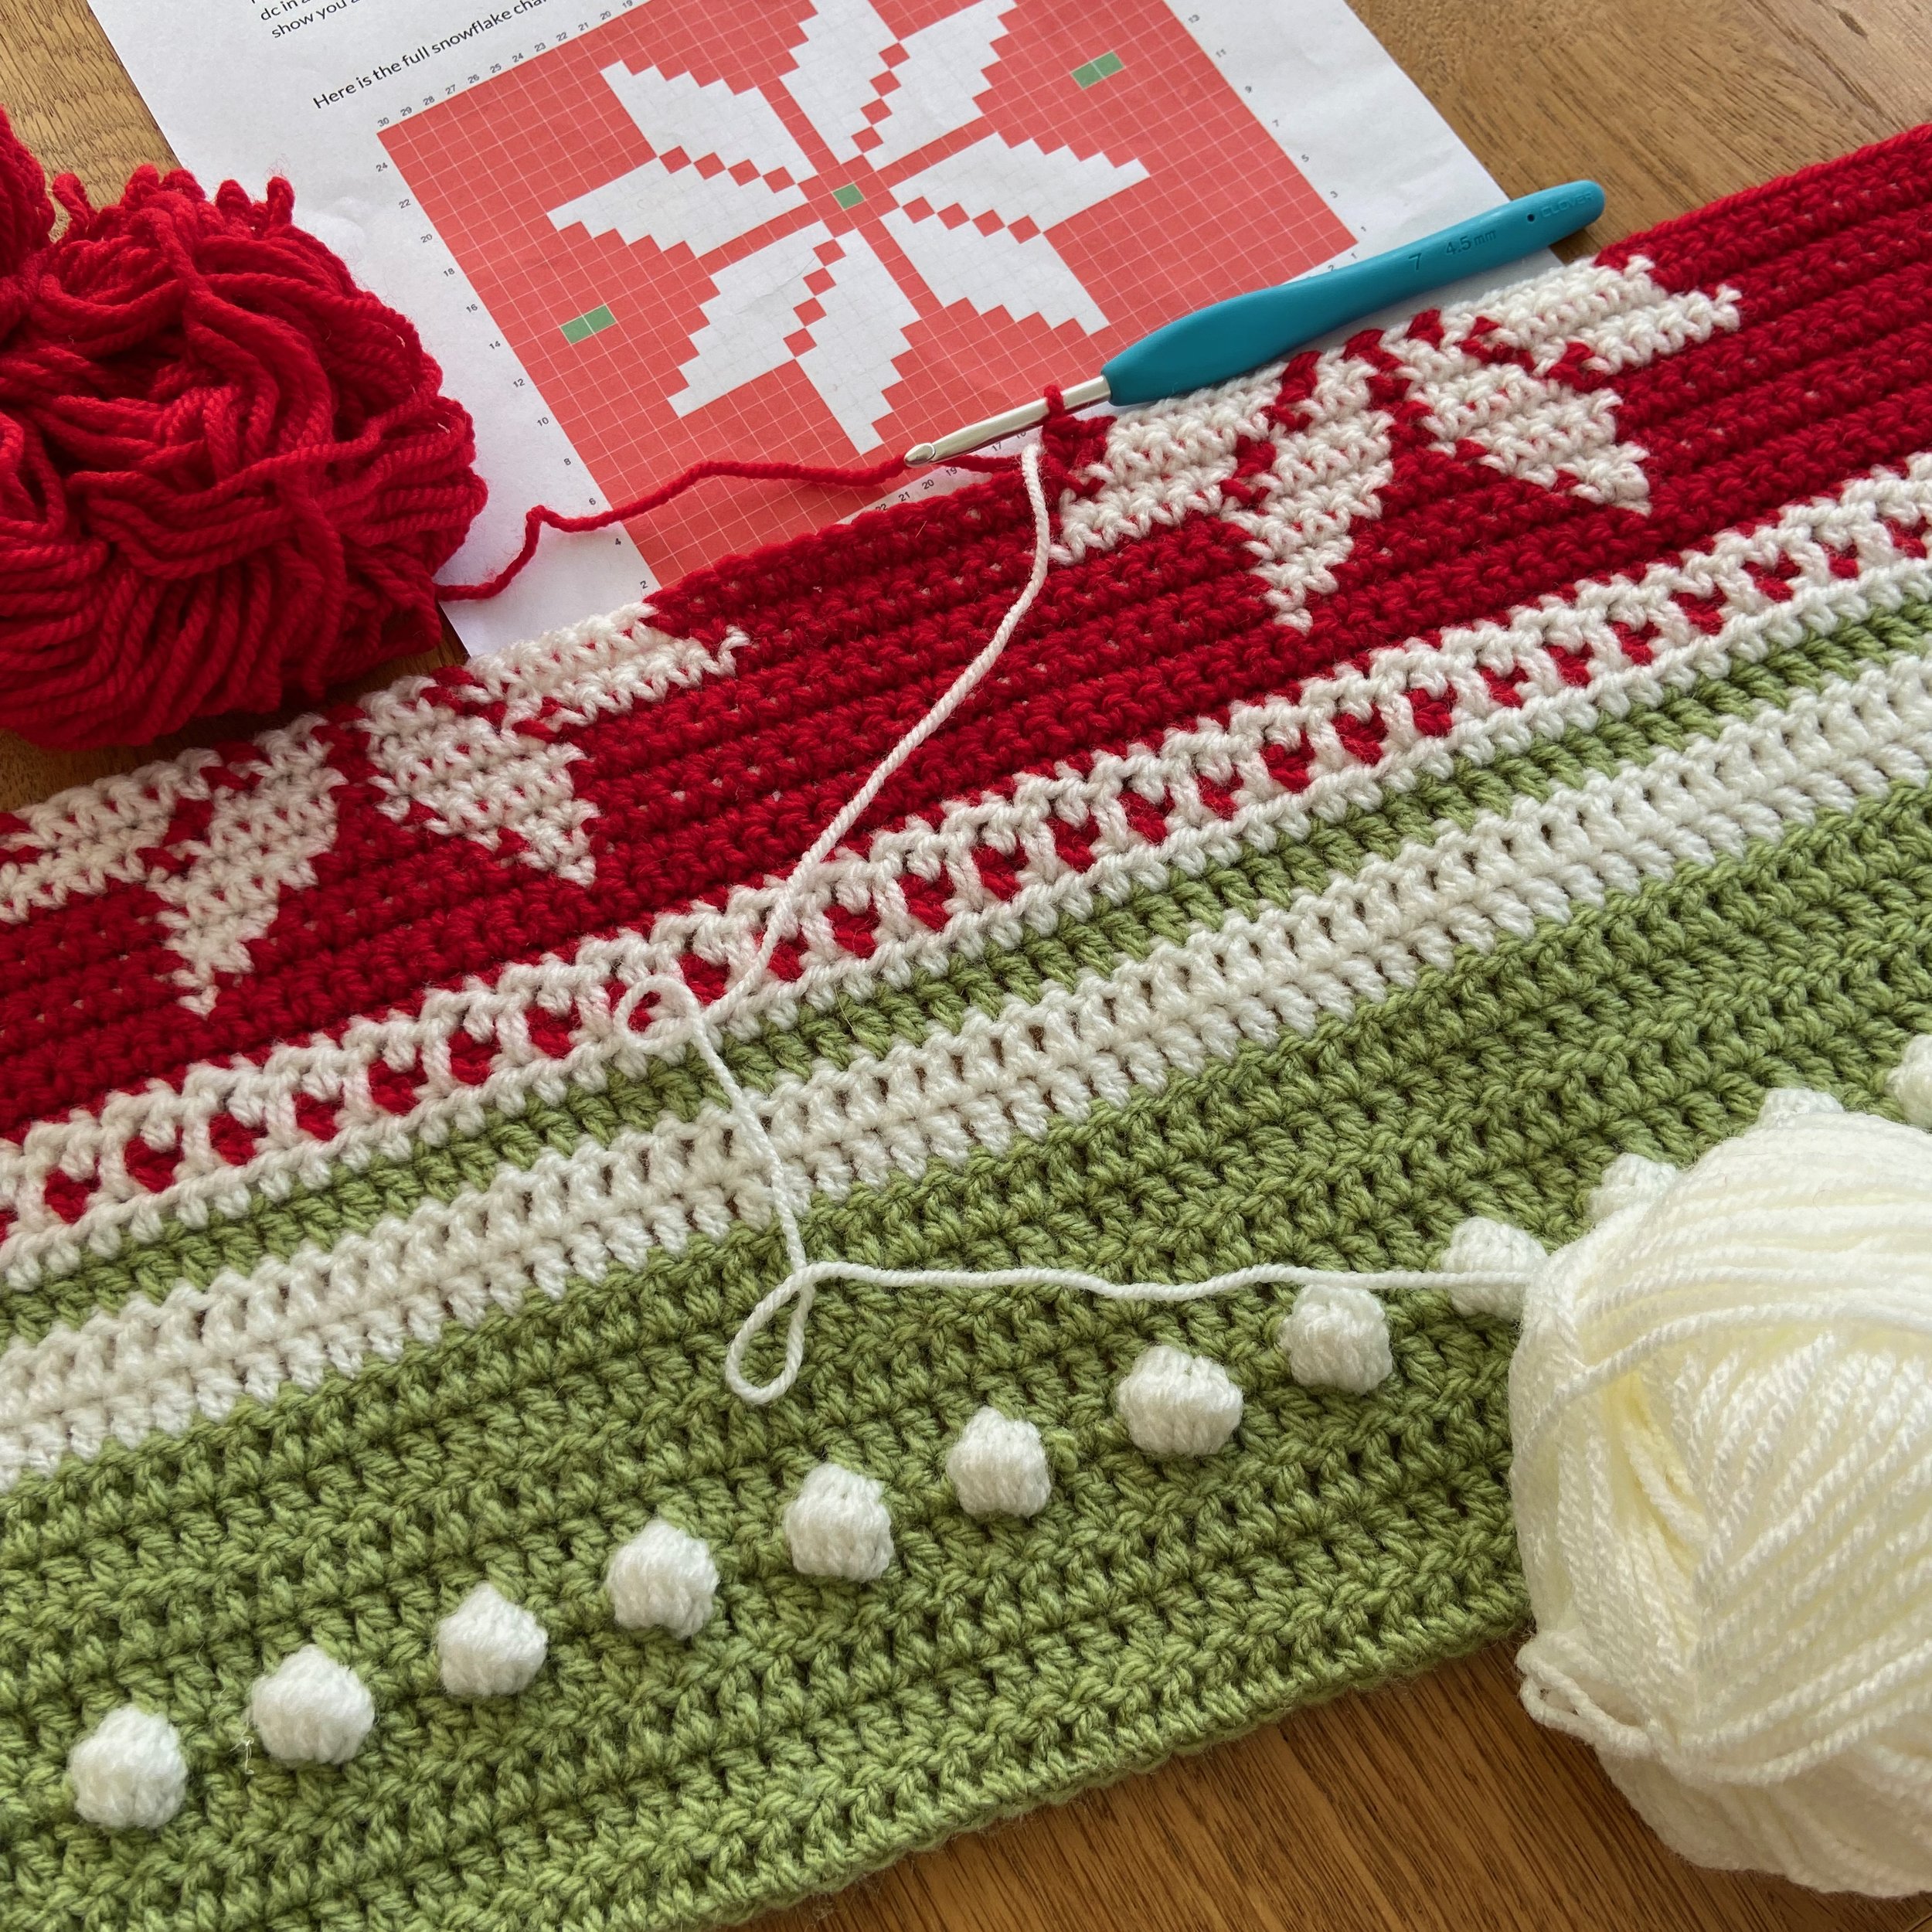
This week I am going to show you how to read charts and work with two colours at the same time to make the snowflakes. This is called tapestry crochet. If you are a new crocheter, you will find this challenging at first, but once you get the hang of it, these sections work up quickly. There are a few problems that can arise from this type of crochet, but can be avoided with my top tips.
TIPS OF THE WEEK
Read the pattern before you begin.
Watch the video. This week I will tell you how to
read the charts
keep track of stitches
change yarn colours
how to stop your yarns from tangling together
Take your time. It might take you more than a week to finish your first set of snowflakes, but weeks 4 and 6 are much easier so it will all even out.
Week 2 - Snowflakes
In this section of the blanket, you will be working the snowflakes from a chart. The chart makes up rows 16-40 of the blanket. To avoid confusion, I will refer to the rows worked from the chart as chart row 1, chart row 2 etc.
Reading charts
Don’t worry about the charts. They are easy to follow once you know how. To make the chart even easier to follow I have made it in the colours the stitches will be worked in. The charts show 1 repeat of the pattern, and you will work the chart multiple times across the width of the blanket. The pattern will tell you how many repeats to work.
You read the chart starting in the bottom right corner at no. 1. Each box represents one double crochet. Odd numbered rows are the front of your blanket and are worked from right to left. Even numbered rows are the back of your blanket and are worked from left to right.
If the pattern says ‘work 5 repeats’ of the chart, you will work row 1, five times across the width of the blanket before moving on to row two etc.

Let’s take a closer look at the snowflake chart. The numbers along the bottom are the stitch numbers. The vertical numbers are the row numbers. We are going to start at stitch 1, row 1 in the bottom right hand corner and work from right to left. In this blanket we will be working 5 repeats of the pattern. Row 1 is 30 red dc, so work it 5 times and you will have worked 150 red dc in all. In the video that accompanies this week, I will explain in detail how the charts work and show you an easy way to keep track of what row you are working on.
Here is the full snowflake chart for the blanket.

Note that this chart is not completely symmetrical. There is one more column of red stitches on the right than on the left. You just need to be aware of this and make sure that you are counting stitches from the correct side of the chart. (Odd or even row)
Every row of the chart is dc.
The 1 ch at the start of each row DOES NOT count as a stitch. Always place your 1st dc in the first stitch of the row.
I have changed to a 4.5mm hook for this section to keep tension even and edges straight and even without any pulling.


Chart row 1: With the RIGHT SIDE facing you (Bobbles sticking out), using a 4.5mm hook, join red in the first stitch and 1 ch. Work row 1 of the chart 5 times. 1 ch, turn. 150 sts.
1. So, you will work 30 red dc 5 times, making 150 dc in total. Remember that the 1 ch does not count as a stitch, so 1 dc in every stitch, including the first.
Chart row 2: Work row 2 of the chart 5 times. 1 ch, turn.
So, you will work 30 red dc 5 times, making 150 dc in total.
Chart row 3: Using red and cream, work row 3 of the chart 5 times. 1 ch, turn.
2. This row has red and cream stitches. We are reading from right to left, so, to start, there are 10 stitches followed by 1 cream stitch. Work 9 red dc and then complete the 10th red dc by pulling through a loop of cream to change colours. This is the same way you changed colours for the bobble row.
3. Insert your hook into the next stitch and pull up a loop of cream. You can see in the picture that I have inserted the hook under the red yarn. This will trap the yarn inside the stitch so that it can’t be seen from either side. This hidden yarn is called the ‘carried ‘ yarn. It’s a good idea to keep an eye on both sides to make sure the carried yarn is hidden and there are no loops sticking out. You can pull gently to ease them back inside the stitches.


4. Because there is only one cream stitch, change back to red by pulling red through the cream stitch on the hook.
5. This picture shows the cream stitch completed with red.
To prevent your yarns from twisting together, always keep the red yarn to the front and the cream yarn to the back.
6. Complete the row by continuing to follow the chart, remembering to:
- Work over the carried yarn.
- Always change colours in the last pull through of the previous stitch.
- Keep red yarn to the front and cream yarn to the back to prevent twisting.
7. Carry the cream yarn along to the end of the row.


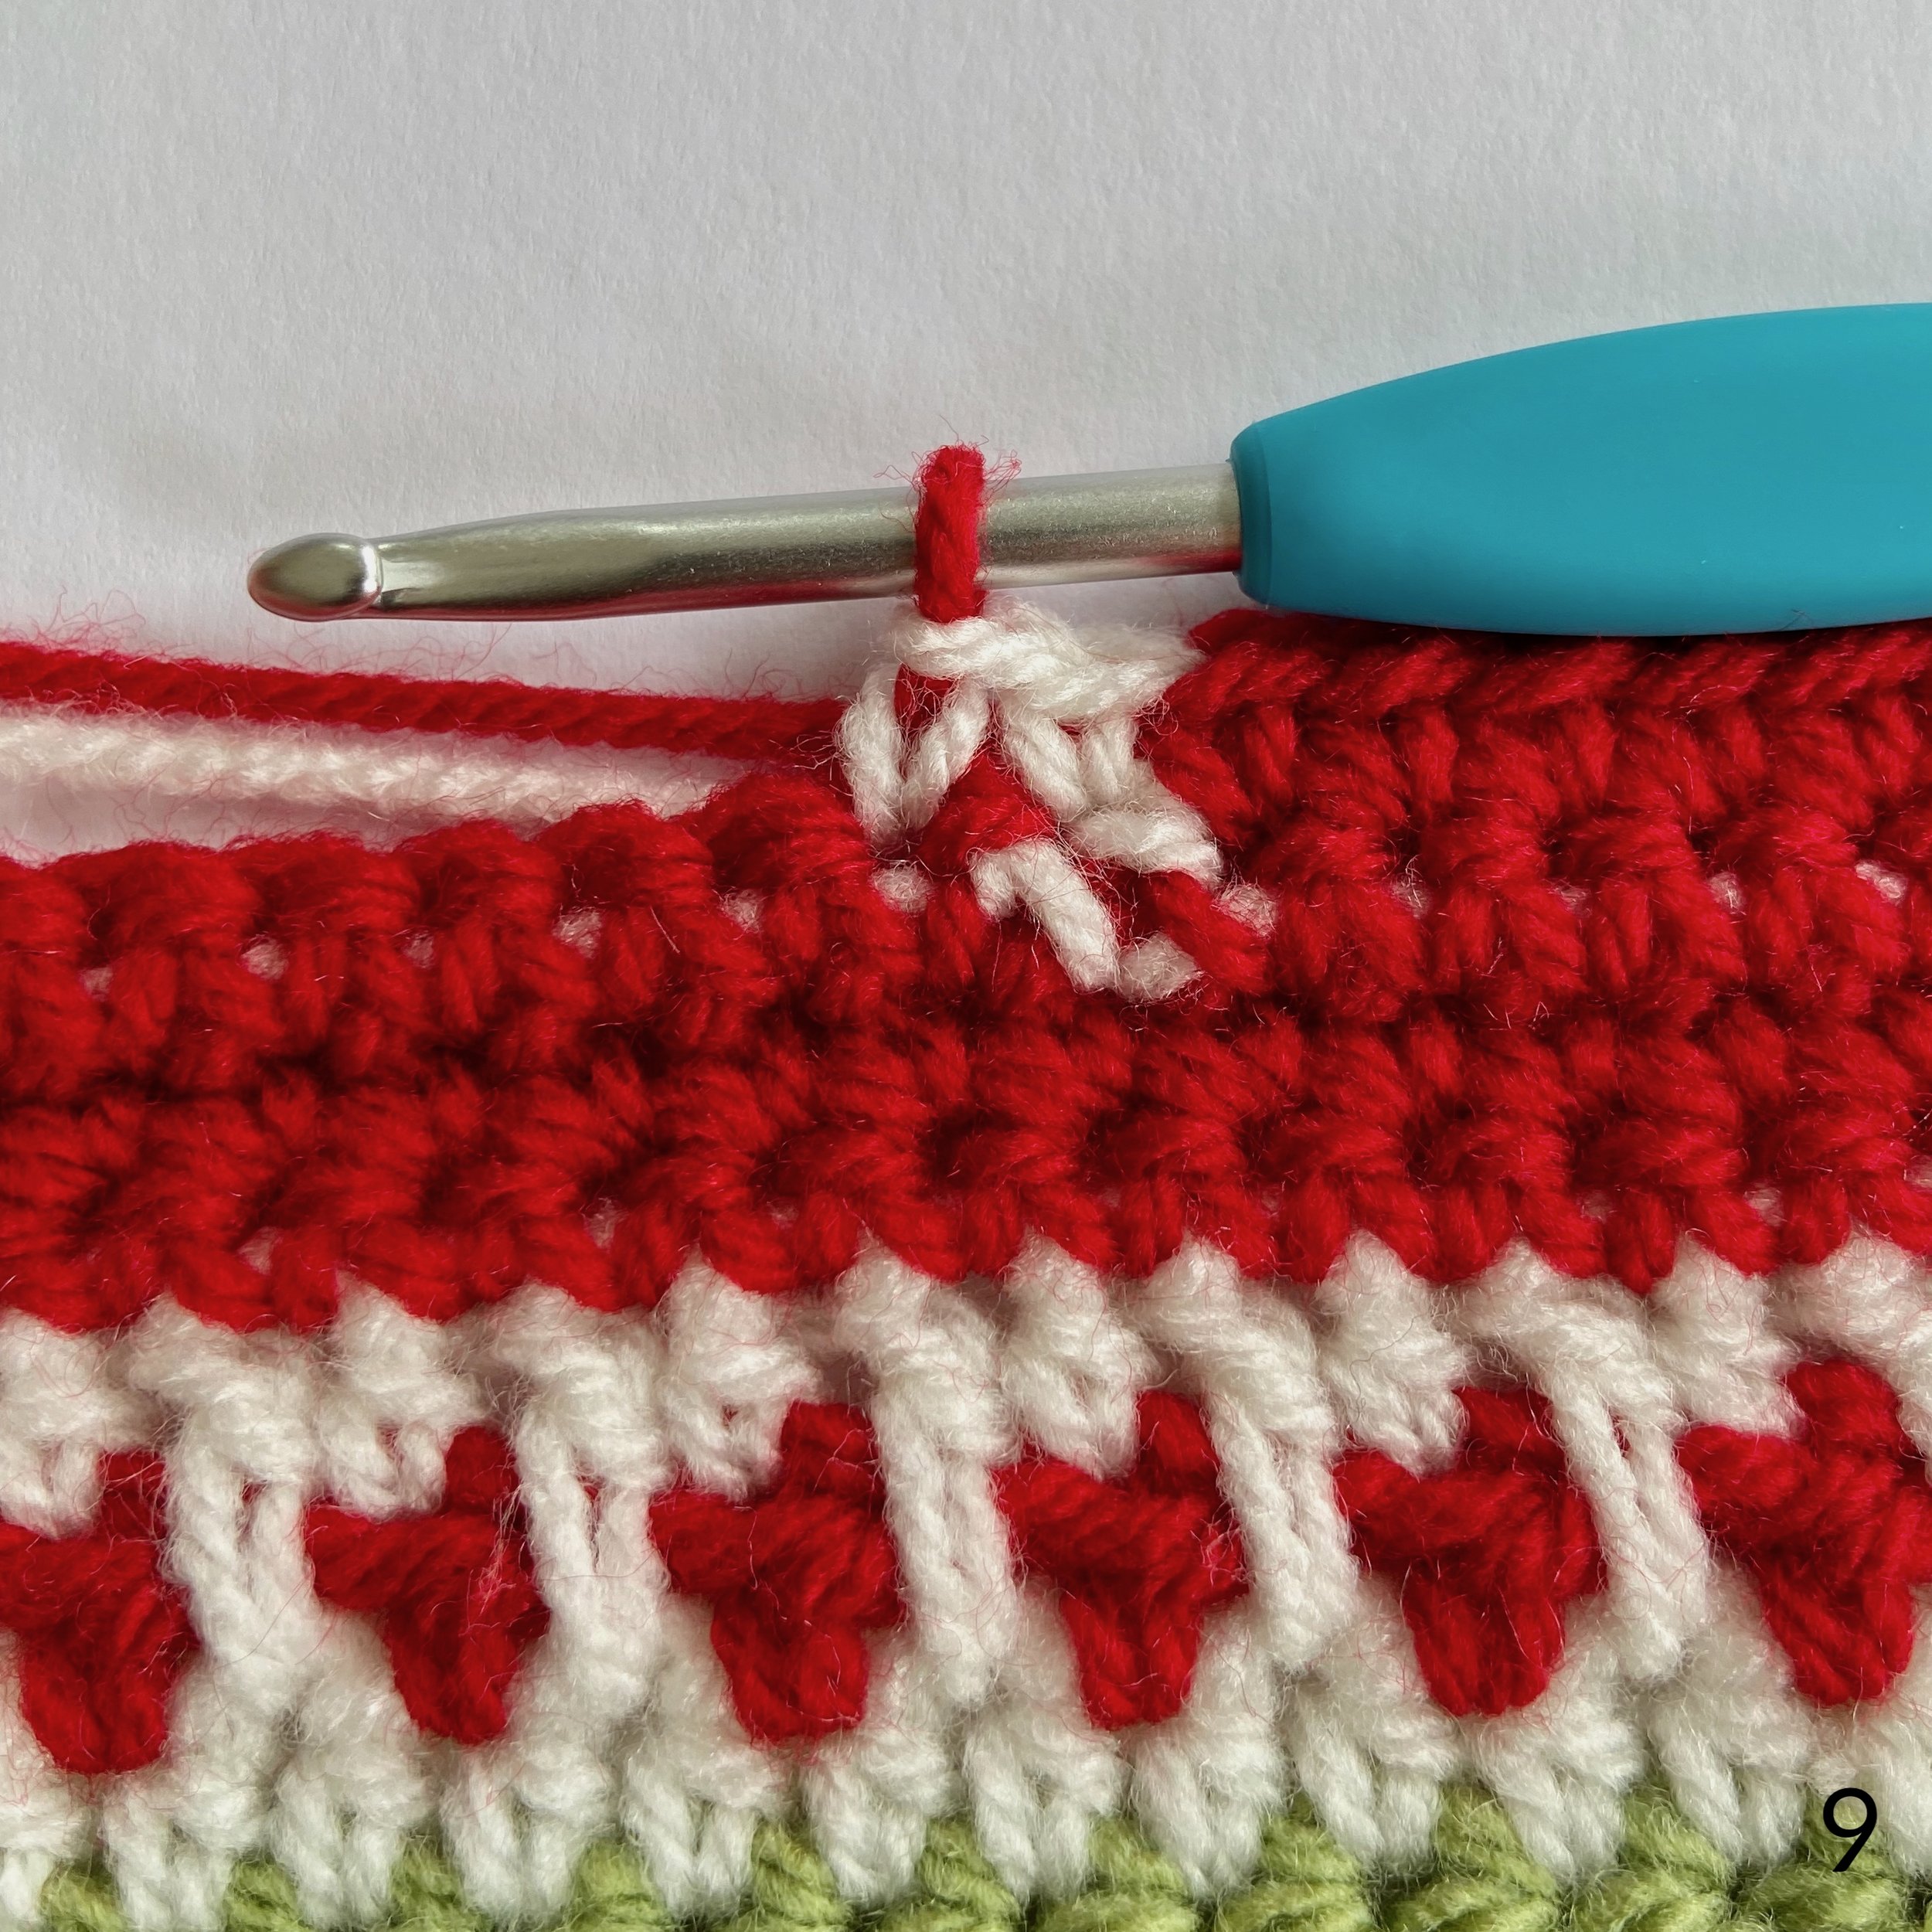
Chart row 4: Using red and cream, work row 4 of the chart 5 times. 1 ch, turn.
8. When you turn to start the row, keep the cream yarn to the back and continue to work over it until you need it. Follow the chart, changing colours as required.
Chart rows 5 - 25: Continue following the chart, changing colours as required. Cut the cream yarn at the end of row 12. Join green in row 13. Cut green at the end of row 13 and join cream in row 14. Cut cream at the end of row 23.
That’s rows 16 - 40 complete. Now we will go back to the regular row numbers.
Rows 41 - 43: Candy Cane stripe. This is worked in the same way as in week 1.
Row 41: Using a 4mm hook, change to cream and 2 ch. Sk the first st and 1 htr in each st across. Change to red, 3 ch, turn.
Row 42: Sk 2 sts and 1 htr in the next st. 1 ch. [Sk 1 st, 1 htr in next st, 1 ch] until 1 st remains. Join cream in last st, 2 ch, turn.
Row 43: [1 htr, 1 tr in row below] until 1 st remains. 1 htr in last st. Change to green, 2 ch, turn.
Row 44: Sk the first stitch and 1 tr in each st across. Change cream, 2 ch, turn.
Row 45: Sk the first stitch and 1 tr in each st across. 2 ch, turn.
Row 46: Sk the first st and 1 tr in each st across. Cut cream yarn but do not fasten off. We will continue from here next week.
Here is the link to take you to the video on YouTube. There are timestamps in the YouTube video description box to help you find the part of the video you need.
The video has subtitles and you can translate them into different languages.